Advertisement
HS-3610W/3612W/3614W
Desktop POS
User Manual
SOME IMPORTANT NOTES
FCC NOTES
This equipment has been tested and found to comply with the limits for a Class A
digital device, pursuant to part 15 of the FCC Rules. These limits are designed to
provide reasonable protection against harmful interference when the equipment is
operated in a commercial environment. This equipment generates, uses, and can radiate
radio frequency energy and, if not installed and used in accordance with the instruction
manual, may cause harmful interference to radio communications. Operation of this
equipment in a residential area is likely to cause harmful interference in which case the
user will be required to correct the interference at his own expense.
This device complies with part 15 of the FCC Rules. Operation is subject to the
following two conditions: (1) This device may not cause harmful interference, and (2)
this device must accept any interference received, including interference that may cause
undesired operation.
CE CLASS A WARNING
This equipment is compliant with Class A of CISPR 32. In a residential environment
this equipment may cause radio interference.
HS-36xxW Ver. A0
Package Contents
HS-36xxW desktop POS (x 1)
24V/100W Power Adaptor (x 1)
Power cord (x 1)
3-inch wide thermal paper roll (x 1)
Paper separator for 2" thermal paper roll (x 1)
Desktop mounting kit pack for HS-3610W (x 1)
(including 1 desktop mounting bracket,
4 fixing screws, and 4 plastic anchors)
Desktop mounting kit pack for HS-3614W (x 1)
(including 1 bottom plate, 1 desktop mounting
bracket, 4 fixing screws, and 4 plastic anchors)
1
Advertisement
Table of Contents

Related Manuals for POSIFLEX HS-3610W


Summary of Contents for POSIFLEX HS-3610W
- Page 1 3-inch wide thermal paper roll (x 1) Paper separator for 2” thermal paper roll (x 1) Desktop mounting kit pack for HS-3610W (x 1) (including 1 desktop mounting bracket, 4 fixing screws, and 4 plastic anchors) Desktop mounting kit pack for HS-3614W (x 1)
- Page 2 AVERTISSEMENT CE CLASSE A Cet équipement est conforme à la classe A de CISPR 32. Dans un environnement résidentiel, cet équipement peut provoquer des interférences radio. WARRANTY LIMITS Warranty will terminate automatically when the machine is opened by any person other than the authorized technicians.
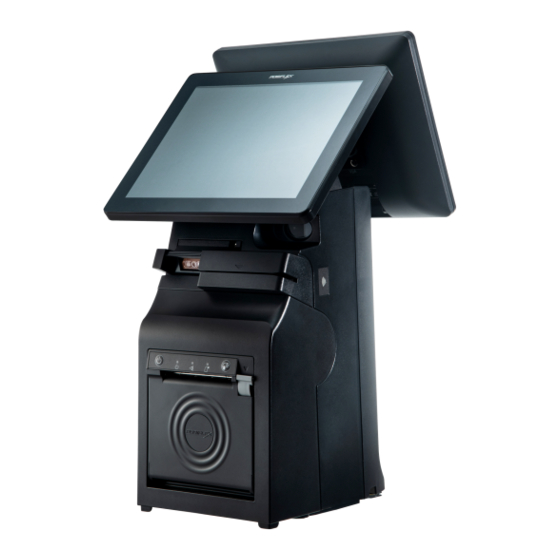
- Page 3 Views of HS-3610W/3612W/3614W Front View HS-361xW P-CAP Touch & LCD Panel Fingerprint or iButton Sensors (Optional) Posiflex 2D Scanner (Optional) 3-Track Magnetic Stripe Reader (Optional) Cover Open Lever Printed Paper Exit Feed Button Paper-out LED Indicator Error LED Indicator Power LED Indicator...
- Page 4 Right Side View RFID Card Reader (Optional) Power Button Bottom View Rubber Pad Rubber Pad Bottom I/O Interface Mounting holes Views of I/O Interface of HS-3610W/3612W/3614W Top I/O Interface USB 3.0 Port VGA Port RJ-50 COM Port DB-25 Parallel Port...
-
Page 5: Connecting Power Adapter
Bottom I/O Interface 24V DC-IN Power Jack RJ-10 Cash Drawer Port Line-Out/Mic-in DB-9 COM Ports USB 2.0 Ports PS/2 Port RJ-45 LAN Port Connecting Power Adapter Please refer to the following instructions on how to connect power adapter to HS-36xxW and to organize your cables. Lay your desktop POS on a level surface with its touch screen facing down as shown in the figure. - Page 6 Before pushing the cover back into place, neatly thread the cables through the cable exit. Cable Exit Press down the cover to close the bottom I/O interface chamber. CAUTION: On doing insertion or extraction of a cable connector, please always hold the connector head itself instead of pulling the cable wire.
- Page 7 2.2. Push the sharp-pointed part of paper separator into the slot on the bottom of the paper roll compartment. 2.3. Put the paper separator into the slot as shown in the below figure. 2.4. Drop 2-inch paper roll inside the paper roll compartment.
- Page 8 Make sure the loose end sticks out of the opening of the paper roll compartment. Then, close the paper roll cover by pushing it back at the center of the top side of the cover with a click sound. To avoid paper jam or other printing errors, do NOT press the paper roll cover release lever during printing.
- Page 9 After inserting another two scerws into the two mouting holes located on the rear of the POS, fasten them to fix the POS termial to the bottom plate. Using desktop-mounting kits Please follow the steps below to install desktop-mounting kits. Please first release the mounting bracket from the bottom plate by removing two screws as shown in the figure.
- Page 10 Support your POS terminal with its screen facing towards you. then, align the two screw bolts on the bottom of the POS with the rail slots of the mounting bracket. Push the POS backward along the rail slots of the bracket until the terminal is locked into place.
- Page 11 Apply two self-tapping screws through the mounting holes into the two plastic anchors. Then, fasten the screws to completely lock the POS onto the table. Installing a Customer Display to HS-36xxW HS-36xxW also allows you to additionally install a customer display to expand its functionality.
- Page 12 Scanning Barcodes with Posilfex 2D Scanner (Optional) The integrated Posiflex 2D Scanner is another prominent feature of HS- 36xxW. With its hand-free design, it offers a more convenient solution for users to read 1D/2D barcodes and then transmitted scanned data to the terminal for further processing, which greatly increases your working efficiency.
- Page 13 The manual trigger button is showed below. Using Fingerprint or iButton Sensors (Optional) As for access control to your computer, two optional identification mechanisms are provided and integrated in HS-36xxW: The fingerprint and iButton sensors. Either will work to verify an individual’s identity. In order to allow the fingerprint sensor to function normally, you have to register your own finger first using Fingerprint Recognition Tool which is pre-installed and accessible on your desktop of your system.
-
Page 14: Status Led Indicator
Self-Diagnosing your Printer The variety of diagnostic tips is provided in aim to help you efficiently troubleshoot printer problems. Please carefully go through the following descriptions to understand how each function provided works. Self Test A self-test page, generated by Self Test function, generally contains useful information describing current printer configurations. -
Page 15: Driver Download
Please be advised not to touch LCD panel while setting up the tilt angle for HS-36xxW. Driver Download Please download the relevant driver that you need from the Posiflex website (https://download.posiflex.com/en-global/Download/index/driver/all-in- one/JIVA_HS-3610W). Specifications HS-3610W... - Page 16 HS-3612W HS-3614W Parallel Port CR Port 1 Port controlling 2 CR D-SUB 15-pin , with 12V power for Posiflex LCD VGA Port monitors Standard USB Port 1 x USB 3.0 (top I/O) + 3 x USB 2.0 (bottom I/O) Audio Port...
- Page 17 Outline Dimension HS-3610W HS-3612W...
- Page 18 HS-3614W ※ The product information and specifications are subject to change without prior notice.
Need help?
Do you have a question about the HS-3610W and is the answer not in the manual?
Questions and answers