Advertisement
Quick Links
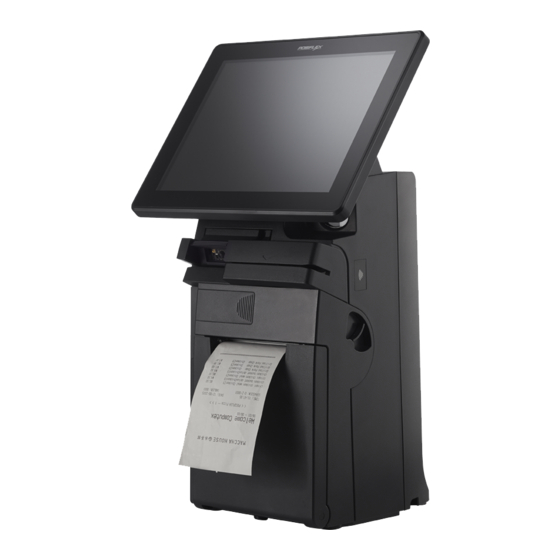
HS-3510W-E/3512W-E/3514W-E
JIVA Desktop POS
User Manual
Product Feature
Innovative All-in-one Terminal
This compact all-in-one 10"/12"/14" touch POS now comes with a
detachable receipt printer for easy maintenance. Add an optional 2D
barcode scanner while the printer is on board, making HS-3510W-
E/3512W-E/3514W-E the most well-rounded all-in-one POS terminal in
the market.
Integrated Design with Advanced Manageability
HS-series integrates the most widely used peripherals including 3"
thermal printer, MSR, fingerprint sensor, 2D barcode scanner and 2nd
customer display to support your daily POS operation. The detachable
modularized design allows quick access to the components, enabling fast
and easy service and upgrades.
Aesthetics
Dressed from head to toe in timeless black or white color, the only trend
that never goes out of style, and with stylish touches added throughout,
HS-series is not just a piece of machinery, it is an elegantly crafted piece
of art that looks right at home in any store decoration.
Built-in Epson TM-m30 POS Receipt Printer
HS-3510W-E/3512W-E/3514W-E series specially incorporate Epson
TM-m30 POS receipt printer with existing all-in-one POS system to
offer users alternative solution for receipt printing.
15650902020 Ver. A0
http://www.posiflex.com
Package Contents
HS-3510W-E/3512W-E/3514W-E desktop
POS with Epson TM-m30 POS receipt printer
(x 1)
24V/60W Power Adaptor (x 1)
Power cord (x 1)
3-inch wide thermal paper roll (x 1)
Desktop mounting kit pack (x 1)
(including 1 desktop mounting bracket,
4 fixing screws, 4 plastic anchors)
User manual (x 1)
1
Advertisement

Related Manuals for POSIFLEX HS-3510W-E


Summary of Contents for POSIFLEX HS-3510W-E
- Page 1 Built-in Epson TM-m30 POS Receipt Printer HS-3510W-E/3512W-E/3514W-E series specially incorporate Epson TM-m30 POS receipt printer with existing all-in-one POS system to offer users alternative solution for receipt printing.
- Page 2 Views of the HS-3510W-E/3512W-E/3514W-E Front View HS-3510W-E/3512W-E/3514W-E P-CAP Touch & LCD Panel Fingerprint or iButton Sensors (Optional) Posiflex 2D Scanner (Optional) 3-Track Magnetic Stripe Reader (Optional) Paper Roll Cover Release Lever Printed Paper Exit Printer Power Button Form Feed Button...
- Page 3 Rear View Top I/O Interface Cable Cover Bottom I/O Interface Cable Cover Cable Exit Left Side View Power Button Right Side View RFID Card Reader (Optional)
- Page 4 Bottom View Rubber Pad Rubber Pad Bottom I/O Interface Mounting holes Views of I/O Interface of HS-3510W-E/3512W-E/3514W-E Top I/O Interface USB 2.0 Port VGA Port RJ-50 COM Port DB-25 Parallel Port Bottom I/O Interface 24V DC-IN Power Jack Line Out...
-
Page 5: Connecting Power Adapter
Connecting Power Adapter Please refer to the following instructions on how to connect power adapter to HS-3510W-E/3512W-E/3514W-E and to organize your cables. Lay your desktop POS on a level surface with its touch screen facing down as shown in the figure. - Page 6 Loading 3” Paper Rolls in Epson TM-m30 POS Receipt Printer Please follow the below steps to load a paper roll. To open the cover for paper jam rescue compartment, pull down the paper roll cover release lever on the front of compartment.
- Page 7 Replacing Epson TM-m30 POS Receipt Printer HS-3510W-E/3512W-E/3514W-E offers a quick solution to help you to replace Epson TM-m30 POS Receipt printer when there is a need. Please go through the steps described below to achieve the purpose.
- Page 8 Carefully support the printer with both of your hands and then push it back into the rear case of HS-3510W-E/3512W- E/3514W-E terminals. After ensuring the front cover is well attached to the rear case, insert the screw...
- Page 9 Mounting the POS onto a Table To facilitate your operation of HS-3510W-E/3512W-E/3514W-E, desktop mounting kits allow you to fix the POS firmly onto a table in preventing your machine from being rocked, tipped or tilted accidentally. Please follow the steps below to finish the installation.
- Page 10 To completely mount the desktop POS onto the table, please follow the steps below. 7.1 Use the two mouting holes located on the rear of the POS to drill another two holes on the same surface. Each hole ” or 6.25 mm diameter and ”...
- Page 11 Mounting a Customer Display to HS-3510W-E/3512W-E/3514W-E HS-3510W-E/3512W-E/3514W-E also allows you to additionally install a customer display to expand its functionality. Based on the model of the second display, the step-by-step instructions are provided in its own user guide to help you mount it onto your POS system.
- Page 12 Power Button Power OFF HS-3510W-E/3512W-E/3514W-E For HS-3510W-E/3512W-E/3514W-E which is preloaded with Windows OS, please carefully go through the sequences described below to properly shut down the system: 1. Right click on Start button on the taskbar.
- Page 13 Operating the Magnetic Stripe Reader (Optional) To have the magnetic stripe reader of HS-3510W-E/3512W-E/3514W-E work properly, you must bear in mind the following tips while swiping your MSR cards through the reader. Make sure to swipe your card with the side of magnetic stripe facing up.
- Page 14 Scanning Barcodes with Posilfex 2D Scanner (Optional) The integrated Posiflex 2D Scanner is another prominent feature of HS- 3510W-E/3512W-E/3514W-E. With its hand-free design, it offers a more convenient solution for users to read 1D/2D barcodes and then transmitted scanned data to the terminal for further processing, which greatly increases your working efficiency.
- Page 15 For an optimal viewing angle, please tilt the LCD monitor up and down in the directions shown by the arrow in the below figure. Please be advised not to touch LCD panel while setting up the tilt angle for HS-3510W-E/3512W-E/3514W-E.
-
Page 16: Specifications
CR Port 1 Port controlling 2 CR (24V drive) VGA Port D-SUB 15-pin , with 12V power for Posiflex LCD monitors 4 x USB 2.0 ports (one on the top I/O plate and the other Standard USB Port three on the bottom I/O plate)
Need help?
Do you have a question about the HS-3510W-E and is the answer not in the manual?
Questions and answers