Table of Contents
Advertisement
Quick Links
Advertisement
Table of Contents

Related Manuals for Ronix 5720


Summary of Contents for Ronix 5720
- Page 1 BAND SAW 5720...
-
Page 3: Technical Specification
TECHNICAL SPECIFICATION 5720 Model Motor Power 350W Motor Type Induction motor Voltage 220-240V Frequency 50-60Hz No-Load Speed 1500RPM Total Length 485mm Total Height 675mm Work Table Size 300×300mm Tilt Range 0-45 degree Blade Width 6.35mm Blade Thickness 0.35mm Blade Size... -
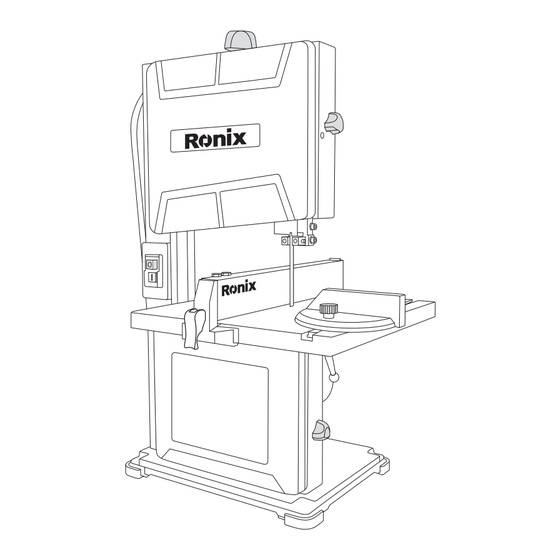
Page 4: Part List
PART LIST Clamping Screw Push Stick Housing Door Door lock Band Saw Guard ON/OFF Switch Saw Table Reinforcer Door Lock BAND SAW... - Page 5 SYMBOLS Retaining Screw Frame Running Wheel Adjustment Height Adjustment Locking Nut Clamping Plate Handwheel Bolt Angle Scale Locking Handle Connection for Dust Extraction Machine Base Pin For Safety Switch Safety Switch Running wheel Band Saw Blade Safety Switch Drive wheel USER MANUAL...
-
Page 6: Contents Of Box
CONTENTS OF BOX The following show the symbols used for the equipment. Be sure that Miter Gauge Fence Rip Fence Table Insert Allen key SYMBOLS Please read and maintains this manual. Use hearing protection. Use a mask. Use eye protection. Remove the mains plug before carrying out any adjustments, maintenance or repair work. -
Page 7: General Power Tool Safety Warnings
GENERAL POWER TOOL SAFETY WARNINGS WARNING! - Read all safety warnings and all instructions. Failure to follow the warnings and instructions may result in electric shock, fire and or serious injury. - Save all warnings and instructions for future reference. - The term “power tool”... -
Page 8: Personal Safety
- When operating a power tool outdoors, use an extension cord suitable for outdoor use. Using a cord suitable for outdoor use will reduce the risk of electric shock. - If operating a power tool in a damp location is unavoidable, use a residual current device (RCD) protected supply. - Page 9 Use of the power tool for operations different from those intended could result in a hazardous situation. SERVICE - Have your power tool serviced by Ronix services qualified repair person. using only identical replacement parts. This will ensure that USER MANUAL...
- Page 10 Replace a band saw blade immediately if it has cracks or other damage. use saw blades recommended by Ronix. Select a suitable band saw blade for the material to be cut. Only use accessory parts which are recommended in this instruction manual.
-
Page 11: Controls And Functions
from small workpieces. When cutting round or unevenly shaped wood, use a suitable holding device that prevents the workpiece from twisting. Always Lower band saw guard down as close as possible to the workpiece for all cutting procedures. Do not clean the band saw while it is still running. When transporting the power tool, the band saw guard must be in the lowest position near the table. -
Page 12: Tilting The Saw Table
Retaining Screw Height Adjustment Band Saw Guard TILTING THE SAW TABLE. to adjusting Saw table tilt first release locking handle by turning it then unscrew Handwheel bolt. Tilt the saw table by using angle scale shows the inclination after that Tighten the locking handle and the handle screw. -
Page 13: Operation
SAFETY DEVICES FUNCTIONS WARNING! Risk of injury from damaged equipment equipment and parts must be repaired or replaced professionally by Ronix services. OPERATION GENERAL INSTRUCTIONS The following safe working practices are considered to contribute to safety, but may not be appropriate complete to every application and They cannot cover every possible danger. - Page 14 When working, always position the band saw guard as close as pos- sible to the workpiece. Always hold end of the workpiece so that your hands are as far away from the band saw blade as possible. Always hold the workpiece so that your fingertips point away from the bandsaw.
-
Page 15: Straight Cuts
SWITCHING ON AND SAWING Always inspected the machine for obvious defects, such as safety devices, loosen screws, damaged parts and etc. have remedied the defects. checked the band saw blade for damage, if it has cracks replaced it. Insert the machine plug into a wall socket. Connect the connection for dust extraction to a vacuum cleaner. -
Page 16: Mounting The Rip Fence
MOUNTING THE RIP FENCE Open the quick release lever of the rip fence. Push the rip fence from the side onto the saw table. Move the rip fence on the saw table. Make sure that both scales are set to the same value. Close the quick release lever of the rip fence. -
Page 17: Curved Cuts
CURVED CUTS CAUTION! Your fingers are particularly at risk when cutting curves! Take special care. Remove the rip fence and the miter gauge fence. Use an auxiliary template for executing repeat curved, irregular cuts. When making curved and irregular cuts in the workpiece, push the workpiece evenly forward using both hands, with your fingers closed. -
Page 18: Cleaning The Inside Of The Machine
dry cloth or brush to do this. Clean the band saw guard with a brush or by blowing out with compressed air. CLEANING THE INSIDE OF THE MACHINE Open both housing doors. Open the cover of the band saw blade on the band saw guard. Remove the sawdust with a brush or by blowing out with compressed air. -
Page 19: Changing The Saw Blade
CHANGING THE SAW BLADE If you have difficulty mounting the band saw blade, call a qualified person. Only use Ronix saw blades that, suitable for your band saw. Open both housing doors Remove one screw of the reinforcer and loosen the second screw. -
Page 20: Troubleshooting
TROUBLESHOOTING Problem Possible cause Error Correction Check The Socket, No Connection Cable, Plug No Main Power Supply And Fuse And Have Them Repaired By Qualified Machin Doesn’t Start Electrician If Necessary Is (30) On/Off Switch Contact The Service Center Broken Defective Motor Contact The Service Center Internal Loose Contact... - Page 21 BAND...
Need help?
Do you have a question about the 5720 and is the answer not in the manual?
Questions and answers