Table of Contents
Advertisement
Quick Links
Advertisement
Table of Contents

Related Manuals for Ronix 5602


Summary of Contents for Ronix 5602
- Page 1 ELECTRIC TABLE SAW 21cm 5602...
-
Page 3: Specification
Max Cutting Capacity 45°: 35mm Main Table Size 525x445mm Table Material Plastic(ABS) Total Length 525mm(work table) Weight (N.W) 10Kg Supplied In Ronix color box Saw blade 1pc angle ruler 1set guide Includes ruler 1set wrench 2pcs push rod 1pc USER MANUAL... -
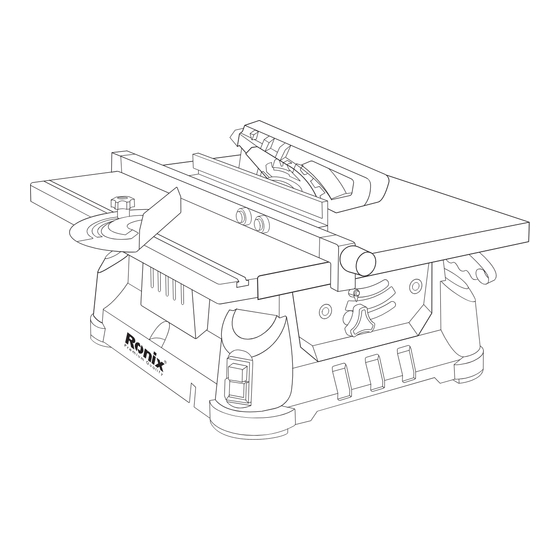
Page 4: Part List
PART LIST 13 12 7 24 17 19 1- Table 2- Auxiliary table 3- Ruler 4- Switch 5- Blade Adjust Knob 6- Fence Handle 7- Blade Guard 8- Shorter Fence 9- Longer Fence 10- KnobsX2pcs 11- Fence Supporter 12- Riving Knife ELECTRIC TABLE SAW 21cm... - Page 5 13- Blade 14- Scale 15- Cord/Plug 16- Dust Connector 17- Screws X2pcs 18- Pull-out Board 19- Blade bottom Guard 20- Spanner 21- Multi-Spanner 22- Nut 23- Flange SYMBOLS The rating plate on your tool may show symbols. These represent important information about the product or instructions on its use. Wear hearing protection.
-
Page 6: General Power Tool Safety Warnings
Waste electrical products should not be Disposed of as household waste. Please recycle where facilities exist. Check with your Local Authority or retailer for recycling advice. Do not touch the moving blade. Do not approach the machine with loose clothing. Danger! Splinter casing. -
Page 7: Electric Safety
presence of flammable liquids, gases, or dust. Power tools create sparks which may ignite dust or fumes. - Keep children and bystanders away while operating a power tool. Distractions can cause you to lose control. ELECTRIC SAFETY - Power tool plugs must match the outlet. Never modify the plug in any way. - Page 8 Protective equipment such as dust masks, non-skid safety shoes, hard hats, or hearing protection used for appropriate conditions will reduce personal injuries. - Prevent unintentional starting. Ensure the switch is in the off-position before connecting to the power source and/or battery pack, picking up or carrying the tool.
- Page 9 tool. Power tools are dangerous in the hands of untrained users. - Maintain power tools. Check for misalignment or binding of moving parts, breakage o parts, and any other condition that may affect the power tool’s operation. If damaged, have the power tool repaired before use.
- Page 10 items with the saw blade could cause a hazardous condition. - Adjust the riving knife as described in this instruction manual. Incorrect spacing, positioning, and alignment can make the riving knife ineffective in reducing the likelihood of kickbacks. - For the riving knife to work, they must be engaged in the workpiece. The riving knife is ineffective when cutting workpieces that are too short to be engaged with the riving knife.
-
Page 11: Kickback Causes And Related Warnings
your hand at a safe distance from the saw blade. - Use only the push stick is provided by the manufacturer or constructed in accordance with the instructions. This push stick provided by the manufacturer or constructed in accordance with the instructions. This push stick provides a sufficient distance of the hand from the saw blade. - Page 12 body on the same side of the saw blade as the fence. Kickback may propel the workpiece at high velocity toward anyone standing in front and in line with the saw blade. - Never reach over or in the back of the saw blade to pull or to support the workpiece.
- Page 13 Keep saw blades clean, sharp, and with sufficient set. Never use warped saw blades or saw blades with cracked or broken teeth. Sharp and properly set saw blades minimize binding, stalling, and kickback. TABLE SAW OPERATING PROCEDURE WARNINGS - Turn off the table saw and disconnect the power cord when removing the table insert, changing the saw blade , or making adjustments to the riving knife or saw blade guard, and when the machine is left unattended.
-
Page 14: Intended Use
- make sure that the saw blade is installed to rotate in the proper direction. Do not use grinding wheels, wire brushes, or abrasive wheels on a table saw. Improper saw blade installation or use of accessories not recommended may cause serious injury. INTENDED USE - The bench-type circular saw is designed for slitting and cross-cutting of all types of timber, commensurate with the machine’s size. -
Page 15: Instructions For Putting Into Use
The equipment must be set up where it can. stand securely. -All covers and safety devices have to be properly fitted before the equipment is switched on. - It must be possible for the blade to run freely. - When working with wood that has been processed before, watch out for foreign bodies such as nails or screws, etc. - Page 16 fence, then tighten the two knobs (10) as arrow shows. 3- Put the fence on the table (1) on the right or left of blade, check the scale (14) and tight the fence handle (6) in clock wise, note: keep the higher face of shorter fence (8) to face to the blade (13).
- Page 17 DUST CONNECTOR Use a household vacuum cleaner to connect with the a dust connector. - The table saw is equipped with dust extraction port (16) / Dia. 24mm for extracting sawdust and chips. - Using the extractor adapter, connected to a range of different sawdust extractors is straightforward.
- Page 18 It is to be used for dry operation only without water or other cooling liquids. The use of separation plates of all kinds is prohibited. 5- The machine is used in general conditions (ambient, between +5 °C and +40 °C, altitudes up to 1000 m) 6- Fitting the upper guard before operating and function checking .
-
Page 19: Setting And Testing
OPERATING INSTRUCTIONS SETTING AND TESTING -The machine must be set up where it can stand firmly, e.g. on a work bench, or it must be bolted to a strong stand. - All covers and safety devices must be properly fitted before the machine is switched on. - Page 20 - Undo the nut (22) with a spanner (20) on the nut itself and multi-spanner (21) on the saw shaft to apply counter-pressure and remove the nut and outer flange (23). - Take out the old blade and place one new blade on the arbor shaft. Make sure saw blade teeth point down at the front side of the saw table.
- Page 21 blade (13) and the riving knife (12) equals 3-5mm. and the riving knife (12) has to be in line with the saw blade (13) the longitudinal direction. CHANGING THE TABLE INSERT - Disassemble the upper saw blade guard (13). - Remove the screws on the table insert (24). - Replace worn table insert (24).
-
Page 22: Rip Fence
Allow the saw blade to reach full speed before cutting. Switching off: -To stop the machine by pressing the red O button (1-b) on the on/Off Switch (1). RIP FENCE - Ripping is cutting a piece of wood with the grain or length-ways. - This is done using the rip fence (11). -
Page 23: Bevel Cross-Cutting
CROSS-CUTTING /WIDTH - The rip fence (11) has to be used when making longitudinal cuts in wooden workpieces. - Slide the rip fence (11) to the right or left side of the saw table (9). - The rip fence (11) can be set to the required dimension with the help of the scale engraved on the saw table (9). - Page 24 - Important! With short workpieces, use the push stick from the beginning. CUTTING VERY NARROW WORKPIECES (WIDTH LESS THAN 30 MM) - Adjust the rip fence (11) to the width ofthe workpiece you require. - Use the push stick o press the workpiece against the rip fence (11) and push the workpiece with the push block through to the end of the riving knife (12)6- Please hold the rigid frame (such as a table) of machine during transportation, do not hold the upper guard, riving knife, or blade...
-
Page 25: Maintenance And Servicing Instructions
10- When bevel cutting, hold the workpiece by hands or push stick in order to avoid bevel ripping on the bevelingside of the saw blade. INSTRUCTION TO WEAR PERSONAL PROTECTION EQUIPMENT - Always wear eye protection. - Wear ear protection. - Always wear face or dust mask if working operations create dust. -
Page 26: Recycling And Disposal
9- Regular and proper cleaning will help ensure safe use and prolong the life of the product. 10- Inspect the product before each use for worn and damaged parts. Do not operate it if you find broken and worn parts. RECYCLING AND DISPOSAL CAUTION! This product has been marked with a symbol relating to removing... - Page 27 Problem Possible cause Solution 1.1 Connect to the power 1.1 Not connected to supply. power supply. 1.The product does 1.2. Check by a specialist 1.2 The power cord or plug not start. electrician. is defective 1.3. Check by a specialist 1.3 Other electrical electrician.
Need help?
Do you have a question about the 5602 and is the answer not in the manual?
Questions and answers