Chapters
Table of Contents

Related Manuals for Kenmore 75085 - 8,000 BTU Single Room Thru-The-Wall Air Conditioner


Summary of Contents for Kenmore 75085 - 8,000 BTU Single Room Thru-The-Wall Air Conditioner
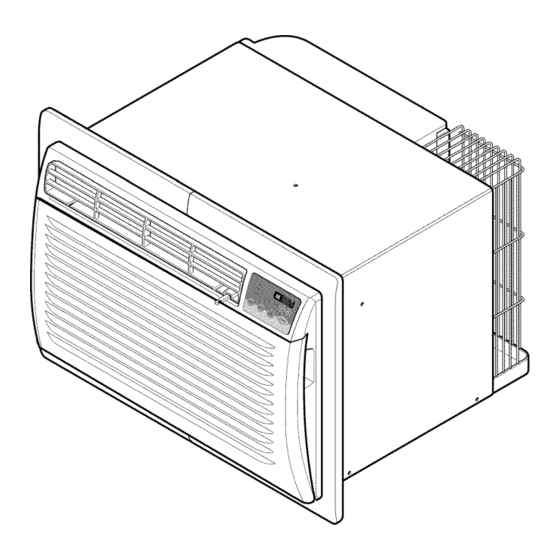
- Page 1 Owner's Manual Manual del Propietario ® THROUGH-THE-WALL AIR CONDITIONER ACONDIClONADO DE AIRE A TRAVESDE PARED Model, Modelo 580.75085 Distributed by Sears, Roebuck and Co., Hoffman Estates, IL 60179 www.sears.com...
-
Page 2: Table Of Contents
FULL ONE YEAR WARRANTY ON CONTACTING SEARS SERVICE AT THROUGH-THE-WALL AIR CONDITIONER 1-800-4-MY-HOME ®. For one year from the date of purchase, when this Warranty coverage applies only to air conditioners air conditioner is operated and maintained for used for non-commercial,... -
Page 3: Safety
IMPORTANT SAFETY INSTRUCTIONS The safety instructions below will tell you how to use your room air conditioner to avoid harm to yourself or damage to your ROOM AIR CONDITIONER. FOR YOUR SAFETY Avoid fire hazard or electric shock. Do not store or use gasoline or other flammable Do not use an extension cord or an adapter plug. -
Page 4: Electrical Requirements
TEST button and then the RESET button. If the TEST button does not trip or if the RESET button will not stay engaged, discontinue use of the air conditioner and contact a qualified service technician. -
Page 5: Installation
(425ram) • Carefully inspect location where air conditioner Kenmore Wall Sleeve FIG. 2 will be installed. Be sure it will support the weight of the unit over an extended period of time. • Handle air conditioner with care. Wear ELECTRICAL... -
Page 6: Installation
Fig. 3. Place the higher portion of dentify the existing wall sleeve before installing the unit from the listed below. shim to the front of the rib on base of wall sleeve. Wall Sleeve Dimensions (inches) Brand... -
Page 7: Procedurea
FIG. 7 Install the new unit into the wall sleeve. To assemble trim, snap the tab of each piece into the slot of the other piece as shown below. Slide trim over the front of the air conditioner FIG. 4 until trim is flush with sleeve as shown below. -
Page 8: Procedureb
60 ° angle as shown in the FIG 9. The Remove the backing from the Around Insulation use of pliers is recommended. - Page 9 PROCEDURE emove the backing from the support blocks and attach them to the inside of the wall sleeve as shown FIG 15. Slide the baffle into slots of the support blocks. 3/32") _/all _/all Block FIG. 15 Install the new unit into the wall sleeve.
-
Page 10: Procedurec
8 1/2" _'_lf the wall sleeve already has a rear grille, skip to step 4. If the wall sleeve does not have a rear FIG. 19 grille or Iouvered panel, install the plastic grille from the kit. Cut the plastic grille to 26-1/2" wide and 15-1/2"... - Page 11 23. The higher portion of shim is to be placed To preventinjuryor strain,useproperliftingand in front of the rib on the base of wall sleeve. carryingtechniques when movingunit. • Whenhandling the air conditioner,be carefulto avoid cutsfrom sharpmetalfins on front and rearcoils.
-
Page 12: Operation
You may hear This is normal and should not be cause for concern. droplets of water Also, do not be alarmed if you hear a slight hissing or hitting the condenser, gurgling sound coming from your air conditioner after causing a pinging or it is off. -
Page 13: Features
1. CABINET 2. HORIZONTAL AIR DEFLECTOR (Vertical Louver) NOTE : If the air conditioner is turned off, wait 3 3. VERTICAL AIR DEFLECTOR minutes before restarting. This allows pressure (Horizontal Louver) inside the compressor to equalize. Failure to wait 3 4. -
Page 14: Control Panel
CONTROL PANEL -FAN SPEED • Every time you push this button, it advances the setting as follows: {High _ Low _ Med _ High} REMOTE CONTROL SIGNAL RECEIVER TEMPERATURE SETTING • Use this button to automatically control the temperature of the room. -
Page 15: Remote Control
REMOTE CONTROL NOTE: The Remote Control will not operate properly if strong light shines on the sensor window of the Air Conditioner or if there are obstacles between the Remote Control and the Air Conditioner. Every time you push button, you will hear a beep from the Air Conditioner. - Page 16 CONTROL HORIZONTAL AIR-DIRECTION BATTERIES ADJUSTMENT 1. Remove the cover from the back of the remote • The horizontal air direction is adjusted by moving controller. vertical louver. • The vertical louver control levers are located in the 2. Insert two batteries.
-
Page 17: Maintenance
• Push the grille up from the bottom and pull the top of the grille away from the case to lift the top tabs •... -
Page 18: Troubleshooting
BEFORE CALLING FOR SERVICE Check the following list to be sure a service call is really necessary. A quick reference to this manual may help you avoid an unneeded service call. THE AIR CONDITIONER WILL NOT OPERATE Check if... Then... - Page 19 -19-...
-
Page 20: Espai_Iol
EL AIRE ACONDICIONADO A TRAVES CON EL SERVlClO DE SEARS EN EL DE PARED 1-800-4-MY-HOME ®. Durante un afio a partir de la fecha de compra, La cobertura de la garantia se aplica t_nicamente a cuando este aire acondicionado funcione y se... -
Page 21: Seguridad
• Asegurese de que el aire acondicionado esta • Cierre los registros de suelo y pared y el regulador de correctamente puesto a tierra. Para reducir al minimo el tiro de la chimenea para que el aire frio no se escape riesgo de descargas e incendios, la puesta a tierra pot la chimenea y hacia los conductos. -
Page 22: Requlsltos Electricos
BAJO NINGUNA CIRCUNSTANCIA CORTE, conectarse a tierra. Este aparato viene equipado QUITE O EVITE EL USO DE LA CONEXION A con un cable de alimentaci6n y una clavija de tres TIERRA DE ESTA CLAVIJA. terminales. Para reducir al m&ximoel peligro de... -
Page 23: Instalaclon
Todos los rnodelos estan equipados con un enchufe de tres dientes para proporcionar el servicio apropiado y HERRAMIENTAS NECESARIAS: poner a tierra el positivo de forrna segura. No carnbie el enchufe de ninguna rnanera. No utilice un enchufe • Guantesce_idos • Llaveinglesaabiertao adecuados adaptador. -
Page 24: Instalaci6N
FIG. 3. Coloque el dentifique el soporte de pared existente antes de instalar la unidad segun la lista. extremo ma.salto de la cuba en la parte frontal de la base del soporte de pared. Marca... -
Page 25: Procedimientoa
Siesta utilizando un nuevo soporte de pared (incluido opcionalmente con su unidad), salte al paso 3. Si no es asi, instale la rejilla plastic& Corte la rejilla plastica a 25-1/2" de ancho y 15-1/4" de alto. Coloque la rejilla pla.sticaen el interior del soporte de pared en la pestafia posterior. -
Page 26: Procedimientob
PROCEDIMIENTO Retire el envoltorio de la tira vertical de aislamiento 15-9/16 x 1-3/8 x 1-3/8 y unala a la parte interior derecha del soporte de pared segun se muestra a edireccione las rejillas de ventilaci6n en la parte continuaci6n. Retire el envoltorio de la tira de posterior del soporte de pared a un a.ngulode 60 °... - Page 27 • Uanipuleconcuidadoel aire acondicionado, tenga cuidadode evitarcortesde lasaristasafiladasde metalde las bobinasfrontaly posterior. • Asegt_rese d e que el aire acondicionado no se caiga al desrnontarlo. • Si la unidadno funcionatras la revisionde instalacion, a segt_rese q ueel interruptor del circuito no se ha disparado.
-
Page 28: Procedimientoc
Corte la rejilla pla.stica a 26-1/2" de ancho y 15-1/2" de alto. Coloque la _"_ Si la profundidad de su soporte de pared es menor o rejilla plastica en la parte interior del soporte de igual a 18", salte al paso 7. Si no, corte las pared en la pestaSa posterior. - Page 29 11-13/16" y ac6plelas segun se muestra necesariasdoso maspersonasparadesplazare a continuaci6n en la FIG. 23. Coloque el extremo instalarla unidad. ma.salto de la curia en la parte frontal de la base Paraevitar lesiones o esfuerzosexcesivos, u tilicelas del soporte de pared. t@nicasde levantamiento y desplazamiento apropiadas al moverla unidad.
-
Page 30: Funcionamiento
El aire acondicionado realiza estas funciones haciendo o ventana. pasar el aire de la habitaci6n a traves de un filtro que atrapa el polvo y las particulas de suciedad. El aire pasa _resor despues a traves un serpentin de enfriamiento que enfria... -
Page 31: Caracteristicas
2. Fije el control TEMP a la posici6n ma.sfria. 3. Fije el control MODE al nivel ma.sFR/O. 4. Ajuste las rejillas de ventilaci6n para Iograr un c6modo flujo de aire. FIG. 26 5. Una vez enfriado el cuarto, ajuste los controles TEMP y MODO a la posici6n que encuentre ma.sc6moda. -
Page 32: Panel De Control
• Si la unidad est,. apagada, utilice el temporizador para establecer el ntJmerode horas antes de iniciar la unidad. • Presione el botdn del temporizador para adelantar el ajuste de 1 hora _ 2 horas _ ... _ 12 horas m_.ximo. -
Page 33: Mando A Distancia
MANDO A DISTANCIA NOTA: El mando a distancia no funcionara correctamente si una luz potente brilla sobre la ventana del sensor del aire acondicionado o si existen obstaculos entre el mando a distancia y el aire acondicionado. Cada vez que presione el bot6n, escuchara una se5al sonora del aire acondicionado. - Page 34 A DISTANCIA AIRE HORIZONTAL • El direccionamiento de aire horizontal se ajusta 1. Quite la tapa de la parte posterior del mando a distancia. moviendo la rejilla de ventilacion vertical. • La las palancas de control de la rejilla de ventilacion 2.
-
Page 35: Mantenimiento
Debe lavarse al menos cada 2 semanas. Si • Abra la rejilla de entrada. deja el filtro de aire Ileno de polvo, el flujo de aire • Retire el tornillode fijacion de la rejilla frontal. disminuira y la capacidad de enfriamiento se vera reducida, posiblemente dafiando la unidad. -
Page 36: Soluclon De Averias
Enderece el conducto lejos de la bobina de evaporador. con la bobina del evaporador, ubicada tras la rejilla frontal. EL AIRE ACONDICIONADO ENFRIA, PERO EL CUARTO EST.&,DEMASIADO C_,LIDO - SE EST.&, F ORMANDO HIELO TR_,S LA REJILLA DE ENTRADA. Compruebe si... - Page 37 _ 37 _...
- Page 38 - 38 -...
-
Page 39: Master Protection Agreements
El Contrato de protecci6n maestra tambien le ayuda a ampliar life of your new product. Here's what the Agreement* la vida de su nuevo producto. Lo siguiente es Io que se incluye en el contrato*: includes:... - Page 40 Your Home For repair - in your home - of all major brand appliances, lawn and garden equipment, or heating and cooling systems, no matter who made it, no matter who sold it! For the replacement parts, accessories owner's manuals that you need to do-it-yourself.
Need help?
Do you have a question about the 75085 - 8,000 BTU Single Room Thru-The-Wall Air Conditioner and is the answer not in the manual?
Questions and answers
Where is the energy saver button