
Related Manuals for Kenmore 580.75085


Summary of Contents for Kenmore 580.75085
- Page 1 Owner's Manual Manual del Propietario ® THROUGH-THE-WALL AIR CONDITIONER ACONDICIONADO DE AIRE A TRAVESDE PARED Model, Modelo 580.75085 580.75116 580.75135 Sears, Roebuck and Co., Hoffman Estates, IL 60179 U.S.A. www.sears.com...
-
Page 2: Table Of Contents
Features ..........TABLE OF CONTENTS ......2 Using the Air Conditioner ....... 13 WARRANTY ..........Control Panel ......... SAFETY ............. Remote Control ........Important Safety Instructions ...... 3 MAINTENANCE ........ELECTRICAL REQUIREMENTS ..4 Air Filter Cleaning ........17 INSTALLATION ........ -
Page 3: Safety
IMPORTANT SAFETY INSTRUCTIONS The safety instructions below will tell you how to use your room air conditioner to avoid harm to yourself or damage to your ROOM AIR CONDITIONER. FOR YOUR SAFETY Avoid fire hazard or electric shock. Do not store or use gasoline or other flammable Do not use an extension cord or an adapter plug. -
Page 4: Electrical Requirements
OBSERVE ALL LOCAL CODES AND RECOMMENDED GROUNDING METHOD ORDINANCES. For your personal safety, this appliance must DO NOT, UNDER ANY CIRCUMSTANCES, be grounded. This appliance has a power REMOVE THE POWER SUPPLY CORD supply cord with a 3-prong grounding plug. To GROUND PRONG. -
Page 5: Installation
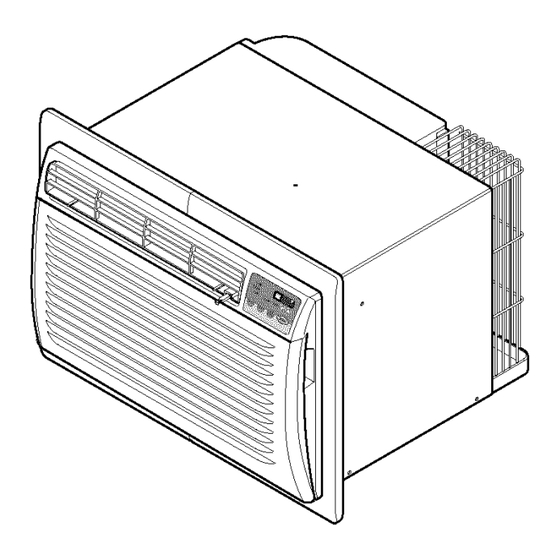
(FIG. 1) With the Kenmore sleeve, you can maintain the best performance of the new air conditioner. (FIG. 2) -
Page 6: Installation
Good installation unit. If you plan to use your existing wall sleeve, with special attention to the proper position of the and it is not Kenmore, use procedure B or C unit will lessen the chance that service will be below. -
Page 7: Procedurea
PROCEDURE Plastic rear grilte Steelrear If you are using the new sleeve (optionally supplied with your unit),skip to step 3. Otherwise, install the plastic grille from the kit. Cat the plastic grille to 25-1/2" wide and 15-1/4" high. Place the plastic grille to the inside of the wall sleeve at the rear flange. -
Page 8: Procedureb
PROCEDURE Remove the backing from the Vertical Insulation strip 15%6 x 13/8 and attach that to the x 13/8 inside right of the sleeve as shown below. Redirect the louvers at the back of the wall sleeve to 60 ° angle as shown in the FiG 9. The Remove the backing from the Around Insulation use of pliers is recommended. - Page 9 PROCEDURE HRemove the backing from the support blocks and attach them to the inside of the wail sleeve as shown FIG 15. Slide the baffle into slots of the support blocks. Wall Wall Sleeve FIG. 15 i'll Install the new unit into the wall sleeve. I[_l Assemble trim as described in Step 6, Procedure A.
-
Page 10: Procedurec
PROCEDURE Remove the backing from the Horizontal Insulation strip 237/32x 13/8x 13n6 and attach that to the inside right of the sleeve as shown Redirect the louvers at the back of the wall sleeve to 60 ° angle as shown in the FIG 16. below. - Page 11 PROCEDURE • Air conditioners coveredin this manualposean To achieve rearward slope for unit draining, remove the backing from the 11 shim t3/16" excessiveweighthazard.Twoor morepeople are neededto moveandinstallthe unit. strips and attach them as shown below in Fig. 23. The higher portion of shim is to be placed To preventinjuryor strain,useproper l ifting and in front of the rib on the base of wall sleeve.
-
Page 12: Operation
HOW AND WHY Unit Vibration Your room air conditioner provides the following The unit may vibrate functions to make hot weather living more and make noise comfortable: because of poor wail or window • Cools and circulates room air. construction. •... -
Page 13: Features
FEATURES USING THE AIR CONDITIONER THE UNIT reduce the risk of fire, electdc shock, or injury to persons, read the important SAFETY instructions section before operating this appliance. To begin operating the air conditioner after installation, follow these steps: 1. Plug in the air conditioner. (To prevent electrical hazards, do not use an extension cord or an adapter plug.) 2. -
Page 14: Control Panel
CONTROL PANEL -FAN SPEED Every time you push this button, it advances the setting as follows: {High , Low _Med * High} Applied to 580.75085 580.75116 RECEIVER • Use this button to automatically control the temperature of the room. The temperature can be set within a range of 60°F to 86°F by increments of I°F. -
Page 15: Remote Control
REMOTE CONTROL NOTE: The Remote Control wiEInot operate properly if strong light shines on the sensor window of the Air Conditioner or if there are obstacles between the Remote Control and the Air Conditioner. Every time you push button, you will hear a beep from the Air Conditioner. POWER •... - Page 16 HORIZONTAL AIR-DIRECTION INSERTING THE REMOTE CONTROL ADJUSTMENT BATTERIES 1. Remove the cover from the back of the remote • The horizontal air direction is adjusted by moving controller. vertical louver. • The vertical louver control levers are located in the 2.
-
Page 17: Maintenance
AIR FILTER CLEANING HOW TO REMOVE THE FRONT GRILLE The Air Filter will become dirty as it removes dust from the inside air. It should be washed at least • Open the inlet grille. every 2 weeks. If the Air Filter remains full of dust, •... -
Page 18: Troubleshooting
BEFORE CALLING FOR SERVICE Check the following list to be sure a service call is really necessary. A quick reference to this manual help you avoid an unneeded service call. THE AIR CONDITIONER WILL NOT OPERATE Check if... Then... The Current interrupter Device is tripped. Press the RESET button located on the power cord plug. - Page 19 Your Home For repair - in your home-of all major brand appliances, lawn and garden equipment, or heating and cooling systems, no matter who made it, no matter who sold it! For the replacement parts, accessories owner's manuals that you need to do-it-yourself. For Sears professional installation of home appliances and items like garage door openers and water heaters.
Need help?
Do you have a question about the 580.75085 and is the answer not in the manual?
Questions and answers