Advertisement
Quick Links
Advertisement

Related Manuals for Mercia Garden Products 0628CSNE0303HGDD2SW-V2


Summary of Contents for Mercia Garden Products 0628CSNE0303HGDD2SW-V2
- Page 1 2mm Drill bit...
-
Page 2: Any Questions
PLEASE SCAN HERE: ANY QUESTIONS? Scan code contact us via our customer portal. - Page 3 Tip: Labelling your parts, using a pencil and masking tape, Before assembly PLEASE SCAN HERE: ANY QUESTIONS? please make sure you have a may help you to identify them easier when you need them. suitable base ready to erect your Scan code building...
- Page 4 Log Boards Contents: Roof Contents: Log Board - 28x70x311mm QTY 1 Left Roof Truss - 40x140x922mm QTY 1 LB28-BH70GR-311mm (1x45 deg cut right bottom notch, 70mm height board) AI-06LOGC3X3-LRT-V1 Log Board - 28x120x1625mm QTY 1 LB28-JDR-1625mm (1x45 deg cut right, window notch) Right Roof Truss - 40x140x922mm QTY 1 AI-06LOGC3X3-RRT-V1 Log Board - 28x120x1625mm QTY 1...
- Page 5 Fixing Kit Contents: Fixing Kit Contents: Bearer - 44x44x2808mm QTY 1 F4444-2808mm-PT Bearer - 44x44x2720mm QTY 6 *HINT: keep the oor board pack F4444-2720mm-PT together to prevent mixing it up. Bearer - 44x44x2492mm QTY 1 F4444-G-2492mm-PT (1x45 deg cut) Bearer - 44x44x2222mm QTY 1 F4444-G-2222mm-PT (1x45 deg cut) Floor Board Pack QTY 1* Bearer - 44x44x1951mm QTY 1...
- Page 6 Door Contents: Window Contents: Window QTY 2 Window Frame QTY 2 AI-06LOGDGSW702X1264-V1 AI-0628DGWF808X1427-V1 Master Door QTY 1 Secondary Door QTY 1 (Morticed for lock) AI-06LOGDGSD750X1900-V4 AI-06LOGDGMD750X1900-V4 Rain Guard - 28x44x710mm QTY 2 Door Frame Left Upright - 71x70x2065mm QTY 1 RG2844-710mm AI-0628LOGDUFL-V4 Door Frame Right Upright - 71x70x2065mm QTY 1...
- Page 7 Screw Pack. There may be extra screws present in the pack. 70mm Bolt Set x 16 40mm Screw x 638 30mm Screw x 134 120mm Screw x 12 20mm Screw x 8 90mm Screw x 10 80mm Screw x 8 Felt Tacks x 400 70mm Screw x 86 Missing parts?
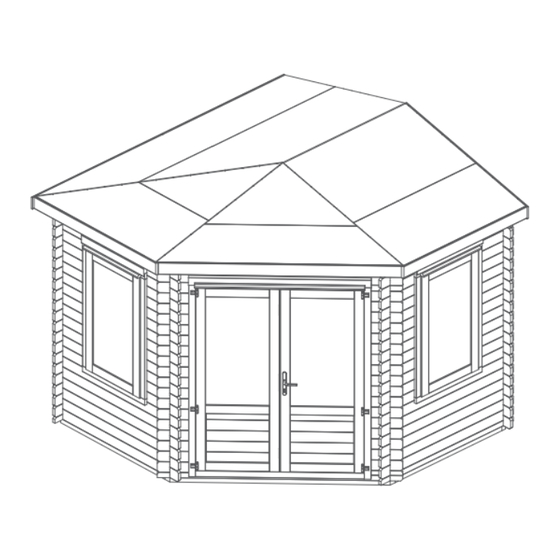
- Page 8 The following steps show how to construct a 3m x 3m corner log cabin. Step 2 To construct a 5m x 3m corner log cabin, please refer to the 5m x 3m instructions. Parts Needed - No. 38 QTY 5 No.
- Page 9 Step 3 Step 4 Parts Needed - No. 1 QTY 1 Parts Needed - No. 6 QTY 1 No. 2 QTY 1 No. 3 QTY 1 Make the log cabin level by laying another board (No. 6) onto the right side of the No.
- Page 10 Step 5 Step 6 Parts Needed - No. 4 QTY 11 Parts Needed - No. 58 QTY 1 No. 7 QTY 5 No. 59 QTY 1 No. 8 QTY 6 No. 60 QTY 1 No. 9 QTY 6 No. 61 QTY 1 No.
- Page 11 Step 7 Parts Needed - No. 56 QTY 1 No. 57 QTY 1 No. 64 QTY 6 The Adjustable Door Hinge (No.64) comes in three parts. Fasten parts No. 64a and 64b of the Adjustable Door Hinge together by screwing part 64a into 64b, as shown in the illustration.
- Page 12 Step 9 Step 8 Once you have laid 6 log boards (o of the starter board) up the door section, slide the To adjust and align your doors: assembled door frame over the boards, ensuring to rest the frame on top of the starter board. If you have not yet assembled your door frame, please refer to steps 6-8.
- Page 13 Step 10 Parts Needed - No. 4 QTY 12 No. 9 QTY 6 No. 10 QTY 6 No. 11 QTY 12 No. 12 QTY 6 No. 13 QTY 6 Following the method shown in the illustration, lay the next 6 boards (No. 4, 9, 10, 11, 12 & 13) on to the log cabin to create your second level.
- Page 14 Doors on the Side Step 11 Parts Needed - No. 55 QTY 4 No. 69 QTY 2 No. 71 QTY 2 No. 73 QTY 4 Open the hinges (No.71) following the directional arrow given on the top of the hinge. Lay the assembled window frame (No.
- Page 15 Step 12 Step 13 Parts Needed - No. 68 QTY 2 Parts Needed - No. 69 QTY 2 With the hinges (No. 71) open in the frame, locate the Window (No. 68) onto the bottom hinge, Once you have laid 6 log boards up the window sections, slide the assembled Window frames ensuring to position both the top and bottom hinge into the groove in the window, as shown.
- Page 16 Step 14 Step 15 Parts Needed - No. 4 QTY 12 Parts Needed - No. 14 QTY 1 No. 9 QTY 6 No. 10 QTY 5 Make the log cabin level by laying another board (No. 14) onto the right side of No.
- Page 17 Step 16 Step 17 Parts Needed - No. 4 QTY 2 Parts Needed - No. 5 QTY 1 No. 15 QTY 1 No. 19 QTY 1 No. 16 QTY 1 No. 53 QTY 4 No. 17 QTY 1 Lay both Boards (No. 5 & 19) onto a at and level surface and locate one Vent (No. 53) into each vent hole, as Following the method shown in the illustration, lay the next layer of boards (No.
- Page 18 Step 18 Step 19 Parts Needed - No. 4 QTY 1 Parts Needed - No. 20 QTY 1 No. 5 QTY 1 No. 21 QTY 1 No. 7 QTY 1 No. 18 QTY 1 Following the method shown in the illustration, lay the Finisher boards (No. 20 & 21) No.
- Page 19 Step 21 Step 20 Parts needed - No. 33 QTY 1 Parts Needed - No. 26 QTY 1 Align the Purlin (No.33) into the cut out notche on the Gable, ensuring they interlock. ** Please Note: You can place your gable on either side of the log cabin, dependant on your needs. Note: Use a mallet and a scrap piece of wood to gently x the purlins into position.
- Page 20 Step 22 - Roof Assembly 1 Step 22 - Roof Assembly 2 Parts needed - No. 29 QTY 1 Parts needed - No. 29 QTY 1 No. 31 QTY 1 No. 31 QTY 1 No. 32 QTY 1 No. 32 QTY 1 Place the Central roof Truss ‘...
- Page 21 Step 23 Step 24 Parts needed - No. 30 QTY 1 Parts needed - No. 29 QTY 2 Place ‘Roof Truss B’ (No. 30) between Roof Truss A (No.29) and the Central Roof Truss (Truss D for Roof Assembly Place one ‘Roof Truss A’ (No. 29) ush to the inside of the gable on either side of the Purlin. 1, and Truss C for Roof Assembly 2) as shown in the illustration.
- Page 22 Step 25 Step 26 Parts needed - No. 27 QTY 1 Parts needed - No. 22 QTY 1 No. 28 QTY 1 No. 23 QTY 1 No. 24 QTY 1 Position the Left and Right Roof Truss’ (No. 27 & 28) up against ‘Roof Truss B’ (No.30), ensuring the angled sides No.
- Page 23 Step 27 Step 28 Parts needed - No. 29 QTY 2 You can now x the assembled roof truss’ and Roof Purlin to the log cabin, making sure the attached blocks sit Locate the last two ‘Roof Truss A’ (No. 29) into the 42mm gaps between the nisher boards No.25 on either side inside the assembly.
- Page 24 Step 29 Step 30 Parts needed - No. 34 QTY 1 Pack A Parts needed - No. 34 QTY 1 Pack A No. 35 QTY 2 Pack B No. 35 QTY 2 Pack B No. 36 QTY 2 Pack C No.
- Page 25 Step 31 Step 32 Parts needed - No. 34 QTY 1 Pack A Parts needed - No. 34 QTY 1 Pack A No. 35 QTY 2 Pack B No. 35 QTY 2 Pack B No. 36 QTY 2 Pack C No.
- Page 26 Step 33 Step 34 Parts Needed - No. 68 QTY 2 Parts needed - No. 34 QTY 1 Pack A No. 35 QTY 2 Pack B Once the Roof is secured, open the window hinges and re-position the Window (No. 68) onto the hinges (as No.
- Page 27 Step 35 Step 36 Parts Needed - No. 72 QTY 2 Lift each door onto the already existing hooks on the door frame, ensuring the hook and bands connect. With the window (No.68) shut tight, from the inside locate the Window Handle (No.72) onto the window and the window casement pin onto the inside of the window frame, as shown.
- Page 28 Step 37 Step 38 Parts Needed - No. 66 QTY 1 Parts Needed - No. 65 QTY 1 On the Master Door (No. 56) un-screw and remove the Lock Plate from the door stile and the Central Lock, From the Handle set (No. 65) position the Metal bar through the central lock and connect one handle onto as shown.
- Page 29 Step 40 Step 39 Parts Needed - No. 50 Parts Needed - No. 62 QTY 1 No. 67 QTY 2 Place the rst oor board (No. 50) inside the building ush to the log board on one side. Continue adding Attach the Door Strip (No.
- Page 30 Step 41 Step 42 Parts needed - No. 51 QTY 5 Parts needed - No. 51 QTY 5 Inside the building place the closure trim (No. 51) against the boarding and align with the roof as shown in Once the oor has been laid, arrange the closure trim (No. 51) around the outside edge of the oor the illustration.
- Page 31 Step 43 Roof Assembly 1 Parts needed - No. 54 Measure and cut the felt (No.54) into eight sheets using the dimensions given below: 1 - 1600mm (L) x 1000mm (W) 2 - 2300mm (L) x 1000mm (W) 3 - 1660mm (L) x 1000mm (W) 4 - 3200mm (L) x 1000mm (W) 5 - 1600mm (L) x 1000mm (W) 6 - 820mm (L) x 1000mm (W)
- Page 32 Step 44 Parts needed - No. 54 Roof Assembly 1 Measure and cut the remaining felt (No.54) into four strips using the dimensions given below: 1 - 1600mm (L) x 200mm( W) 2 - 2340mm (L) x 200mm (W) 3 - 1700mm (L) x 200mm (W) 4 - 1710mm (L) x 200mm (W) Lay the st strip (1- 1600mm X 200mm) onto the roof as shown (1), ensuring it is overlapping the previously placed sheets.
- Page 33 Step 45 Step 46 Parts Needed - No. 46 QTY 1 Parts Needed - No. 63 QTY 1 No. 47 QTY 1 - No. 70 QTY 2 No. 48 QTY 2 No. 49 QTY 2 Attach the Rain Guards (No. 70) to the Window frames, ensuring to position the rain guards directly above the windows, ush to the underside of the top framing, as shown.
- Page 34 Step 47 Step 48 Parts needed - No. 52 QTY 8 Once constructed, apply a preserving and a waterproo ng treatment to your garden building as soon as Arrange the storm braces (No.52) around the building (internally), placing two storm braces per wall. possible.
-
Page 35: Any Questions
PLEASE SCAN HERE: ANY QUESTIONS? Scan code contact us via our customer portal.
Need help?
Do you have a question about the 0628CSNE0303HGDD2SW-V2 and is the answer not in the manual?
Questions and answers