
Related Manuals for Techni Mobili RTA-2706A


Summary of Contents for Techni Mobili RTA-2706A
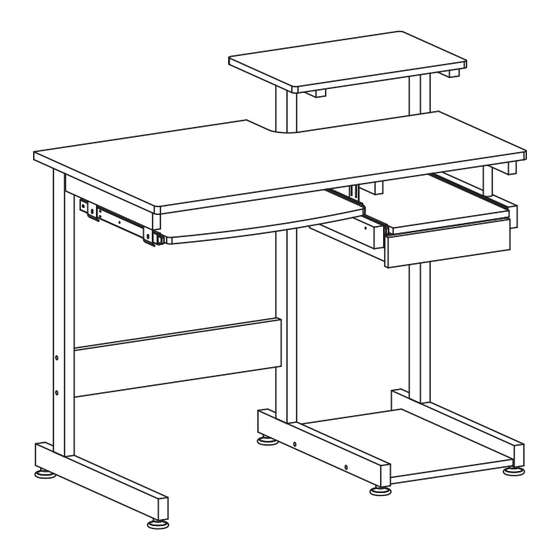
- Page 1 COMPLETE COMPUTER WORKSTATION DESK MODEL RTA-2706A ASSEMBLY INSTRUCTIONS REV-7-OL-7868-0224 Thank you for purchasing our product...
-
Page 2: Main Parts List
RTA-2706A Replacement Parts for International Do a quick inventory For Support, assembly questions Customers & AK-HI-PR orders: of all the parts and & Replacement Parts within the hardware listed below. 48 Contiguous United States: RTA Products will replace the part free of... -
Page 3: Hardware List
RTA-2706A MAIN PARTS LAYOUT (For reference) On the left side only On the right side: 1 set of sliders #14. sliders #14 at top, sliders # 12 at bottom. i g h HARDWARE LIST INCLUDED TOOLS ITEM PART QTY SIZE / DESCRIPTION... - Page 4 RTA-2706A BEFORE YOU START THE ASSEMBLY, PLEASE READ THE FOLLOWING TIPS AND WARNINGS. • The product is not reversible, it assembles ONLY as shown in the front page, with the drawer on the RIGHT side. The drawer cannot install on the LEFT side.
-
Page 5: Assembly Steps
RTA-2706A ASSEMBLY STEPS WE RECOMMEND TO PLACE THE PIECES OVER BLANKETS OR TABLECLOTHS TO PROTECT THEIR FINISH DURING ASSEMBLY. STEP 1 • FIRST identify the FRONT LOWER HOLES on the legs 2 and 3. You will Hardware attach front of the sliders 12 on these holes using screws H by opening the... - Page 6 RTA-2706A STEP 2 Install the glide studs 4 into the bottom of the legs 1, 2 and 3. ( T o ( T o ( B o t t o m t t o ( B o ( T o...
- Page 7 RTA-2706A STEP 4 • FIRST identify on the top shelf 6, what is the FRONT, BACK , LEFT and This step RIGHT, as this panel should go installed only as it is shown below. requires of 2 persons • THEN, and with the help of another person lifting the frame at the top,...
- Page 8 RTA-2706A STEP 5 Attach one pair of sliders 14 to the frames 2 and 3 with screws E on the top sets Hardware of holes. The screws go from the outside, through the legs and into the threaded holes of the sliders. The tabs go facing down.
- Page 9 RTA-2706A STEP 7 • FIRST, flip the keyboard panel 10 upside-down and attach the second set of This step sliders 14 with screws C in their respective sides. requires of 2 persons • THEN, attach the slider brackets 9 to the indicated holes on the tabletop 8 with Hardware screws G, with their lips facing towards the inside.
- Page 10 RTA-2706A STEP 8 • FIRST, with the help of another person, carefully place the tabletop 8 over the This step legs 1, 2 and 3. requires of 2 persons • THEN, secure the tabletop to the legs with screws B.
- Page 11 RTA-2706A P.10 P.10 STEP 10 Pull out the BOTTOM sliders 12 from the unit, and with the help of another This step person, install the drawer 13 with screws F. requires of 2 persons Hardware M3x15 Tools (included) (Front)
-
Page 12: Weight Limits
RTA-2706A P.11 P.11 WEIGHT LIMITS 30 Lbs (13.6 Kg) 80 Lbs (36.2 Kg) 22 Lbs (9.9 Kg) 30 Lbs (13.6 Kg) WARNINGS • Do not exceed the indicated weight limits. • Do not expose the surfaces to direct sunlight or to extreme environmental conditions. - Page 13 RTA-2706A P.12 P.12 TECHNI MOBILI WARRANTY DESKS/LAPTOP CARTS/FILE CABINETS: LIMITED 5-YEAR WARRANTY RTA Products, LLC warrants to the Original Purchaser who acquired a new product from RTA Products or its authorized resellers that this product will be free from defects in its workmanship and materials, under normal use and service conditions, as described herein.
Need help?
Do you have a question about the RTA-2706A and is the answer not in the manual?
Questions and answers