Table of Contents
Advertisement
Quick Links
Download the app
& activate product
Before using this product, please read this manual carefully and keep it for future reference.
The design and specifications are subject to change without prior notice for product improvement. Consult
with your dealer or the manufacturer for details.
PORTABLE AIR CONDITIONER
USER MANUAL
MAP08S1XWT
MAP10S1XWT
MAP10HS1XWT
Advertisement
Table of Contents

Related Manuals for Midea MAP08S1XWT


Summary of Contents for Midea MAP08S1XWT
- Page 1 PORTABLE AIR CONDITIONER USER MANUAL MAP08S1XWT Download the app MAP10S1XWT & activate product MAP10HS1XWT Before using this product, please read this manual carefully and keep it for future reference. The design and specifications are subject to change without prior notice for product improvement. Consult...
-
Page 2: Table Of Contents
THANK YOU LETTER Thank you for choosing Midea! Before using your new Midea product, please read this manual thoroughly to ensure that you know how to operate the CONTENTS THANK YOU LETTER.........................2 SAFETY PRECAUTIONS......................3 BEFORE YOU GET STARTED....................8 INSTALLATION INSTRUCTIONS..................10 OPERATING INSTRUCTIONS....................18... -
Page 3: Safety Precautions
SAFETY PRECAUTIONS Must Read the Warning Message Read Safety Precautions Before Operation and Installation. To prevent property damage, injury or death to user or other people, the instructions in this manual must be followed. Incorrect operation due to ignoring of instructions may cause damage, harm, or death. - Page 4 WARNING • The unit must be kept free from obstruction to ensure proper function and to mitigate safety hazards. • Do not modify the length of the power cord or use an extension cord to power the unit. • Do not share a single outlet with other electrical appliances. Improper power supply can cause fire or electrical shock.
- Page 5 CAUTION • Do not operate or stop the unit by inserting or pulling out the power cord plug. • Do not use hazardous chemicals to clean or come into contact with the unit. Do not use the unit in the presence of inflammable substances or vapour such as alcohol, insecticides, petrol, etc.
- Page 6 FOR R32 REFRIGERANT MODEL IMPORTANT NOTE: Read this manual CAUTION: carefully before installing or operating Risk of fire your new appliance. Make sure to save flammable materials this manual for future reference. Explanation of symbols displayed on the unit CAUTION This symbol shows that the operation manual should be read carefully.
- Page 7 WARNING • Any person who is involved with working on or breaking into a refrigerant circuit should hold a current valid certificate from an industry-accredited assessment authority, which authorizes their competence to handle refrigerants safely in accordance with an industry recognized assessment specification. Examples for such working procedures are: •...
-
Page 8: Before You Get Started
BEFORE YOU GET STARTED Preparations Before Installation The installation We recommend Installing We’re here if n u a must be carried doing this with your AC you need us, out in strict a helper. should take please contact accordance with about 1-866-646-4332 the instructions... - Page 9 What Should I Look For First When Purchasing A Portable Air Conditioner? The right air conditioner helps you cool a room e ciently. An undersized unit won’t cool adequately while one that’s too large will not remove enough humidity, leaving the air feeling damp.
-
Page 10: Installation Instructions
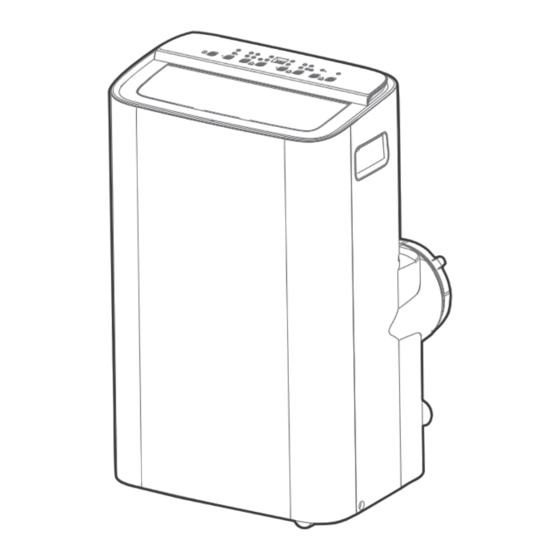
INSTALLATION INSTRUCTIONS Product Installation Location Your Installation Location Should Meet The Following Requirements: • Make sure that you install your unit on an even surface to minimize noise and vibration. • The unit must be installed near a grounded plug, and the Collection Tray Drain (found on the back of the unit) must be accessible. - Page 11 Product Overview NOTICE All the illustrations in the manual are for explanation purpose only. Your machine may be slightly di erent. The actual shape shall will remain the same. The unit can be controlled by the unit control panel alone or with the remote control. Control panel Upper air filter (behind the grille)
- Page 12 Installation Overview Installation Completion Display 1. Window Slider 2. Extended Exhaust Hose 3. Portable Air Conditioner 4. Security Bracket and 2 Screws NOTICE Illustrations in this manual are for explanatory purposes. The actual shape of your indoor unit may be slightly di erent.
- Page 13 Installation Accessories Your Window Installation Kit fits windows 19.4”-62.2”(49.3-158.1cm) and can be shortened for smaller windows. NOTICE Items with (*) are on some models. Slight variations in design may occur. Unit Adaptor Air exhaust (1pc) passage (1 pc*) Foam Seal A Foam Seal B Foam Seal C (Adhesive) 4 pc(*)
- Page 14 Confirm Your Window Type (Window Type And Opening Size Of Different Types) Sliding Window Installation Hung Window Installation For Optimal Performance In Operation NOTICE To ensure proper function, DO NOT overextend or bend the hose. Make sure that there is no obstacle around the air outlet of the exhaust hose (in the range of 500mm) in order to ensure the exhaust system works properly.
- Page 15 Exhaust Hose And Adaptors Installation 1 - The Exhaust Hose Assembly Installation (Window Type): Press the exhaust hose (or extended Exhaust hose assembly exhaust hose) into the window slider Exhaust hose adaptor and unit adaptor. The pieces will clip together using the tabs on the adaptors.
- Page 16 NOTE: Once the exhaust hose assembly and adjustable window slider are prepared, choose one of the two installation methods based on your window type. Foam seal A Foam seal B (Adhesive type) (Adhesive type-shorter) Hung Window Installation 3. Complete sealing of window Cut the adhesive foam seal A and B strips to the proper lengths, and attach them to the window sash and frame as shown.
- Page 17 5. Sliding Window Installation Insert the window slider assembly into the window opening. Cut the non-adhesive foam seal C strip to match the height of the window. Insert the seal between the glass and the window frame to prevent air and insects from getting into the room.
-
Page 18: Operating Instructions
OPERATING INSTRUCTIONS Electronic Control Operating Instructions 1. POWER Button NOTICE Power switch on/o . The control is capable of displaying Used to initiate the Wireless function. For temperature in degrees Fahrenheit or the first time using the Wireless function, degrees Celsius. To convert from one press and hold the POWER button for 3 to the other, press and hold the Up and seconds to initiate the Wireless connection... - Page 19 The air conditioner will control room 6. SWING Mode temperature automatically around the Used to initiate the Auto swing feature. When the operation is ON, press the SWING button temperature point set by you. Under AUTO to stop the louver at the desired angle. mode, you can not select the fan speed.
- Page 20 Drainage Guide During dehumidifying mode, remove the upper drain plug from the back of the unit, install the drain connector (5/8” universal female mender) with 3/4” hose (not inlcuded). Remove the upper drain For the models without drain connector, just attach the plug drain hose to the hole.
-
Page 21: Cleaning & Maintenance
CLEANING & MAINTENANCE Air Filter & Cabinet Cleaning Clean the unit using a damp, lint-free cloth and mild detergent. Dry the unit with a dry, lint-free cloth. • Take the filter out along the arrow direction. • Wash the air filter by immersing it gently in warm water (about 40°C/104°F) with a neutral detergent. - Page 22 Store The Unit When Not In Use Step 2 Step 1 Step 3 HEAT hours C-SENSE *Drain the unit‘s water collection tray then reinstall the bottom *Please refer to the drain plug back in. actual plug, and the legend is for reference only. Step6 Step4 Step 5...
-
Page 23: Troubleshooting Tips
TROUBLESHOOTING TIPS Common Issues The following problems are not a malfunction and in most situations will not require repairs. Proble Solution Unit does not P1 Protection Code. The water collection tray is full. turn on when Turn off the unit, drain the water from pressing the Water Collection Tray and restart ON/OFF button... -
Page 24: Remote Control And App Instructions
REMOTE CONTROL AND APP INSTRUCTIONS Handling the Remote Control Location of the remote control Use the remote controller within a distance of 26.2 ft (8 meters) from the air conditioner, pointing it towards the receiver. Reception is confirmed by a beep. CAUTION •... - Page 25 Buttons and Functions Before you begin using your new air conditioner, make sure to familiarize yourself with its remote control. The following is a brief introduction to the remote control itself. For instructions on how to operate your air conditioner, refer to the How to Use Basic Functions section of this manual.
- Page 26 Remote Screen Indicators Information are displayed when the remote controller is power up. Mode display COOL AUTO AUTO COOL HIGH Displayed when data transmitted. Displayed when remote controller is ON. Displayed when TIMER ON time is set Displayed when TIMER OFF time is set Shows set temperature or room temperature, or time under TIMER setting Indicated all the current settings are...
- Page 27 How to Use Basic Functions ATTENTION Before operation, please ensure the unit is plugged in and power is available. AUTO Mode 1. Select AUTO mode MODE 2. Set your desired temperature 3. Turn on the air conditioner NOTE: ON/OFF 1. In AUTO mode, the unit will automatically select the COOL, or FAN function based on the set temperature.
- Page 28 Setting the TIMER TIMER ON/OFF - Set the amount of time after which the unit will automatically turn on/off. TIMER ON setting 1. Press TIMER ON button to initiate the ON time sequence. TIMER ON 2. Press Temp. up or down button for for multiple times to set the desired time to turn on the unit.
- Page 29 How to Use Advanced Functions Swing function(some units) Press Swing button The horizontal louver will swing up and down SWING automatically when pressing Swing button. Press again to make it stop. Keep pressing this button more than 2 seconds, the SWING vertical louver swing function is activated.
- Page 30 300 Kimball Dr Parsippany NJ 07054 Telephone number or internet contact information: Midea.com/us FCC Compliance Statement ( products subject to Part 15) This device complies with Part 15 of the FCC Rules. Operation is subject to the following two conditions: (1) This device may not cause harmful interference, and (2) this device must accept any interference received, including interference that may cause undesired operation.
- Page 31 OS may or may not be supported until a new version is released. Your specific mobile phone or problems in your network may prevent the system from working and Midea will not be responsible for any problems that could be caused by incompatibility or network issues.
- Page 32 How to use SmartHome App Ensure that your mobile phone is connected to the wireless network. Bluetooth must be turned on. The device must also be powered up. Step 1: Download the SmartHome app Scan the QR code below to download the SmartHome app from app store or search for it directly on the Google Play Store or Apple's App Store.
- Page 33 Step 3: Connecting the device 1) When you log in, you may see the message "Smart devices discovered nearby". Tap to add your device. 2) If no such message appears, proceed as follows: Tap on "+" and select your device in the list of nearby available devices.
- Page 34 3) Follow the steps in the app to connect your device to the wireless network. If your device fails to connect, follow the additional instructions in the app. Add device Add device For Window AC For Portable AC Step 4: Controlling the device After pairing successfully, a card will be created for the device in the SmartHome app.
- Page 35 How to use Matter Matter is a connectivity technology that unifies the smart home by allowing devices and ecosystems (such as Alexa, Google Home and Apple Home) to speak the same language thus creating exciting new features and use cases. To use Matter, you will need at least one Matter enabled smart speaker from Amazon, Google or Apple, and it's respective app.
- Page 36 Step 2: Turn on Bluetooth Turn on Bluetooth on your mobile device. Settings Bluetooth Bluetooth Step 3: Enter AP mode Window AC: Hold down the CONNECT / Power button for 3 seconds to begin the pairing process (“AP” will appear on the AC’s display). Portable AC: Hold down the SWING / Power button for 3 seconds to begin the pairing process (“AP”...
- Page 37 Step 4: Open app Open the Alexa, Google Home, Apple Home app on your mobile device. Apple Home Google Home Alexa Step 5: Scan matter QR code Tap the “+” and “Add Device/Accessory” or tap "+Add" in your app and then select Matter device and scan the Matter QR code found on the side of the AC device.
- Page 38 Step 6: Control device After pairing is successful, you can control your AC’s temperature and mode settings, etc. through the respective ecosystem app and smart speaker. Due to a compatibility issue, the temperature value shown in the Alexa, Google Home or Apple Home app may be 1 degree di erent from that displayed on the air conditioner.
- Page 39 App & Smart Speakers can support Matter only when using these versions or above. Device Version iPhone iOS 16.5 Apple Home 16.5 Google Play services min version: 22.36.15 Android Google Home app (GHA) min version: 2.58.24.1-dogfood Google Google Hub firmware min version: 1.56.324896 Home Hub (appears on hub as Chromecast firmware version) Alexa App...
- Page 40 Declaration of conformity FCC ID: 2ADQOMDNA23 IC: 12575A-MDNA23 This device complies with Part 15 of the FCC Rules and Industry Canada’s licenceexempt RSSs. Operation is subject to the following two conditions: (1) This device may not cause interference;and (2) This device must accept any interference,including interference that may cause undesired operation of the device.
-
Page 41: Warranty
Installation and Operating Instructions. 2) Damages caused by serviced performed by persons other than those authorized by Midea customer service; or external causes such as abuse, misuse, inadequate power supply or acts of God. - Page 44 CP001UI-PX 16120600A27479 20231226...
Need help?
Do you have a question about the MAP08S1XWT and is the answer not in the manual?
Questions and answers