Table of Contents
Advertisement
Available languages
Available languages
Quick Links
1
重点
项目
校对项
库
文件名
A
1.物料编码
2.版面尺寸
3.材质标注
B
4.颜色标注
5.客户型号
6.产品名称
C
7.产品参数
8.电压功率
D
9.单位符号
10.认证标志
11.回型标志
E
12.ROHS标志
13.警语警语
及字高
F
1.文字图案印刷颜色为:
2.该说明书的幅面大小为:
3.该说明书的装订方式为: 钉装
14.控制面板
4.说明书警语及认证标志应满足CE/UL标准,CE:警语部分大写字母高度不低于3mm,CE标志不低于5mm,WEEE标志不低于7mm;
及功能
UL:大写字母字高不小于1/12"(2.11mm),小写字母字高不小于1/16"(1.6mm),"IMPORTANT SAFEGUARDS","SAVE
THESE INSTRUCTIONS"等词,其字高不小于3/16"(4.8mm),IMPORTANT SAFEGUARDS 必须在最前面。
5.产品应符合QMG-J53.021《产品说明书技术条件》的有关要求。
15.目录及
6.有ROHS指令要求的物料应符合美的企业标准QML-J11.006《产品中限制使用有害物质的技术标准》。
页码
G
标 记 处数 更改文件号
H
制 图
设 计
校 对
会 签
1
2
黑色
,印刷字体需清晰可见,文字不能粘到一起;
A4
签 字 日 期
邱献硼
审 核
卢灿飞
--- --
标准化
古广君
古广君
-----
审 定
2024108
日 期
--- --
2
3
技术要求(版本号:B,2020-01)
,未注直线尺寸公差应符合GB/T1804-v;
70P以下为钉装,70P以上为胶装(特殊要求除外)
;[
多头灶
说明书
K
1
3
4
5
]
16166000A32032
MIDEA MC-6T5201R216
MCH520T239K0-0502
材料:双胶纸 100克
1:1
广东美的生活电器制造有限公司
1
4
5
6
A
B
C
D
E
F
G
H
6
Advertisement
Chapters
Table of Contents

Subscribe to Our Youtube Channel
Related Manuals for Midea MCH520T239K0


Summary of Contents for Midea MCH520T239K0
- Page 1 70P以下为钉装,70P以上为胶装(特殊要求除外) 3.该说明书的装订方式为: 钉装 14.控制面板 4.说明书警语及认证标志应满足CE/UL标准,CE:警语部分大写字母高度不低于3mm,CE标志不低于5mm,WEEE标志不低于7mm; 及功能 UL:大写字母字高不小于1/12”(2.11mm),小写字母字高不小于1/16”(1.6mm),“IMPORTANT SAFEGUARDS”,“SAVE THESE INSTRUCTIONS”等词,其字高不小于3/16”(4.8mm),IMPORTANT SAFEGUARDS 必须在最前面。 5.产品应符合QMG-J53.021《产品说明书技术条件》的有关要求。 15.目录及 6.有ROHS指令要求的物料应符合美的企业标准QML-J11.006《产品中限制使用有害物质的技术标准》。 页码 16166000A32032 MIDEA MC-6T5201R216 多头灶 MCH520T239K0-0502 说明书 材料:双胶纸 100克 标 记 处数 更改文件号 签 字 日 期 制 图 邱献硼 审 核 卢灿飞 设 计...
- Page 2 CERAMIC HOB USER MANUAL MCH520T239K0 Warning notices: Before using this product, please read this manual carefully and keep it for future reference. The design and specifications are subject to change without prior notice for product improvement. Consult with your dealer or manufacturer for details.
-
Page 4: Table Of Contents
THANK YOU LETTER Thank you for choosing Midea! Before using your new Midea product, please read this manual thoroughly to ensure that you know how to operate the features and functions that your new appliance o ers in a safe way. -
Page 5: Safety Instructions
SAFETY INSTRUCTIONS Intended Use The following safety guidelines are intended to prevent unforeseen risks or damage from unsafe or incorrect operation of the appliance. Please check the packaging and appliance on arrival to make sure everything is intact to ensure safe operation. If you find any damage, please contact the retailer or dealer. - Page 6 SAFETY WARNINGS Your safety is important to us. Please read this information before using your cooktop. INSTALLATION Electrical Shock Hazard • Disconnect the appliance from the mains electricity supply before carrying out any work or maintenance on it. • Connection to a good earth wiring system is essential and mandatory. •...
- Page 7 • If the supply cord is damaged, it must be replaced by the manufacturer, its service agent or similarly qualified persons in order to avoid a hazard. • WARNING: If the surface is cracked, switch o the appliance to avoid the possibility of electric shock, for hob surfaces of glass-ceramic or similar material which protect live parts.
- Page 8 • Do not let your body, clothing or any item other than suitable cookware contact the Induction glass until the surface is cool. • Keep children away. • Handles of saucepans may be hot to touch. Check saucepan handles do not overhang other cooking zones that are on.
- Page 9 • Do not use pans with jagged edges or drag pans across the Induction glass surface as this can scratch the glass. • Do not use scourers or any other harsh abrasive cleaning agents to clean your cooktop, as these can scratch the Induction glass. •...
-
Page 10: Specifications
SPECIFICATIONS Cooking Hob MCH520T239K0 Cooking Zones 3 Zones Supply Voltage 220-240V~ 50Hz or 60Hz Installed Electric Power 4700-5700W Product Size L×W×H(mm) 590X520X51 Building-in Dimensions A×B (mm) 560X480 Weight and Dimensions are approximate. Because we continually strive to improve our products we... -
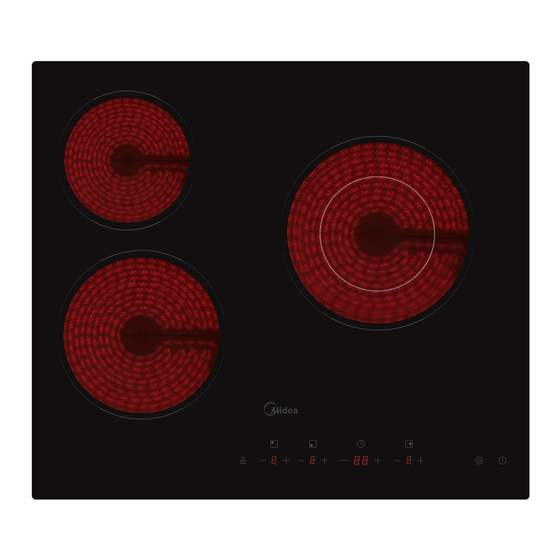
Page 11: Product Overview
PRODUCT OVERVIEW Top View Max. 1200 W zone Max. 1000 / 2200 W zone Max. 1800 W zone Glass plate Control panel Control Panel Keylock Power Power Timer regulating Power Dual ON/OFF control regulating regulating controls regulating zone control controls controls controls control... - Page 12 Product Information The microcomputer ceramic cooker hob can meet di erent kinds of cuisine demands because of resistance wire heating, micro-computerized control and multi-power selection, really the optimal choice for modern families. The ceramic cooker hob centers on customers and adopts personalized design. The hob has safe and reliable performances, making your life comfortable and enabling to fully enjoy the pleasure from life.
-
Page 13: Quick Start Guide 1
QUICK START GUIDE Take care when frying as the oil and fat heat up very quickly, particularly if you’re using PowerBoost. At extremely high temperatures oil and fat will ignite spontaneously and this presents a serious fire risk. Cooking Tips •... - Page 14 Heat Settings The settings below are guidelines only. The exact setting will depend on several factors, including your cookware and the amount you are cooking. Experiment with the Ceramic hob to find the settings that best suit you. Heat setting Suitability •...
-
Page 15: Product Installation 1
PRODUCT INSTALLATION Selection of Installation Equipment Cut out the work surface according to the sizes shown in the drawing. For the purpose of installation and use, a minimum of 5 cm space shall be preserved around the hole. Be sure the thickness of the work surface is at least 30mm. Please select heat-resistant and insulated work surface material (Wood and similar fibrous or hygroscopic material shall not be used as work surface material unless impregnated) to avoid the electrical shock and larger deformation caused by the heat radiation from the hotplate. - Page 16 WARNING: Ensuring Adequate Ventilation Make sure the ceramic hob is well ventilated and that air inlet and outlet are not blocked. In order to avoid accidental touch with the overheating bottom of the hob, or getting unexpectable electric shock during working, it is necessary to put a wooden insert, fixed by screws, at a minimum distance of 25mm from the bottom of the hob.
- Page 17 Adjust the bracket position to suit for di erent work surface’s thickness. Under any circumstances, the brackets cannot touch with the inner surfaces of the worktop after installation (see picture). CAUTIONS 1. The ceramic cooker hob must be installed by qualified personnel or technicians. We have professionals at your service.
- Page 18 Connecting the Hob to the Mains Power Supply The power supply should be connected in compliance with the relevant standard, or a single-pole circuit breaker. The method of connection is shown below. 1. If the cable is damaged or needs replacing, this should be done by an after-sales technician using the proper tools, so as to avoid any accidents.
-
Page 19: Operation Instructions 1
OPERATION INSTRUCTIONS Touch Controls • The controls respond to touch, so you don’t need to apply any pressure. • Use the ball of your finger, not its tip. • You will hear a beep each time a touch is registered. •... - Page 20 How to Use 1. Start Cooking After power on, the buzzer beeps once, all the indicators light up for 1 second then go out, indicating that the ceramic hob has entered the stat of standby mode. 1. Touch the ON/OFF control.
- Page 21 Beware of hot Surfaces “H” will show which cooking zone is hot to touch. It will disappear when the surface has cooled down to a safe temperature. It can also be used as an energy saving function if you want to heat further pans, use the hotplate that is still hot.
- Page 22 4. Locking the Controls • You can lock the controls to prevent unintended use (for example children accidentally turning the cooking zones on). • When the controls are locked, all the controls except the ON/OFF control are disabled. To lock the controls Touch the lock control The timer indicator will show...
- Page 23 4. When the time is set, it will begin to count 5. Buzzer will beep for 30 seconds and the down immediately. The display will show the timer indicator shows “- -” when the setting remaining time and the timer indicator will time finished.
- Page 24 NOTE a) The red dot next to power level indicator will illuminate indicating that zone is selected. b) If you want to change the time after the timer is set, you have to start from step 1. Setting the Timer to Turn one Cooking Zone O Set one zone 1.
- Page 25 NOTE a) The red dot next to power level indicator will illuminate indicating that zone is selected. b) If you want to change the time after the timer is set, you have to start from step 1. 6. Over-Temperature Protection A temperature sensor equipped can monitor the temperature inside the ceramic hob.
-
Page 26: Cleaning And Maintenance
CLEANING AND MAINTENANCE What? How? Important! • When the power to the cooktop is switched o , there will be no ‘hot 1. Switch the power to the cooktop o . surface’ indication but the cooking zone Everyday soiling on 2. -
Page 27: Troubleshooting
TROUBLESHOOTING Operation of your appliance can lead to errors and malfunctions. The following tables contain possible causes and notes for resolving an error message or malfunction. It is recommended to read the tables carefully below in order to save your time and money that may cost for calling to the service center. Problem Possible causes What to do... - Page 28 1. The hob is equipped with a self diagnostic function. With this test the technician is able to check the function of several components without disassembling or dismounting the hob from the working surface. 2. Failure code occur during customer using & Solution; Failure code Problem Solution...
-
Page 29: Trademarks, Copyrights And Legal Statement
Midea Group and/or its a liates (“Midea”), to which Midea owns trademarks, copyrights and other intellectual property rights, and all goodwill derived from using any part of an Midea trademark. Use of Midea trademark for commercial purposes without the prior written consent of Midea may constitute trademark infringement or unfair competition in violation of relevant laws. -
Page 30: Disposal And Recycling
DISPOSAL AND RECYCLING Important instructions for environment Compliance with the WEEE Directive and Disposing of the Waster Product: This product complies with EU WEEE Directive (2012/19/EU). This product bears a classification symbol for waster electrical and electronic equipment (WEEE). This symbol indicates that this product shall not be disposed with other household wastes at the end of its service life. -
Page 31: Data Protection Notice
European Economic Area. Further information are provided on request. You can contact our Data Protection O cer via MideaDPO@midea.com. To exercise your rights such as right to object your personal date being processed for direct marketing purposes, please contact us via MideaDPO@midea.com. - Page 32 PLACA DE VITROCERÁMICA MANUAL DE INSTRUCCIONES MCH520T239K0 Advertencia: Antes de utilizar este producto, lea atentamente este manual y consérvelo para futuras consultas. El diseño y las especificaciones están sujetos a cambios sin previo aviso con el fin de mejorar el producto.
- Page 33 AGRADECIMIENTOS ¡Gracias por elegir Midea! Antes de utilizar su nuevo dispositivo Midea, lea atentamente este manual para asegurarse de que sabe cómo manejar las características y funciones que le ofrece su nuevo electrodoméstico de forma segura. CONTENIDO AGRADECIMIENTOS INSTRUCCIONES DE SEGURIDAD ESPECIFICACIONES DESCRIPCIÓN DEL PRODUCTO...
-
Page 34: Instrucciones De Seguridad
INSTRUCCIONES DE SEGURIDAD Uso Adecuado Las siguientes directrices de seguridad tienen por objeto evitar riesgos imprevistos o daños derivados de un funcionamiento inseguro o incorrecto del dispositivo. Compruebe el embalaje y el aparato a su llegada para asegurarse de que todo está intacto para garantizar un funcionamiento seguro. Si encuentra algún daño, póngase en contacto con el vendedor o distribuidor. - Page 35 ADVERTENCIAS DE SEGURIDAD Nos preocupa su seguridad. Por tanto, le rogamos que lea esta información antes de usar su hornilla. INSTALACIÓN Riesgo de descarga eléctrica • Antes de realizar cualquier trabajo o mantenimiento, desconecte el aparato de la red de suministro eléctrico. •...
- Page 36 • No se debe permitir a ningún niño que juegue con el aparato. Ningún niño deberá realizar limpieza o mantenimiento del aparato sin la debida supervisión. • Si el cable proporcionado está dañado, debe ser remplazado por el fabricante, servicio técnico o personal calificado similar para evitar posibles peligros.
- Page 37 • No obstante, aquellas personas con marcapasos u otros implantes eléctricos (tales como las bombas de insulina) deberán consultar con su médico o bien con el fabricante de dicho implante antes de utilizar este equipo a fin de asegurarse de que sus implantes no se vean afectados por el campo electromagnético.
- Page 38 • No guarde artículos de interés para niños en algún armario colocado encima del equipo. Si algún niño se subiera a la hornilla, podría resultar seriamente lesionado. • Mientras el equipo esté en uso, no deje que queden niños solos o sin supervisión en sus alrededores.
-
Page 39: Especificaciones
ESPECIFICACIONES Placa decocina MCH520T239K0 3 Zonas Zonas de cocción 220-240V~ 50Hz o 60Hz Voltaje de alimentación Potencia eléctrica instalada 4700-5700W Tamaño del producto L×A×A (mm) 590X520X51 Dimensiones de montaje A×B (mm) 560X480 El peso y las dimensiones son aproximados. Debido a que nos esforzamos continuamente para mejorar... -
Page 40: Descripción Del Producto
DESCRIPCIÓN DEL PRODUCTO Vista superior Zona Máx. 1200 W Zona Máx. 1000 / 2200 W Zona Máx. 1800 W Placa de vidrio Panel de control Panel de control Control de Controles Controles Controles de Controles de Control Encendido/ bloqueo de de regu- de regu- regulación del... - Page 41 Información del producto La placa de vitrocerámica con microordenador puede satisfacer diferentes tipos de demandas culinarias gracias al calentamiento por resistencia de alambre, el control microordenado y la selección de potencia múltiple, lo que la convierte en la mejor opción para las familias modernas. La placa de cocción de cerámica se centra en los clientes y adopta un diseño personalizado.
-
Page 42: Guía De Inicio Rápido 1
GUÍA DE INICIO RÁPIDO Tenga cuidado al freír dado que el aceite y la grasa cobran temperatura muy rápidamente, especialmente emplea PowerBoost. A temperaturas extremadamente altas, el aceite y la grasa pueden cobrar fuego de manera inesperada, lo cual representa un serio riesgo de incendio. Consejos para la cocción •... - Page 43 Ajustes de temperatura Los ajustes que aparecen a continuación son descritos exclusivamente a modo de lineamiento. El ajuste exacto dependerá de varios factores, tales como sus utensilios de cocina y la cantidad de comida que usted esté cocinando. Experimente con su hornilla de inducción hasta hallar los ajustes que le resulten más útiles.
-
Page 44: Instalación Del Producto 1
INSTALACIÓN DEL PRODUCTO Selección del equipamiento de instalación • Recorte la superficie de trabajo según los tamaños que se muestran en eldibujo. Para la instalación y el uso, se debe mantener un espacio mínimo de 5 cm alrededor del orificio. Asegúrese de que el espesor de la superficie de trabajo sea de por lo menos 30 mm. - Page 45 ADVERTENCIA: garanti cela ventilación adecuada Asegúrese siempre de que la hornillade inducción cuente con una buena ventilación y de que tanto la entrada como lasalidade aire nunca quedenobstruidas. A findeevitarcualquier contacto accidental con el fondo de la hornilla cuando el mismoesté muy caliente, así como cualquierdescargaeléctrica ines- perada durante su operación, es necesario colocar una basede madera, sujetada por tornillos, a una distancia mínimade 25 mm desde la parte inferior de la hornilla.
- Page 46 Ajuste la posición del soporte para adaptarla a diferentes espesores de la superficie de trabajo. HORNILLA HORNILLA MESA MESA SOPORTE SOPORTE Bajo ninguna circunstancia podrán los soportes entrar en contacto con las superficies internas de la hornilla tras la instalación (vea la ilustración). AVISOS 1.
- Page 47 Conexión dela hornilla con la red de suministro eléctrico La fuente de alimentación debe conectarse de conformidad con la norma pertinente, o un disyun- tor unipolar. A continuación se muestra el método de conexión. • Si el cable está dañado o requiere de su reemplazo, dicha operación deberá ser realizada por un agente de posventa que cuente con herramientas dedicadas a fin de evitar posibles accidentes.
-
Page 48: Instrucciones De Operación 1
INSTRUCCIONES DE OPERACIÓN Controles táctiles • Los controles responden al tacto, por lo tanto no es necesario ejercer ninguna presión sobre ellos. • Utilice la yema y no la punta del dedo. • Cada vez que se registre un toque, usted oirá un pitido. •... - Page 49 Cómo usar 1. Iniciar cocción Tras el encendido, el zumbador emitirá un pitido, todos los indicadores se iluminarán durante 1 segundo y luego se apagarán, lo que indicará que la placa de vitrocerámica ha entrado en la modalidad de espera. 1.
- Page 50 Cuidado con las superficies calientes La letra "H" indicará qué zona de cocción está caliente al tacto. Desaparecerá cuando la superficie se haya enfriado a una temperatura segura. También se puede utilizar como una función de ahorro de energía si desea calentar más sartenes, utilice la placa de cocción que todavía está caliente. 3.
- Page 51 4. Bloqueo de controles • Es posible bloquear los controles a fin de evitar cualquier uso involuntario (por ejemplo, por niños que enciendan las zonas de cocción por accidente). • Cuando los controles estén bloqueados, todos los controles quedarán desactivados, excepto por el control ON/OFF.
- Page 52 4. Una vez ajustado el tiempo, comenzará inmedi- 5. El zumbador emitirá un pitido durante 30 atamente la cuenta atrás. La pantalla mostrará segundos y el indicador del temporizador el tiempo restante y el indicador del temporiza- mostrará "- -" cuando finalice el tiempo de dor parpadeará...
- Page 53 NOTA a) El punto rojo junto al indicador de nivel de potencia se iluminará indicando que la zona está seleccionada. b) Si desea cambiar la hora después de ajustar el temporizador, tiene que empezar desde el paso 1. Ajuste del temporizador para apagar una zona de cocción Seleccione una zona 1.
- Page 54 NOTA a) El punto rojo junto al indicador de nivel de potencia se iluminará indicando que la zona está seleccionada. b) Si desea cambiar la hora después de ajustar el temporizador, tiene que empezar desde el paso 1. 6. Protección contra sobrecalentamiento Un sensor de temperatura equipado puede controlar la temperatura en el interior de la placa vitrocerámica.
-
Page 55: Cuidado Y Limpieza
CUIDADO Y LIMPIEZA ¿Qué? ¿Cómo? ¡Importante! • Cuando se desconecte la hornilla de la Toda suciedad 1. Apague y desconecte la hornilla de la electricidad, no recibirá ninguna depositada a diario electricidad. indicación de "superficie caliente" ¡aun sobre el vidrio 2. -
Page 56: Solución De Problemas
SOLUCIÓN DE PROBLEMAS El funcionamiento de su aparato puede dar lugar a errores y averías. Las siguientes tablas contienen las posibles causas y notas para resolver un mensaje de error o mal funcionamiento. Se recomienda leer atentamente las tablas siguientes para ahorrar el tiempo y el dinero que puede costar llamar al centro de servicio. - Page 57 1. La hornilla de inducción viene equipada con una funcionalidad de autodiagnóstico. Gracias a esta prueba, el técnico es capaz de comprobar el funcionamiento de varios componentes sin desarmar ni desmontar la hornilla de la superficie de trabajo. 2. Código de fallo ocurrido durante la utilización del usuario y solución; Códigode error Problema Solución...
-
Page 58: Marcas, Derechos De Autor Ydeclaración Legal
Midea. El uso de la marca Midea con fines comerciales sin el consentimiento previo por escrito de Midea puede constituir una infracción de la marca o de la competencia desleal en violación de las leyes pertinentes. -
Page 59: Eliminación Y Reciclaje
ELIMINACIÓN Y RECICLAJE Instrucciones importantes Para La Protección Del Medio Ambiente Cumplimiento de la normativa RAEE y eliminación del producto de desecho: Este producto cumple con la normativa RAEE de la UE (2012/19/UE). Este producto lleva el símbolo de lasifi- cación de residuos de aparatos eléctricos y electrónicos (RAEE). -
Page 60: Aviso Sobre La Protección De Datos
Puede solicitar más información al respecto. Puede ponerse en contacto con nuestro encargado de la protección de datos a través de MideaDPO@midea.com. Para ejercer sus derechos, como el de oponerse al tratamiento de sus datos personales con fines de marketing directo, póngase en contacto...
Need help?
Do you have a question about the MCH520T239K0 and is the answer not in the manual?
Questions and answers