Table of Contents
Advertisement
FCC STATEMENT
This device complies with Part 15 of the FCC Rules. Operation is subject to the following
two conditions:
(1).
This device may not cause harmful interference, and
(2).
This device must accept any interference received, including interference that may
cause undesired operation.
Note:
This equipment has been tested and found to comply with the limits for Class B digital
devices, pursuant to Part 15 of the FCC rules. These limits are designed to provide
reasonable protection against harmful interference in a residential installation. This
equipment generates uses and can radiate radio frequency energy and, if not installed
and used in accordance with the instructions, may cause harmful interference to radio
communications.
However, there is no guarantee that interference will not occur in a particular installation.
If this equipment does cause harmful interference to radio or television reception, which
can be determined by turning the equipment off and on, the user is encouraged to try to
correct the interference by one or more of the following measures:
Reorient or relocate the receiving antenna
Increase the separation between the equipment and receiver
Connect the equipment into an outlet on a circuit different from that to which the
receiver is connected
Use of shielded cable is required to comply with Class B limits in Subpart B of Part 15 of
the FCC rules.
Do not make any changes or modifications to the equipment unless otherwise specified in
the manual. If such changes or modifications should be made, you could be required to
stop operation of the equipment.
Product Information
Product design and specifications are subject to change without notice. This includes
1.
primary product specifications, software, software drivers, and user's manual. This
User Manual is a general reference guide for the product.
The product and accessories that come with your camera may be different from those
2.
described in this manual. This is due to the fact that different retailers often specify
slightly different product inclusions and accessories to suit their market requirements,
customer demographics, and geographical preferences.
-1-
English
Advertisement
Table of Contents

Related Manuals for Genius G-SHOT P713 MP3


Summary of Contents for Genius G-SHOT P713 MP3
-
Page 1: Fcc Statement
Connect the equipment into an outlet on a circuit different from that to which the receiver is connected Use of shielded cable is required to comply with Class B limits in Subpart B of Part 15 of the FCC rules. -
Page 2: Safety Instructions
Contact your dealer for precise product definition and included accessories. The illustrations in this manual are for the purpose of explanation and may differ from the actual design of your camera. The manufacturer assumes no liability for any errors or discrepancies in this user manual. - Page 3 This might cause damage to the person’s eyesight. Do not subject the LCD monitor to impact. This might damage the glass on the screen or cause the internal fluid to leak. If the internal fluid enters your eyes or comes into contact with your body or clothes, rinse with fresh water.
-
Page 4: Notes On Battery Usage
The camera may feel warm after long period of continuous use. This is normal and not a malfunction. If the battery is not to be used for a long period of time, remove it from the camera to prevent leakage or corrosion. -
Page 5: Table Of Contents
IMAGE PLAYBACK 34-39 Inserting the Battery Single Image Playback Charging the Battery Magnifying Images Loading an SD Memory Card (Optional Viewing Nine Images At A Time Accessory) Viewing Video Clips Setting the Date and Time Automated Playback (Slide Show) Choosing the Language... - Page 6 CAMERA AS A CONNECTING THE PC CAMERA 51-53 CAMERADIRECTLY TO THE Step 1: Installing the PC camera Driver Step 2: Connecting the digital still Camera PRINTER FOR PRINTING to your computer IMAGES (PICTBRIGDE Step 3: Run your application software (i.e.
-
Page 7: Introduction
Your new stylish digital camera delivers high quality, 2560 x 1920 resolution images using a 5.0 Mega pixel CCD sensor. Using the 2.0" TFT color image LCD monitor, you can compose images and then examine them in detail. An auto-flash sensor automatically detects the shooting (lighting) conditions and determines whether the flash should be used. -
Page 8: Package Contents
Package contents Carefully unpack your package and make sure that you have the following items. In the event that any item is missing or if you find any mismatch or damage, promptly contact your dealer. Digital still camera USB cable User’s manual... -
Page 9: Components Guide
1. Strap eyelet 2. Lens cover 3. Shutter button 4. Flash 5. Lens 6. Microphone 7. Self-timer LED Rear view DC IN 5V terminal Focus switch Macro mode Normal mode USB terminal Tripod socket Battery/SD Card OK OK button Zoom button... -
Page 10: Led Indicators
Yes * (1) movies) Self-timer Blinking red The self-timer function is activated (Sec) ---- ---- Button event Yes * (1) (1) The camera sounds one beep. (Sec) The self-timer sounds 10 beeps for 10 seconds, 5 beeps for 5 seconds. -10-... -
Page 11: Scene Modes
English Scene Modes Select the scene mode suitable for the occasion or situation. Mode Description Select this option to leave all the adjustments to the [ A ] Auto mode camera and take images casually. Select this option to capture fast-moving subjects. -
Page 12: Lcd Monitor Icons
English LCD Monitor Icons These indicators are displayed when recording still images: Scene mode ] Auto mode ] Sports mode ] Night Scene mode ] Portrait mode ] Landscape mode ] Backlight mode Image quality ] Virtually no battery power... - Page 13 [ ] Fill flash (on) [ ] Flash off ] Automatic flash ] Red-eye reduction 12. [ ] Self-timer mode 13. [ ] Macro mode icon 14. White balance [ No icon] Auto ] Daylight ] Cloudy ] Tungsten ] Fluorescent 15.
- Page 14 English These indicators are displayed when playing images back: Playback mode ] Card indicator Battery level ] Full battery level ] Fairly consumed ] Nearly exhausted ] Virtually no battery power ] Protect indicator ]DPOF icon These indicators are displayed when recording video clips:...
- Page 15 English These indicators are displayed when playing video clips back: Playback mode Battery level ] Full battery level ] Fairly consumed ] Nearly exhausted ] Virtually no battery power ] Card indicator Index number of total number Movie mode Elapsed time...
-
Page 16: Preparing Your Camera
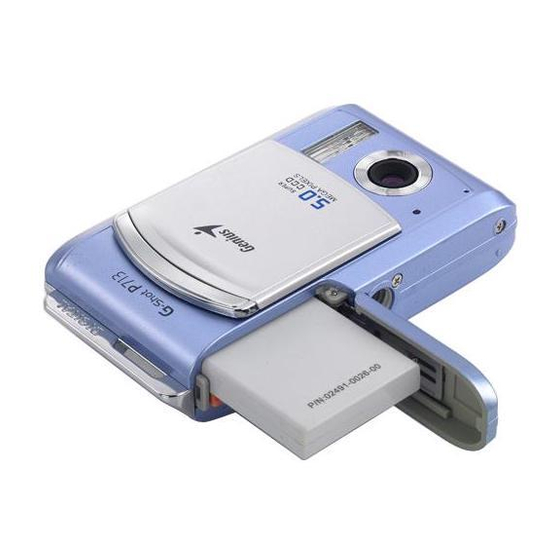
Installing the Battery We highly recommend you to use the specified rechargeable lithium-ion battery to realize the full capability of your digital still camera. Make sure that the power of the digital still camera is off before inserting or removing the battery. -
Page 17: Charging The Battery
If you open the battery cover without removing the battery, the power will not be terminated. If you remove the battery, you have to insert the battery again in a period of 2 hours in order to make sure that the date and time will not be reset. -
Page 18: Inserting And Removing An Sd Memory Card
(on the side of the SD memory card) to "LOCK". To save, edit, or delete data on an SD memory card, you must unlock the card. Be sure to format the memory card with this camera before its initial usage. -
Page 19: Setting The Date And Time
English To prevent valuable data from being accidentally erased from an SD card, you can slide the write protect tab (on the side of the SD memory card) to “LOCK”. To save, edit, or erase data on an SD memory card, you must unlock the card. -
Page 20: Attaching The Camera Strap
English NOTE The language setting will be retained even if the camera is turned off. Attaching the Camera Strap To prevent accidental slippage during the use, always use the camera strap. Attach the camera strap as follows: Thread the small loop of the strap through the strap eyelet on the camera. -
Page 21: Using The Lcd Monitor
English Using the LCD Monitor Using the LCD monitor can help you to confirm an image while taking pictures, to replay recorded images/video clips or to adjust menu settings. The mode icons, text and numbers that are displayed on the LCD monitor may vary according to the current settings. -
Page 22: Adjusting The Zoom
Press the shutter button to capture a “zoomed” image. NOTE You can only set the digital zoom at the resolution of 2560 x 1920 pixels; digital zoom is not available at the resolution of 3072 x 2304 pixels, 2048 x 1536 pixels, 1280 x 960 pixels or 640 x 480 pixels. - Page 23 Compose your image and press the shutter button. The camera has four flash modes: Fill flash (on), Flash off, Automatic flash and Red-eye reduction. The table below will help to choose the appropriate flash mode: Flash mode Description The flash will always fire regardless of the surrounding brightness.
-
Page 24: Using The Self-Timer
By using the [ ] self-timer you can join in the screen when taking group shots. According to your preferences you can take pictures with the self-timer in any scene mode (Auto/Sports/Night Scene/Portrait/Landscape/Backlight). Self-timer duration can be set as 10 seconds or 5 seconds. Self-timer mode appears... -
Page 25: Using The Macro Mode
] Macro mode, EV compensation, Scene mode and ISO speed cannot be set. In [ ] Macro mode, Flash mode is automatically set to [ ] Flash off. After a macro shot is taken DO NOT FORGET to reset the lens to the [ ] Normal position. -25-... -
Page 26: Setting The Image Resolution And Quality
These settings affect the number of images that can be stored in memory, or on an SD memory card. As you get to know the camera, it is recommended that you try each quality and resolution setting to get an appreciation for the effects that these settings will have on your images. -
Page 27: Number Of Recordable Images
SD memory card at the camera’s image quality and size settings. The number of recordable images may vary depending on the recorded subject and the capacity of the memory card, or if there are files other than images, or when the recording is made while switching the picture quality/resolution. -
Page 28: Selecting Photography Mode
SELECTING PHOTOGRAPHY MODE Auto Mode Using [ A ] Auto mode the majority of the settings are adjusted by the camera. Simply point the subject and then shoot. Press the MENU button to enter the [Capture] menu and select [Scene] by using the button. -
Page 29: Sports Mode
In [ ] Sports mode, ISO speed cannot be set. In [ ] Sports mode, Flash mode is automatically set to [ ] Flash off. For other settings like Language, Power Off time or others, choose [Setup] in Capture/Video/Playback menu. -29-... -
Page 30: Night Scene Mode
The people in an evening sky or night scene are illuminated with lights from the flash while the background is captured at a slow shutter speed to prevent blurring and let the both (people and the background) appear according to the exposure. -
Page 31: Portrait Mode
In [ ] Portrait mode, ISO speed cannot be set. In [ ] Portrait mode, in a dark or nighttime background, Flash mode defaults to [ Red-eye reduction. For other settings like Language, Power Off time or others, choose [Setup] in Capture/Video/Playback menu. -
Page 32: Landscape Mode
] Landscape mode helps you to capture vivid and expansive landscape pictures with the enhancement of the image’s color and saturation. ] Landscape mode is used when the distance to the subject is between 1.0m to infinity. Press the MENU button to enter the... -
Page 33: Backlight Mode
Use [ ] Backlight mode when light is coming from behind your subject, throwing their features into a shadow, or when your subject is in the shade but the background is brightly lit. Press the MENU button to enter the... -
Page 34: Movie Mode
] Playback mode, you can view, magnify your images or play video clips back. This mode even provides thumbnail images display and slide show, allowing you to quickly search for the image that you want or play the images back one by one automatically. -
Page 35: Magnifying Images
] print indicator only appears on the LCD monitor when the image is set to print out. If there is no image stored in the internal memory or on the memory card, [No Image] message will appear on the LCD monitor. -
Page 36: Viewing Nine Images At A Time
To return to the regular display from 4X-enlarged status, press the OK button. NOTE Each press of the OK button, the modes switch cyclically: 1X 2X 3X 4X 1X. Viewing Nine Images At A Time This function allows you to view nine thumbnail images on the LCD monitor simultaneously so that you can quickly scan for a particular image. -
Page 37: Viewing Video Clips
Automated Playback (Slide Show) Slide show function enables you to play your images back automatically in sequential order as a slide show. This is a very useful and entertaining feature for reviewing recorded images and for presentations. 1. Press the MODE button twice to enter [ ] Playback mode. -
Page 38: Protecting Images
To stop the slide-show display, press the OK button. NOTE To not set automated playback (slide show) you may press the MENU button to exit. Protecting Images This feature allows you to prevent recorded images from being accidentally erased. Press the MODE button twice to enter [ ] Playback mode. -
Page 39: Deleting Images
English [Single]: Protect one image at one time [All]: Protect all images at once Select [ Unlock ] or [ Lock ] by using the button. [Unlock]: Unlock the protected image. [Lock]: Protect the selected image or all images. Press the OK button again to confirm the setting. -
Page 40: Deleting All Images/Video Clips
English 5. Use the button to select [Execute] and press the OK button to confirm the deletion. To cancel the action, select [Cancel]. 6. Continue the deletion if necessary. If all images are deleted, [No Image] will pop up. To exit the deletion, press the MODE button again. -
Page 41: Formatting An Sd Memory Card Or Internal Memory
Protected images cannot be deleted with the delete function. If SD memory card is inserted, images and video clips recorded on the memory card will be deleted first. Formatting an SD Memory Card or Internal Memory This utility formats the internal memory (or memory card) and deletes all stored images and data. -
Page 42: Setting The Dpof
English To format images or video clips recorded in the internal memory, be sure to remove your SD memory card first. For complete compatibility, be sure NOT to select FAT 32 as the file system when you format the SD card on your computer. Memory cards formatted in FAT 32 file system will not be recognized by this camera. -
Page 43: Mp3 Modes
NOTE To print out images recorded in the internal memory, it is necessary to copy your images to an SD memory card first. ] Print-order icon will also display on the LCD monitor to indicate selected images for printing. -
Page 44: Deleting Mp3 Files
NOTE To avoid any interruption during the MP3 playback, place the focus switch to [ ] to lock all buttons on the camera. Deleting MP3 files In the MP3 mode, press the MENU button. -
Page 45: Connecting The
THE PRINTER FOR PRINTING IMAGES (PictBridge FUNCTION) Even if you do not have a computer, you can connect the camera directly to a printer that supports PictBridge to perform image selection and printings using the camera monitor screen and controls. DPOF support also lets you specify which images you want to print and how many copies of each should be printed. -
Page 46: Transferring Recorded Images To Your Computer
You can share recorded images/video clips with your family or friends via e-mail or post them on the Web. Before doing these things, you need to connect the camera to your computer using the USB cable and then transfer the images/video clips. -
Page 47: Step 1: Installing The Usb Driver
English To transfer images/video clips from the camera to your computer, follow the steps below: Step 1: Installing the USB driver Step 2: Connecting the camera to your computer Step 3: Downloading images/video clips System requirements System requirements (Windows) (Macintosh) -
Page 48: Step 2: Connecting The Digital Still Camera To Your Computer
Step 3: Downloading images/video clips When the camera is turned on and connected to your computer, it is considered as a disk drive, just like a floppy disk or CD. You can download (transfer) images/video clips by copying them from the “removable disk”... -
Page 49: For Computers Running Windows
“Copy” from the “Edit” menu. After that, open the destination location and choose “Paste” from the “Edit” menu. For computers running Mac OS Open the “untitled” disk window and the hard disk or the destination location. Drag and drop from the camera disk to the desired destination. NOTE Memory card users may prefer to use a memory card reader (highly recommended). -
Page 50: Installing Photo Express
For more information about the operation of Photo Explorer application software, refer to its respective help documentation. For Windows 2000/XP users, please make sure to install and use the Photo Explorer in “Administrator” mode. Photo Explorer is not supported on the Mac. iPhoto or iPhoto2is recommended. -
Page 51: Using The Digital Still
3. After the driver installation is completed, restart your computer. NOTE The USB driver bundled on the CD-ROM is designed in a form 2 in 1 (USB & PC camera driver). a) On Windows 98, the Windows OS will install both USB & PC camera drivers. -
Page 52: Step 2: Connecting The Digital Still Camera To Your Computer
Position the digital still camera steadily on top of your computer monitor or use a tripod. NOTE When using this digital still camera as a PC camera, it is necessary to install the battery into the digital still camera. Step 3: Run your application software (i.e. Windows... -
Page 53: List Of Menu Options
English 4. Type the e-mail address or the network address of the computer that you are calling. 5. Click Call. The person that you are calling must also have Windows NetMeeting running and be willing accept your call to start the videoconference. - Page 54 2048 x 1536 pixels [1280 x 960]: 1280 x 960 pixels [640 x 480]: 640 x 480 pixels Quality This sets the quality (compression rate) at which the image is taken. [Fine]: Low compression rate [Normal]: Normal [Economy]: High compression rate Scene This sets the scene mode for capturing images.
-
Page 55: White Balance
Scenes with low reflectivity, such as shots of green or dark foliage White Balance When the brightness of the light changes, our eyes adapt the difference so that the white object remains white. For digital still cameras, they can also see the white object as white by averaging the light around the subject. - Page 56 Sensitivity equivalent to ISO200 Color To capture an image, the camera offers three types of color (Full color/ Black & White/ Sepia) for you to match as your wish. Your images will demonstrate different impression by choosing different types of color.
-
Page 57: Quick View
Display quick view [OFF]: Do not display quick view Date Imprint If you set imprint function, your image will be displayed with the date on it. [ON]: Date will be showed on the captured image. [OFF]: Date will not be showed on the captured image. -
Page 58: Playback Menu
Playback menu. Scroll through the options by using the button. 2. To enter the sub-menu, press the OK button. After settings are set, press the OK button to confirm. Delete Delete still images and video clips that have not come out right. -
Page 59: Slide Show
PLAYBACK for further details. DPOF Set the number of prints in the DPOF format to images that you want to print. (This function is available for still images only.) You can print images easily just by inserting the SD card to a DPOF-compatible printer or a print shop. -
Page 60: Video Menu
English Video Menu This menu is for the basic settings to be used when recording video clips. Refer to the section in this manual titled “Capture Menu” in LIST OF MENU OPTIONS for further details. White Balance Refer to section in this manual titled “Capture Menu”... -
Page 61: Setup Menu
Delete the selected MP3 file. [All MP3]: Delete all MP3 files in a single operation. Specify whether or not LCD monitor is to be turned on during the MP3 playback. [ON]: The LCD monitor is kept ON during the MP3 playback. -
Page 62: Power Off
Specify in which language menus and messages are to be displayed on the LCD monitor. Power Off If no operation is performed for a specific period of time, the power to the camera is automatically turned off. This feature is useful to reduce battery wear. -
Page 63: Devices
English Exit Select this option if you wish to exit from the menu mode. CONNECTING THE CAMERA TO OTHER DEVICES -63-... -
Page 64: Camera Specifications
640 x 480 Video clip 320 x 240 Fine/Normal/Economy Image quality 16 MB internal memory (14 MB available for image storage) Recording media SD memory card (optional, up to 1 GB) EXIF 2.2, DCF 1.0, DPOF 1.0, MPEG-1 File format Aperture: 3.0... -
Page 65: Troubleshooting
Weight * Design and specifications are subject to change without notice. TROUBLESHOOTING Refer to the symptoms and measures listed below before sending the camera for repairs. If the problem persists, contact your local reseller or service center. Power Supply Symptom... - Page 66 The battery is not fully Fully charge the battery and charged. discharge it for at least one The battery is not used for complete cycle before use an extended period of time to maximize its performance after charged.
- Page 67 The flash does not fire. The flash cannot other than one of those. mode. recharge. The flash is set to no flash. Set the flash to auto flash. Even though the flash The distance to the subject is Get closer to your subject...
-
Page 68: Other Problems
English Playback Symptom Cause Measure It is not set to playback Toggle the MODE button to Cannot playback. mode. playback mode. You played back a memory Loaded a card that was The contents of memory card that was not formatted formatted and stored on by card cannot be replayed. - Page 69 The free space on the space for running Windows, and hard disk in your if the drive for loading image files computer may be has a capacity at least that of the Cannot download insufficient. memory card inserted in the images.
Need help?
Do you have a question about the G-SHOT P713 MP3 and is the answer not in the manual?
Questions and answers