Table of Contents
Advertisement
Quick Links
FCC STATEMENT
This device complies with Part 15 of the FCC Rules. Operation is subject to
the following two conditions:
(1) This device may not cause harmful interference, and
(2) This device must accept any interference received, including interference
that may cause undesired operation.
Note:
This equipment has been tested and found to comply with the limits for Class
B digital devices, pursuant to Part 15 of the FCC rules. These limits are
designed to provide reasonable protection against harmful interference in a
residential installation. This equipment generates uses and can radiate radio
frequency energy and, if not installed and used in accordance with the
instructions, may cause harmful interference to radio communications.
However, there is no guarantee that interference will not occur in a particular
installation. If this equipment does cause harmful interference to radio or
television reception, which can be determined by turning the equipment off
and on, the user is encouraged to try to correct the interference by one or
more of the following measures:
Reorient or relocate the receiving antenna.
Increase the separation between the equipment and receiver.
Connect the equipment into an outlet on a circuit different from that to
which the receiver is connected.
Use of shielded cable is required to comply with Class B limits in Subpart B of
Part 15 of the FCC rules.
Do not make any changes or modifications to the equipment unless otherwise
specified in the manual. If such changes or modifications should be made, you
could be required to stop operation of the equipment.
-1-
English
Advertisement
Table of Contents

Subscribe to Our Youtube Channel
Related Manuals for Genius P513


Summary of Contents for Genius P513
- Page 1 Connect the equipment into an outlet on a circuit different from that to which the receiver is connected. Use of shielded cable is required to comply with Class B limits in Subpart B of Part 15 of the FCC rules.
- Page 2 The product and accessories that come with your camera may be different from those described in this manual. This is due to the fact that different retailers often specify slightly different product inclusions and accessories to suit their market requirements, customer demographics, and geographical preferences.
- Page 3 Do not use the camera while you are walking, driving or riding a motorcycle. This might cause you to fall over or result in a traffic accident. CAUTION If foreign objects or water have entered the camera, turn the power OFF and remove the batteries.
- Page 4 The battery becomes hot during use. Touching a hot battery might cause burns. Do not wrap the camera or place it in cloth or blankets. This might cause heat to build up and deform the case, resulting in fire. Use the camera in a well-ventilated place.
- Page 5 The camera may feel warm after long period of continuous use. This is normal and not a malfunction. If the battery is not to be used for a long period of time, remove it from the camera to prevent leakage or corrosion.
-
Page 6: Table Of Contents
Thumbnail Display GETTING STARTED 16-22 Rotating the Image Attaching the Camera Strap DELETING IMAGES 32-33 Loading the Batteries Deleting single image / deleting all Inserting and Removing the images MENU OPTIONS 33-38 SD Memory Card (optional Capture Menu accessory) Video Menu... - Page 7 USING THE DIGITAL STILL EDITING SOFTWARE CAMERA AS INSTALLATION 43-45 A PC CAMERA 41-43 Installing Photo Explorer Step 1: Installing the PC Camera Installing Photo Express CAMERA Driver SPECIFICATIONS 46-47 Step 2: Connecting the digital still CAMERA camera to your computer...
-
Page 8: Introduction
Capture different still images including single, self timer, continuous 1.3MP and continuous VGA. Video mode – Record video clips without voice. Thumbnail display – Displays a set of 6 images on the LCD monitor for easier and quicker selection of images. -
Page 9: Package Contents
English Package contents Carefully unpack your camera and ensure that you have the following items: Digital camera Software CD-ROM USB cable Camera strap Quick guide Camera pouch 2 x AAA alkaline batteries NOTE Accessories and components vary by retailer. -
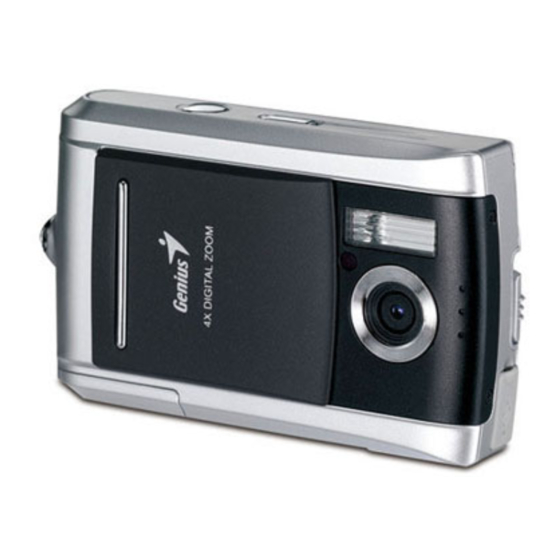
Page 10: Getting To Know Your Camera
Name Description Camera strap attachment. Strap eyelet Protects the lens Lens cover Designed to collect and focus rays of light to Lens form a sharp image on the sensor. Self-timer LED Blinks during Self-timer mode until image is captured. Provides flash illumination. -
Page 11: Rear View
Name Description Allows you to choose the appropriate focus Focus switch setting. Allows you to capture images of subjects at a Normal mode distance of 1.5m to infinity. Allows you to capture close-ups of subjects Macro mode up to the distances from 0.4 - 0.6m. - Page 12 English Name Description SET button Confirms the chosen settings. Flash button Allows you to choose the appropriate flash setting. Scrolls downward. Arrow button (down) MENU button Toggles OSD menu on and off. Scrolls left. Arrow button (left) Zooms in/out the image.
-
Page 13: Led Indicator & Beep
English LED Indicator & Beep This describes the color and state of the LED indicator. Color State Description Self-timer Blinking Self-timer function is activated. Status Green Blinking Flash charging in progress. Camera is powered on. Charging process is completed. Flash is off. -
Page 14: Lcd Monitor Icons
Focus mode [No icon] Normal mode Macro mode Shooting mode [No icon] Single Macro mode Cont. 1.3MP Cont. VGA Possible number of shots (at White balance the current size and quality Auto settings) ] Daylight Digital zoom indicator ] Cloudy... - Page 15 Video mode 1. Video mode 2. Storage media 3. Remaining battery status 4. Possible recording time 5. Size 6. Focus mode (at preview mode only) Playback mode-Still image playback 1. Capture mode 2. Protect icon 3. File number / total files...
-
Page 16: Getting Started
Ni-MH rechargeable battery is highly recommended. If you will not be using the batteries for an extended period of time, remove them from the camera to prevent leakage or corrosion. Never use batteries of different types (together) or mix old and new batteries. - Page 17 If the card cannot be inserted, check the orientation. 4. Close the battery/SD card cover. NOTE Be sure to format the memory card with this camera before its initial usage. Refer to section in this manual titled “Formatting Media” for further details. To remove a memory card: Make sure the camera is turned off.
-
Page 18: Turning The Power On/Off
Press the POWER button to turn the power off. NOTE The power is turned off automatically when the camera has not been operated for a fixed period of time. To resume the operation condition, turn the power on again. Refer to section in this manual titled “Power Off” in the Setup Menu for further details. -
Page 19: Formatting The Sd Memory
4. To exit from the menu, press the MENU button. NOTE To format the internal memory, do not insert an SD memory card into the camera. Otherwise, you will format the SD memory card. Formatting the SD memory card also erases the protected images. All data other than images are also erased. -
Page 20: Setting Image Resolution And Quality
Lower resolution/quality images take up less memory space and may be quite suitable for sharing images via e-mail, in a report, or on a web page. To change image resolution or image quality, perform the steps below: 1. - Page 21 In video mode, only size setting is available. Possible number of shots (still image) The table below shows the approximate number of shots that you can take at ach setting based on internal memory and SD memory card. SD Memory Card...
-
Page 22: Capture Mode
* The data shows the standard testing results. The actual capacity varies according to the shooting conditions and settings. * Frame rate of video recording would be different depending on the SD memory card access speed. If using a low access speed SD memory card, it influences the frame rate and recording time. -
Page 23: Macro Mode
The LCD monitor darkens in strong or bright light. This is not a malfunction. Macro Mode For close-up of small subjects like flowers or insects, shoot using the Macro mode. You can use this feature for close-ups of subjects up to the distances from 0.4 – 0.6m. 1. Set the focus switch to 2. -
Page 24: Digital Zoom
The digital zoom function is not automatically cancelled after the image is captured. The digital zoom is only activated in single and self-timer shooting modes. 4MP and 5MP are made by F/W interpolation so the digital zoom is not available. -24-... -
Page 25: Flash
3. Compose the image and press the shutter button. The available flash settings in normal mode: Flash mode Description The flash will not fire. Select this mode when taking images in a place where flash photography is Flash off prohibited, or when the distance to the subject is beyond the effective range of the flash. -
Page 26: Shooting Mode
The flash mode is automatically set to off for close-up photography. If you will not be using the flash, turn it off. Turning the flash OFF will result in faster camera startup and faster operation because the capacitor will not be charged needlessly. -
Page 27: Video Mode
1.3MP. Permits continuous photography of 3 images max with Cont. VGA the image size of VGA. VIDEO MODE Recording Video Clips This mode allows you to record video clips (without audio) at a resolution of VGA / QVGA pixels. -27-... -
Page 28: Playback Mode
5. Pressing the shutter button again stops recording. NOTE Flash cannot be used. PLAYBACK MODE Playing Back Still Images You can play back still images on the LCD monitor. 1. Slide the lens cover to open. 2. Press the POWER button. 3. Press the button. -
Page 29: Playing Back Video Clips
* When no memory card is loaded, it plays back from internal memory. * When an SD memory card is loaded, it plays back from SD memory card. If there are no images stored in memory, icon will appear on the LCD monitor. -
Page 30: Slideshow Display
English NOTE To play the video clip back on your computer, you may use either Windows Media Player or Apple “QuickTime Player”. QuickTime basic player is available free of charge, compatible with both Mac and Windows- computers and can be download from the Apple web site at www.apple.com. -
Page 31: Protecting Images
The protect icon is displayed with protected images. Thumbnail Display This function allows you to view as many as 6 thumbnail images on the LCD monitor simultaneously so you may search for a particular image. 1. Press the button. -
Page 32: Rotating The Image
English 5. Press the SET button. The selected image is displayed at its regular size. Rotating the Images You can rotate still images during image playback. 1. Press the button. 2. Press the MENU button. 3. Select [Rotation] with the buttons and press the SET button. -
Page 33: Menu Options
NOTE To delete or videos stored in internal memory, do not insert a memory images card into the camera. Otherwise, you will delete the images or video clips stored on the memory card. MENU OPTIONS Capture Menu This menu is for the basic settings to be used when capturing still images. - Page 34 ] 3MP ] 4MP ] 5MP WB (White Balance) This sets the white balance capturing under a variety of lighting conditions and permits images to be captured that approach the conditions that are seen by the human eye. * [A]...
-
Page 35: Video Menu
Shooting Refer to section in this manual titled “Shooting Mode” for further details. Video Menu This menu is for the basic settings to be used when recording video clips. 1. Toggle the MODE button to and press the SET button. -
Page 36: Setup Menu
Refer to the section in the “Slideshow Display” for further details. Protect Refer to the section in the “Protecting Images” for further details. Thumbnail Refer to section in this manual titled “Thumbnail Display” for further details. Rotation Refer to the section in the “Rotating Images” for further details. Setup Menu Set your camera’s operating environment. - Page 37 White Balance to Fluorescent setting. * 50Hz / 60Hz Power Off If no operation is performed for a specific period of time, the power to the camera is automatically turned off. This feature is useful to reduce battery wear.
-
Page 38: Transferring Recorded
To transfer images/video clips from the camera to your computer, follow these steps: Step 1: Installing the USB driver (Windows 98 and Mac OS 9.0 users only) Step 2: Connecting the camera to your computer Step 3: Downloading image and video files... - Page 39 For Mac OS 9.0 or higher, the computer will automatically recognize the camera and load its own USB drivers. NOTE USB driver that bundled inside the CD-ROM is designed in a form 2 in 1 (USB & PC camera driver). Windows a) On 98, the Windows OS will install both USB &...
- Page 40 When the camera is turned on and connected to your computer, it is considered as a disk drive, just like a floppy disk or CD. You can download (transfer) images/video clips by copying them from the “removable disk” (“untitled” disk on a Macintosh) to your computer hard drive or to another kind of disk.
-
Page 41: Computer
Windows- Open the "removable disk" and subsequent folders by double clicking on them. Your images are inside these folder(s). Select the images that you want, and then choose "Copy" from the "Edit" menu. Open the destination location (folder) and choose "Paste" from the "Edit" menu. You may also drag and drop image files from the camera to a desired location. -
Page 42: Computer
3. After the driver installation is completed, restart your computer. NOTE The USB driver that bundled inside the CD-ROM is designed in a form 2 in 1 (USB & PC camera driver). a) On Windows 98, the Windows OS will install both USB & PC camera drivers. -
Page 43: Installation
English 2. Connect the other end of the USB cable to the USB connector on the camera. button and press the SET button. 3. Select using the 4. Position the camera steadily on top of your computer monitor or use a tripod. - Page 44 For more information about the operation of Photo Explorer application software, refer to its respective help documentation. For Windows 2000/XP users, please make sure to install and use the Photo Explorer in “Administrator” mode. Photo Explorer is not supported on the Mac. iPhoto or iPhoto2is recommended.
-
Page 45: Installation
Follow the on-screen instructions to complete the installation. NOTE For more information on how to use Photo Express to edit and retouch your recorded images, please refer to its online help. For Windows 2000/XP users, make sure to install and use the Photo Express while logged in as a user with an Administrator account. -
Page 46: Specifications
Item Description Sensor Approx. 3.2 Mega pixels Image resolution <Still image> 2560 x 1920 pixels (FW interpolation to 5 Mega pixels) 2304 x 1728 pixels (FW interpolation to 4 Mega pixels) 2048 x 1536 pixels 1280 x 960 pixels 640 x 480 pixels <Video clip>... -
Page 47: Troubleshooting
Approx. 82g (without batteries and memory card) *Design and specifications are subject to change without notice. TROUBLESHOOTING Refer to the symptoms and measures listed below before sending the camera for repairs. If the problem persists, contact your local reseller or service center. Power Supply Symptom Cause... - Page 48 English Symptom Cause Measure The batteries are Replace with a new set of exhausted. batteries. It is being used in extreme low The batteries temperature. run out quickly. Many shots are being captured in dark places inside, requiring flash. The batteries...
- Page 49 The flash is set to off. flash cannot other than one of those. recharge. The image was captured in The image is Set the flash to something a dark place while set to no too dark. other than flash off mode. flash. -49-...
- Page 50 English Playback Symptom Cause Measure It is not set to playback Toggle the button to Cannot playback. mode. playback mode. The contents of You played back a Insert a memory card that memory card memory card that was not was formatted and stored cannot be formatted by this device.
- Page 51 The free space on a space for running Windows, and the hard disk in your if the drive for loading image files computer may be has a capacity at least that of the Cannot insufficient. memory card inserted in the download camera.
Need help?
Do you have a question about the P513 and is the answer not in the manual?
Questions and answers