Table of Contents
Advertisement
Quick Links
WEEE Warning Message
Symbol for Separate Collection in European Countries
This symbol indicates that this product is to be collected
separately.
The following apply only to users in European countries:
This product is designated for separate collection at an
appropriate collection point. Do not dispose of as
household waste.
For more information, contact the retailer or the local
authorities in charge of waste management.
FCC STATEMENT
This device complies with Part 15 of the FCC Rules. Operation is subject to the following
two conditions:
(1).
This device may not cause harmful interference, and
(2).
This device must accept any interference received, including interference that may
cause undesired operation.
Note:
This equipment has been tested and found to comply with the limits for Class B digital
devices, pursuant to Part 15 of the FCC rules. These limits are designed to provide
reasonable protection against harmful interference in a residential installation. This
equipment generates uses and can radiate radio frequency energy and, if not installed
and used in accordance with the instructions, may cause harmful interference to radio
communications.
However, there is no guarantee that interference will not occur in a particular installation.
If this equipment does cause harmful interference to radio or television reception, which
can be determined by turning the equipment off and on, the user is encouraged to try to
correct the interference by one or more of the following measures:
Reorient or relocate the receiving antenna
Increase the separation between the equipment and receiver
Connect the equipment into an outlet on a circuit different from that to which the
receiver is connected
-1-
English
Advertisement
Table of Contents

Subscribe to Our Youtube Channel
Related Manuals for Genius P635


Summary of Contents for Genius P635
- Page 1 If this equipment does cause harmful interference to radio or television reception, which can be determined by turning the equipment off and on, the user is encouraged to try to correct the interference by one or more of the following measures:...
- Page 2 English Use of shielded cable is required to comply with Class B limits in Subpart B of Part 15 of the FCC rules. Do not make any changes or modifications to the equipment unless otherwise specified in the manual. If such changes or modifications should be made, you could be required to stop operation of the equipment.
- Page 3 This might cause damage to the person’s eyesight. Do not subject the LCD monitor to impact. This might damage the glass on the screen or cause the internal fluid to leak. If the internal fluid enters your eyes or comes into contact with your body or clothes, rinse with fresh water.
- Page 4 The camera may feel warm after long period of continuous use. This is normal and not a malfunction. If the battery is not to be used for a long period of time, remove it from the camera to prevent leakage or corrosion.
-
Page 5: Table Of Contents
15-22 Playing Back Still Images Attaching the Camera Strap Playing Back Video Clips Inserting and Removing the Battery Playing Back Still Images/Video Clips on Charging the Battery a TV Inserting and Removing the SD Attaching Voice Memos Memory Card (Optional Accessory) - Page 6 English Playback Menu PC CAMERA 71-73 Setup Menu (In Photography Mode) Step 1: Installing the PC camera Driver Setup Menu (In Playback Mode) Step 2: Connecting the digital still Camera to your computer Step 3: Running your application software CONNECTING THE (i.e.
-
Page 7: Introduction
Congratulations on your purchase of the new digital camera. Capturing high-quality digital images is fast and easy with this state-of-the-art smart camera. Equipped with a 6.2 Mega pixel CCD, this camera is capable of capturing images with a resolution of up to 2848 x 2136 pixels. -
Page 8: Package Contents
Sunset, Sunrise, Splash, and Fireworks. Package contents Carefully unpack your package and make sure that you have the following items. In the event that any item is missing or if you find any mismatch or damage, promptly contact your dealer. Digital still camera... -
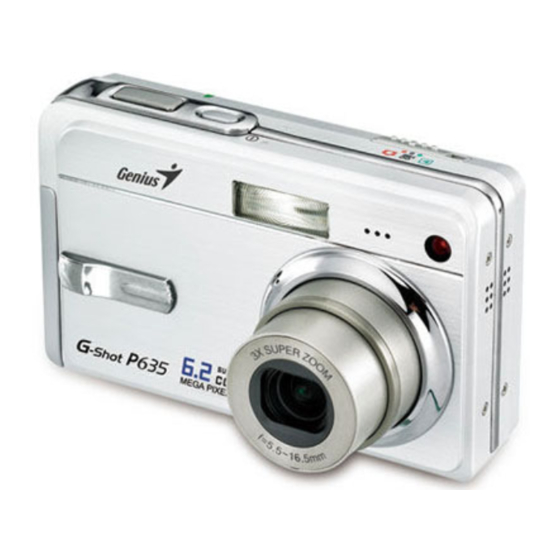
Page 9: Front View
1. Shutter button 5. Microphone 2. POWER button 6. Self-timer LED 3. Flash 4. Mode switch 7. Lens Still image mode 8. Battery / SD card cover Video mode 9. PC (USB) / AV out terminal Playback mode 10. Strap holder... -
Page 10: Rear View
English Rear view 1. Status LED Indicator Erase button 2. T Zoom in button 8. PC (USB) / AV Out terminal W Zoom out button 9. Battery / SD card cover 3. MENU 10. Camera connector to cradle / button 4. - Page 11 Allows you to choose the appropriate flash Flash button setting. button Scrolls downwards. Allows you to toggle the self-timer on and off, Self-timer button selects the desired self-timer mode. Enters the menu page and confirms the 5. SET button chosen setting.
-
Page 12: Lcd Monitor Icons
English Status LED Indicators This describes the color and state of the status LED. During During Color State During power off connection to photography a PC Green Ready for shot. System ready. Battery charging When the image is in progress. - Page 13 10s ] 10 sec. ] Forced Flash 2s ] 2 sec. ] Flash off 10+2s ] 10+2 sec. 5. AE* / AF* Extra Function 14. Unsteady hold warning icon ] AE-LOCK 15. [ ] Exposure compensation ] Manual five focus areas ] Backlight correction 6.
- Page 14 ] Night ] Candlelight NOTE Each press of the display button switches one step in the sequence of Normal display (displaying the icons, etc), Normal and Histogram, Composition Line display, No OSD display Photography mode [ 1. [ ] Video mode 2.
-
Page 15: Getting Strated
3. SD memory card indicator (if present) 4. File number 5. Folder number 6. Protect icon 7. Video mode 8. Playback mode 9. Total time GETTING STARTED Attaching the Camera Strap Attach the camera strap as shown in the illustration. -15-... -
Page 16: Inserting And Removing The Battery
2. Insert the battery in the correct orientation shown. Tilt the battery lock lever in the direction of the arrow and orient the battery so that its label is faces to the rear side of the camera, and then insert the battery. - Page 17 NOTE Always make sure that the digital still camera is off before removing the battery. The battery may feel warm after it has been charged or immediately after being used. This is normal and not a malfunction. When using the digital still camera in cold environments, keep the digital still camera and its battery warm by holding it inside your jacket or other warm protective environment.
-
Page 18: Turning The Power On/Off
Refer to section in this manual titled “Formatting the SD Card or Internal Memory” for further details. Before inserting or removing the SD card, make sure that the power of the camera is off. The camera will automatically turn off when inserting or removing the SD card. -
Page 19: Choosing The Language
The time is displayed in 24-hour format. 5. After confirming all settings are correct, press the SET button. Choosing the Language Specify which language menus and messages are to be displayed on the LCD monitor. 1. Slide the mode switch to [... -
Page 20: Formatting The Sd Card Or Internal
To cancel formatting, select [Cancel] and press the SET button. NOTE To format the internal memory, do not insert an SD card into the camera. Otherwise, you will format the SD card. Formatting the SD card also erases the protected images. All data other than images are also erased. - Page 21 High resolution and quality settings are recommended for printed output and situations requiring the finest detail. Lower resolution/quality images take up less memory space and may be quite suitable for sharing images via e-mail, in a report, or on a web page.
-
Page 22: Photography Mode
* The data shows the standard testing results. The actual capacity varies according to the shooting conditions and settings. PHOTOGRAPHY MODE ] Still Image Mode Your camera is equipped with a 2.5" LTPS color LCD monitor to help you compose -22-... -
Page 23: Recording Voice Memos
LED turns red. If the photographic preview is set to “On”, the captured image will be displayed while the image is being recorded onto the SD card/internal memory. Recording Voice Memos A voice memo can be recorded once for... -
Page 24: Using The Optical Zoom
[VOICE RECORDING] is displayed on the screen immediately, and the voice memo recording starts. 7. Press the shutter button one more time during recording, or wait for 30 seconds [VOICE RECORD END] will be displayed and the recording will end. -
Page 25: Using The Digital Zoom
Using a combination of 3 times optical zoom and 4.0 times digital zoom permits zoom photography of up to 12 times to suit the subject and the distance. The digital zoom is a compelling feature, the more an image is enlarged (zoomed), the more pixilated (grainier) the image will appear. -
Page 26: Setting The Flash
English NOTE The zoom setting is automatically cancelled by either turning the camera off or the activation of the Auto OFF function. Setting the Flash Set the flash for capturing images. The flash firing mode can be set to suit for the photographic conditions. - Page 27 Capture Mode Continuous Auto Marco Focus Mode Infinity * This table is for reference only and varies according to different combinations of photography modes. : Available X: Unavailable The available flash settings in different photography modes: Flash mode Description The flash fires automatically to suit the photographic conditions.
-
Page 28: Setting The Focus
Suppressed away for the flash to be effective. Flash Setting the Focus Images can be captured with the distance to the subject set by auto focus, [ macro or [ ] infinity. 1. Slide the mode switch to [ ] or [ 2. -
Page 29: Manual Five Focus Areas
Selects this when you want to capture images of subjects at a distance of infinity. Infinity Manual five focus areas You can choose your desired focus area and make the focus area more clear by this setting. 1. Press the POWER / button to turn the power on. - Page 30 For the [ ] mode. For the [ ] mode. 3. Compose the image, press the shutter button down halfway, then press it down fully. The self-timer LED flashes and the image is captured after the preset time has elapsed.
-
Page 31: Exposure Compensation/Backlight
(the contrast) is large, or when the subject that you want to photograph is very small within the screen. Exposure can be set in 0.3 EV units. -
Page 32: Ae-Lock
2. Slide the mode switch to [ 3. Compose the image on the monitor screen to get the exposure value you want. 4. Press the shutter button down half way and press the MENU button at the same time. The AE* icon will display on the monitor. -
Page 33: Setting The Scene Mode
English and press the shutter button the rest of the way down to capture the image. It will capture according the recording exposure value. Setting the Scene Mode By simply selecting one of the following 12 modes, you can capture the image with the most appropriate settings. - Page 34 Select this mode when you want to capture people ] Night with an evening or night scene background. Select this mode when you want to capture photos of ] Candlelight a candlelit scene, without spoiling the atmosphere. Select this mode when you want to capture an image...
-
Page 35: Setting The Panorama Mode
: Available X: Unavailable Setting the Panorama Mode This mode is designed to make it easier to take a series of shots then stitch them together with software to make a single photo. You can capture a photographic subject that won’t fit into a single frame, such as a landscape, and stitch it together later with a program such as Cool 360 or a Photoshop application. -
Page 36: Using The Photo Frame Function
2. Shoot the first image. The next image appears beside the previous image. 3. Orient the camera so that the second frame overlaps a small portion of the photographic subject of the first image and press the shutter button to capture the next image. -
Page 37: Video Mode
English ] Video Mode This mode allows you to record video clips at a resolution of 320 x 240 pixels. You can select audio to be recorded or not. 1. Slide the mode switch to [ 2. Compose the image with the zoom button. - Page 38 A press of the button opposite to the direction in which the image was rotated will return the image to the normal display. ] icon is displayed with the video data. Video clips cannot be rotated.
-
Page 39: Playing Back Video Clips
Press the SET button to playback the voice memo data. Playing Back Video Clips You can play back video clips recorded on the LCD monitor. You can also play back sound if you record with audio. 1. Slide the mode switch to [ The last image appears on the screen. -
Page 40: Playing Back Still Images/Video Clips On
You can also playback your images on a TV screen. Before connecting to any devices, make sure to select NTSC / PAL system to match the video output system of the video equipment you are going to connect to the camera, then turn all connected devices off. -
Page 41: Thumbnail Display
Voice memo is only available for still images. Thumbnail Display This function allows you to view 9 thumbnail images on the LCD monitor at the same time, which can quickly search for the image that you want. 1. Slide the mode switch to [ The last image appears on the screen. -
Page 42: Zoom Playback
], [ ] icon will be displayed in a thumbnail display. Zoom Playback This mode also allows you to enlarge your image on the selected portion of the image to check for small details. 1. Slide the mode switch to [ 2. -
Page 43: Slideshow Display
5. To return to regular display, toggle the W button until the regular display appears on the screen. NOTE The range of magnification factor is from 1x to 4x in 0.5x increments. Slideshow Display The slideshow function enables you to playback your still images automatically in order one image at a time. -
Page 44: Protecting Images
Video clips are displayed in the first frame image, and they are not played back. You can adjust the slide show display interval within the range of 3 sec., 5 sec., 10 sec. Slideshow display is only activated when more than 2 images are stored in the SD card/internal memory. - Page 45 [ ] is displayed with all the images. Canceling the Protection To cancel protection for only one image, display the image that you want to remove the image protection. 1. Select [Protect] with the buttons from the playback menu, and press the SET button.
-
Page 46: Dpof Settings
You can select the images to be printed and how many prints to make with the DPOF menu in the camera and insert the memory card to a card compatible printer. When the printer starts printing, it will read the embedded information on the memory card and print the specified images. - Page 47 NOTE The date that is printed on the photo is the date set on the camera. To print the correct date on the photo, set the date on the camera before you photograph the image. Refer to the section in this manual titled “Setting the Date and Time”...
-
Page 48: Resizing An Image (Resize)
When resizing ends, the screen returns to playback mode. NOTE It is possible to reduce the size of an image. It is not possible to increase the size of an image, or to restore it to its original size after it has been decreased. -
Page 49: Compressing An Image (Quality Change)
Compressing an Image (Quality Change) Changes the quality (compression rate) of a recorded image. Compresses images down to half of their size or more, overwrites an old size images with a newly compressed image. Only quality changing to the lower quality level is available. -
Page 50: Erasing Images
2. Press the button. The last image and quick delete menu appear on the screen. 3. Press the SET button to erase the image. To not erase, select [Cancel], and press the SET button. Erasing at Playback Mode Erasing single image / Erasing all images 1. - Page 51 To not erase, select [Cancel], and press the SET button. NOTE Even if you capture images after erasing an image, the file number is assigned the next number of the very last one before the image was erased. Erasing selected images This erases a number of selected images.
-
Page 52: Menu Options
5. Press the SET button. NOTE To delete the image in internal memory, do not insert an SD card into the camera. Otherwise, you will delete the image in an SD card. MENU OPTIONS Still Image Menu (Capture) This menu is for the basic settings to be used when capturing still images. - Page 53 NOTE The unavailable menu options are in gray color. Scene Mode Refer to the section in the “Setting the Scene Mode” for further details. Size This sets the size of the image that will be captured. ] 2816 x 2112...
- Page 54 [ Blank ] Auto Incandescent Fluorescent 1 Fluorescent 2 Day Light Cloudy Manual Manual WB This manually sets the white balance and stores it. Use of this is convenient when the white balance does not offer a good match. -54-...
-
Page 55: Still Image Menu (Function)
English Before you select [Execute] determine the subject (such as a white paper) that will be used to set the white balance. * Cancel / Execute This sets the sensitivity for capturing images. When the sensitivity is raised (and the ISO figure is increased), photography will become possible even in dark locations, but the more pixilated (grainier) the image will appear. - Page 56 In [Continuous] and [AEB] capture mode, the voice memo is automatically fixed at [Off]. Voice Memo Refer to the section in the "Recording Voice Memos" for further details. * On / Off NOTE When [Voice Memo] is set to [On], the preview setting is also fixed at [On]. -56-...
- Page 57 The adjustment range is from -5 to +5. Digital Zoom This sets whether or not to use digital zoom at the time of photography. * On / Off Preview This sets whether or not to display the captured image on the screen immediately after the image is captured.
-
Page 58: Video Menu (Capture)
English Photo Frame Refer to the section in the “Using the Photo Frame Function” for further details. Real Time AF This sets the Real Time Focus function at image capture preview mode. * On / Off Video Menu (Capture) This menu is for the basic settings to be used when recording video clips. -
Page 59: Video Menu (Function)
This sets whether or not to record audio at the time of video recording. * On / Off LCD Bright. Refer to the section in the “LCD Bright” in Still Image Menu (Function) for further details. Digital Zoom Refer to the section in the “Digital Zoom” in Still Image Menu (Function) for further details. - Page 60 English Playback Menu In the [ ] mode, set which settings are to be used for playback. 1. Slide the mode switch to [ 2. Press the MENU button. The playback menu is displayed. 3. Select the desired option item with the buttons, and press the SET button to enter its respective menu.
- Page 61 Copy to Card Allows you to copy your files from the digital still camera’s internal memory to a memory card. Of course, you can only do this if you have a memory card installed and some files in internal memory.
- Page 62 * Cancel / Execute Auto OFF If no operation is performed for a specific period of time, the power to the camera is automatically turned off. This feature is useful to reduce battery wear. * 1 Min. / 2 Min. / 3 Min. / Off Date/Time Refer to the section in “Setting the Date and Time”...
- Page 63 4. Select the desired setting with the buttons, and press the SET button. 5. To exit from the menu, press the MENU button. Beep Refer to the section in “Beep” in Setup Menu (In Photography Mode) for further details. -63-...
- Page 64 Refer to the section in “Fr. No. Reset” in Setup Menu (In Photography Mode) for further details. Card Info. This displays the free capacity of the SD card. If the SD card is not inserted, “NO CARD” message is displayed on the screen. System Info.
- Page 65 SET button. 5. Select [PictBridge] with the buttons, and press the SET button. 6. Connect the USB port on the cradle and the USB jack on the printer with the supplied USB cable, then turn on your printer. Printing images...
- Page 66 English [Paper Size]: Select the desired paper size according to the printer type. [Layout]: Select the desired printing layout according to the printer type. [Print]: After all settings are configured, select this item to start printing. 2. If you select [Images] in the previous step, the figure shown on the right hand side will appear.
- Page 67 [COMPLETE] will be displayed temporarily, reminding you that the printing procedure is finished. If a print error is detected, [PRINT ERROR] will be displayed. NOTE The image printing may failed if the power to the camera is cut off. -67-...
- Page 68 You can share recorded images/video clips with your family or friends via e-mail or post them on the Web. Before doing these things, you need to connect the camera to your computer using the USB cable and then transfer the images/video clips.
- Page 69 English 1. Insert the CD-ROM that came with the camera into your CD-ROM drive. The welcome screen appears. 2. Click “USB Driver”. Follow the on-screen instructions to complete the installation. After the USB driver has been installed, restart your computer.
- Page 70 When the camera is turned on and connected to your computer, it is considered to be a disk drive, just like a floppy disk or CD. You can download (transfer) images by copying them from the “Removable disk” (“untitled” or “unlabeled” disk on a Macintosh) to your computer hard drive.
- Page 71 USING THE DIGITAL STILL CAMERA AS A PC CAMERA Your digital still camera can act as a PC camera, which allows you to videoconference with business associates, or have a real-time conversation with friends or family. To use the digital still camera for videoconferencing, your...
- Page 72 AC power adapter/charger. NOTE When using this digital still camera as a PC camera, it is necessary to install the battery into the digital still camera. Step 3: Run your application software (i.e. Windows...
- Page 73 English 4. Type the e-mail address or the network address of the computer that you are calling. 5. Click Call. The person that you are calling must also have Windows NetMeeting running and be willing accept your call to start the videoconference.
- Page 74 NOTE For information on how to use Photo Express to edit and retouch your recorded images, please refer to its online help. For Windows 2000/XP users, make sure to install and use the Photo Express while logged in as a user with an Administrator account.
- Page 75 For more information about the operation of Cool 360 application software, refer to its respective help documentation. For Windows 2000/XP users, please make sure to install and use the Cool 360 in “Administrator” mode. Cool 360 is not supported on the Mac.
- Page 76 Item Description Image sensor Effective pixels 6.2 Mega pixels <Still image> 2848 x 2136, 2272 x 1704, 1600 x 1200, Image resolution 640 x 480 < Video clip> 320 x 240 2.5" LTPS color LCD (High-resolution 230K pixels LCD monitor...
- Page 77 Approx. 120 g (without the battery & SD memory card) * Design and specifications are subject to change without notice. TROUBLESHOOTING Refer to the symptoms and measures listed below before sending the camera for repair. If the problem persists, contact your local reseller or service center. Power Supply...
- Page 78 Reload the battery. If using The power does not Camera malfunction. the AC power adapter, go off. reconnect it. It is being used in extreme low temperature. Many shots are being captured in dark places The battery runs out inside, requiring flash.
- Page 79 Recharge or use the AC The battery is running low. power adapter/charger. The power is not on. Turn the power on. The camera is not in shooting Slide the mode switch to mode. shooting mode. The shutter button is not Press the shutter button all pressed all the way.
- Page 80 Symptom Cause Measure The flash does not fire. The flash cannot The flash is set to no flash. Set the flash to auto flash. recharge. Even though the flash The distance to the subject is Get closer to your subject...
- Page 81 Turn the power off and does not operate. Camera malfunction. remove the battery once, and try again. The date and time is The correct date and time is Set the correct date and wrong. not set. time. The date set has...
- Page 82 The free space on the a space for running Windows, hard disk in your and if the drive for loading image computer may be files has a capacity at least that of insufficient. the memory card inserted in the camera. Cannot download Recharge the battery or use the images.
Need help?
Do you have a question about the P635 and is the answer not in the manual?
Questions and answers