Maxxus Multipress 8.1 Installation & Operating Manual
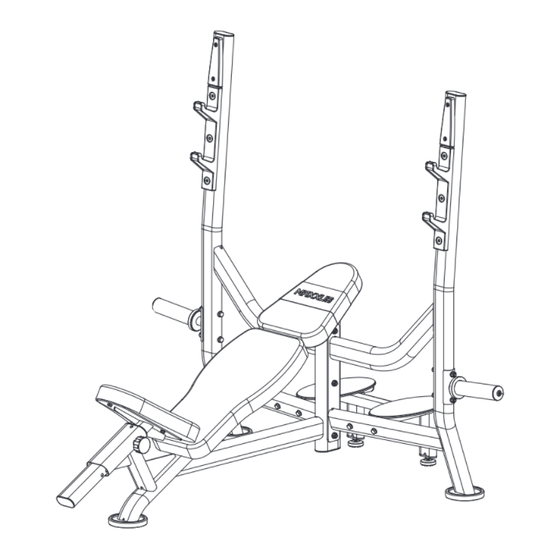
Incline bench with safety bars pro
Hide thumbs
Also See for Multipress 8.1:
- Installation & operating manual (52 pages) ,
- Operating manual and assembly manual (28 pages) ,
- Installation & operating manual (33 pages)
Advertisement
Advertisement
Table of Contents

Subscribe to Our Youtube Channel
Related Manuals for Maxxus Multipress 8.1


Summary of Contents for Maxxus Multipress 8.1
- Page 1 INCLINE BENCH with safety bars PRO...
- Page 2 Repairs Contract / Notication o Damage Claim © 2023 by MAXXUS Group GmbH & Co. KG All rights reserved This publication may not be reproduced, stored in retrieval system, or transmitted on whole or in part, in any form or by any means, electronic, mechanical, photocopying, recording, or otherwise, without the prior written permission of Maxxus Group GmbH &...
-
Page 3: Safety Instructions
oors such as wood, laminates, oor tiles etc. We recommend placing MAXXUS® oor protection mats permanently under the device. Please ensure that these mats cannot slip or slide. − Do not put this training device on pale or white coloured carpets or rugs as the eet o the device may leave marks. − Make sure that your training device is kept out of contact with hot items and is kept at a safe distance from any sources of heat e.g. - Page 4 Any manipulation of or interference with the device can cause damage to the device and be a danger to people. If you have any questions or queries contact your specialist dealer or the MAXXUS Service Team and they will be pleased to help you further.
- Page 5 Assembly Assembly Step 1 Lock Pre-assembled part assembly (A) and Pre-assembled part assembly (B) into Pre-assembled part assembly (C) well with 3pcs External hexagon screw M10*75 (No.12) 6pcs Flat washer φ10 (No.17) and 3pcs Locking nut M10 (No.19) as shown in the picture.
- Page 6 Assembly Assembly Step 2 Lock Pre-assembled part assembly (D) into Pre-assembled part assembly (A) and Pre-assembled part assembly (B) respectively with 2pcs Adjustable oot pad (No.32) 4pcs External hexagon screw M10*60 (No.11) 8pcs Flat washer φ10 (No.17) and 4pcs Locking nut M10 (No.19) as shown in the picture.
- Page 7 Assembly Assembly Step 3 Lock Back cushion (No.8) and Head cushion (No.9) into Pre-assembled part assembly (C) well with 1pc External hexagon screw M8*60 (No.15) 6pcs External hexagon screw M8*20 (No.14) and 7pcs Flat washer φ8 (No.16) as shown in the picture.
- Page 8 Assembly Assembly Step 4 Lock Seat cushion (No.7) into Pre-assembled part assembly (E) with 3pcs External hexagon screw M8*20 (No.14) and 3pcs Flat washer φ8 (No.16). Then, insert Pre-assembled part assembly (E) into the hole o Pre-assembled part assembly (C) and lock well with M16 Elastic bolt (No.36) that pre-assembled as shown in the picture.
- Page 9 Assembly Assembly Step 5 Lock 2pcs of Pre-assembled part assembly (F) into Pre-assembled part assembly (A) and Pre-assembled part assembly (B) respectively with 2pcs External hexagon screw M10*100 (No13), 8pcs Arced washer φ10 (No.18) and 4pcs Locking nut M10 (No.19) as shown in the picture.
- Page 10 Assembly Assembly Step 6 Insert Spring clamp (φ50) (No.10) into Hang barbell rod tube assembly (No.25) as shown in the picture.
-
Page 11: Care, Cleaning & Maintenance
To achieve this clean the guide pipes with a damp cloth and some liquid soap or washing up liquid. Alternatively, you can use the MAXXUS® degreaser spray (optionally available). After this, dry the guide pipes o thoroughly and lubricate them with MAXXUS® lubricant spray (optionally available) leaving a thin lm on the surace. -
Page 12: Training Recommendations
Training Recommendations Preparation Before Training Before you start training make sure that not only your training device is in perfect condition, your body must also be prepared for training. Therefore, if you have not done any endurance training for some time, you should consult your GP and undergo a tness check-up. - Page 13 Training Recommendations Intake of Liquids The intake o sufcient liquids beore and during training is vital. During a 60-minute training session it is possible to lose up to 0.5 litres of liquid. To compensate for this loss, you can drink a mix of one third apple juice to two thirds water to replace all electrolytes and minerals which your body loses through sweat.
-
Page 14: Parts List
Parts List Teil Menge Main frame assembly Support frame assembly - R Support frame assembly - L Station platform assembly Seat cushion adjustable assembly Hang barbell rod assembly Seat cushion Back cushion Head cushion Spring clamp (φ50) External hexagon screw (M 10*60) External hexagon screw (M 10*75) External hexagon screw (M 10*100) External hexagon screw (M 8*20) - Page 15 Pre-assembled parts...
-
Page 16: Exploded Drawing
Exploded Drawing... -
Page 17: Warranty
The warranty period for your training device starts on the date of purchase and applies solely to products which were purchased directly from the MAXXUS Group GmbH & Co. KG, or one of the MAXXUS Group GmbH & Co. KG direct and authorised distribution partners. - Page 18 Ich erkenne die Allgemeinen Geschäftsbedingungen der MAXXUS Group GmbH & Co. KG an. Falle einer vor Ort-Reparatur sind unsere Mitarbeiter inkassoberechtigt. Mit meiner Unterschrift bestätige ich I hereby instruct the company MAXXUS® Group GmbH & Co. KG to repair the above deects. In Warranty cases I will not be charged diese Vereinbarung.
- Page 19 Maxxus Group GmbH & Co. KG Nordring 80 w D-64521 Groß-Gerau E-Mail: info@maxxus.de www.maxxus.com...
Need help?
Do you have a question about the Multipress 8.1 and is the answer not in the manual?
Questions and answers