
Subscribe to Our Youtube Channel
Related Manuals for Midtronics GR8


Summary of Contents for Midtronics GR8
- Page 1 April 2015 168-451EN-C Battery Diagnostic Station 00002-MCGR8 INSTRUCTION MANUAL...
- Page 2 This page intentionally left blank.
-
Page 3: Table Of Contents
Safety Reminder Chapter 5: Info Menu Safety Precautions Print/View Chapter 1: Introduction & Overview Totals Conventions In This Manual Transfer Assembling the GR8 Version Control Module Chapter 6: Setup Menu Charger Cables Connecting AC Power Clock Front of GR8 Time... - Page 4 Chapter 8: Maintenance & Troubleshooting Test Messages Test Cable Maintenance Cleaning Clamps Handling Test Cables Storing Test Cables IR Printer Power On Procedure Installing the Batteries Charging The Batteries Power On Self-Test Printing Data And Screen Images Printing Data Printing Screen Images Paper Feed and Tear Procedure Replacing The Paper Roll Printer Storage...
-
Page 5: Safety Guidelines
Safety Guidelines Safety Guidelines General Safety Precautions 1.9 Do not overcharge the battery. 1.10 Charge the battery in a dry, well-ventilated area. 1.11 Never place articles on or around the charger, or locate Risk of explosive gases the charger in a way that will restrict the flow of cooling Batteries generate explosive gases during normal air through the cabinet. -
Page 6: Preparing To Charge The Battery
Safety Guidelines Preparing To Charge The Battery 3.1 If it is necessary to remove the battery from vehicle to Hazardous voltage. charge it, always remove the grounded terminal from the An improper connection can result in battery first. Make sure all accessories in the vehicle are off, electric shock so as not to cause an arc. -
Page 7: Charger Location
Safety Guidelines Charger Location that can cause physical injury. 7.4 Turn OFF all vehicle loads, including door lights, and cor- 5.1 Locate the charger as far away from the battery as the rect any defects in the vehicle’s electrical system that may charger cables permit. -
Page 8: Safety Reminder
Safety Guidelines Safety Precautions 8.2 Check the polarity of battery posts. POSITIVE (POS., P, +) post usually has larger diameter than NEGATIVE (NEG., Inspect the battery for damages and check the electrolyte N, –) post. level. If the electrolyte level is too low, replenish it and 8.3 Attach at least a 60 cm (24-inch), 6-gauge insulated bat- fully charge the battery. -
Page 9: Chapter 1: Introduction & Overview
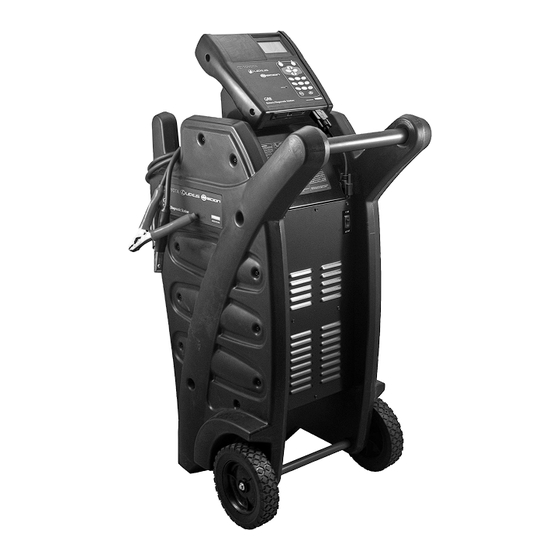
BACK The text for soft keys are in Bold capital ARROW letters. Assembling The GR8 The GR8 is shipped with the control module and mounting bracket packed separately. For easy assembly, follow these steps: Control Module The hardware to attach the control module’s mounting... -
Page 10: Charger Cables
Chapter 1: Introduction & Overview Charger Cables Front of GR8 The two connectors for the charger cables are located on the back of the unit. Three screws are included to secure the cables. Plug the small connector into the small socket (A) on the back of the unit. -
Page 11: Back Of Gr8
Chapter 1: Introduction & Overview Back of GR8 Control Module Keypad Voltmeter The voltage reading for a connected battery appears Control Module Label above the left soft key until other menus or functions are selected. -
Page 12: Data Entry Methods
Chapter 1: Introduction & Overview Data Entry Methods Menu Screen Arrows (tu) When displayed, the arrows show you which ARROW key Typically, the soft key below the right half of the screen on the keypad to press to display other icons or screens. confirms your choice. -
Page 13: Value Boxes
Twelve setup utilities, many of which customize your user interface. Includes administrative functions. Provides a list of topics and definitions. Also includes Midtronics Customer Service phone numbers. -
Page 14: Charging Menu
Chapter 1: Introduction & Overview Charging Menu When using the ARROW keys to select option buttons, press NEXT to continue to the next step. BACK returns you to the The Charging Menu provides three charging options: Main Menu at the start of the test and to the previous screen as Diagnostic Charging, Jump Start, and Manual Charging. -
Page 15: Preparing To Charge
Menu with a glossary of test-related definitions that you may want to review prior to testing. The menu also provides trou- bleshooting information and phone numbers for Midtronics Customer Service, in case you encounter a problem and/or need technical assistance. -
Page 16: Chapter 2: Diagnostic
Chapter 2: Diagnostic Chapter 2: Diagnostic The Diagnostic charging function has four modes to Select the battery rating. determine the State-of-Health of the battery while bringing it to a full State-of-Charge. The charger first analyzes the battery and ... -
Page 17: Dynamic Scan Test
Charge Time BAD CELL decision is displayed. Both decisions include a Progress Bar: warranty code and a Midtronics test code. Fills left to right When the decision is GOOD BATTERY, the charger gives you the option of topping off the battery’s charge level before it NOTE: The actual time needed to charge the battery displays the results. -
Page 18: Diagnostic Charge Results
Chapter 2: Diagnostic Diagnostic Charge Results State-of-Charge (SOC) The State-of-Charge (SOC) is one of several important factors The charger displays one of three battery decisions and an that affect the battery’s ability to crank an engine. It is a mea- analysis, which includes the battery State-of-Charge (SOC) and sure of the available capacity remaining of a battery expressed State-of-Health (SOH). -
Page 19: Chapter 3: Charging Menu
Chapter 3: Charging Menu Chapter 3: Charging Menu Use the Charging menu to access the Power Supply, The charger tests the battery to determine if it is safe to Jump Start, and Manual functions of the charger. charge for jump starting. NOTE: If it detects that the battery is defective, Power Supply Mode it beeps, flashes the status light, and displays a... - Page 20 Chapter 3: Charging Menu For VOLTAGE, select the maximum voltage and press NEXT. The range for Regular-type batteries is 12.7 to 15.3 V; AGM is 12.7 to 14.4 V. Press NEXT. 12.40 VOLTAGE Select a charge duration from 5 to 120 minutes. To select a timed charge when “CONTINUOUS”...
-
Page 21: Chapter 4: Battery Test
Chapter 4: Battery Test Chapter 4: Battery Test Test Results Use the Battery Test function to test individual batter- ies either in a vehicle (connected) or out of vehicle. Battery Test information is displayed across multiple screens. Batteries can also be tested by rating and type. Use ... -
Page 22: State-Of-Charge (Soc)
Chapter 4: Battery Test State-of-Charge (SOC) The State-of-Charge is one of several important factors that affect the battery’s ability to crank an engine. It is a measure of the available capacity remaining of a battery expressed as a percentage of its original rated capacity. State-of-Health (SOH) State-of-Health is a measure of a battery’s condition relative to a fresh battery. -
Page 23: Chapter 5: Info Menu
Totals tracks the number of battery tests in four cat- Version egories: the Lifetime, User Totals, Last 100 Log, and Totals By Decision. VERSION displays the GR8 software version, the date the software was released, and the serial number of LIFETIME the charger. -
Page 24: Chapter 6: Setup Menu
Chapter 6: Setup Menu Chapter 6: Setup Menu Users Use the Setup Menu to customize the charger’s user interface. It is also used to access the administrative Use the USERS utility to create and edit a USER ID with (ADMIN) functions which control user access. 1 to 7 alphanumeric characters and link it to a test Access to the Setup Menu initially requires an ADMIN PIN counter. -
Page 25: Edit
Chapter 6: Setup Menu Edit Display At the User ID select EDIT. Use the DISPLAY option to adjust the contrast of the ENTER NEW text on the display and the backlight time. DELETE Contrast Level EDIT Press ADJUST key to display the numerical scroll box. Scroll to an ID placeholder. -
Page 26: Language
Use this function to change the five-digit Administrator PIN. Re-enter it a second time and then press SAVE. The default PIN Press SAVE. is 12345. Call Midtronics at 1.800.776.1995 for a forgotten or missing Administrator PIN. Format Clear Test Totals... -
Page 27: Chapter 7: Software Update (Muw)
The MUW (Midtronics Update Wizard) is a TIS-based system Plug the charger into a dedicated, grounded nominal 15- that allows you to update the software in your GR8 Battery amp or higher AC outlet and turn it on. Diagnostic Station when new software revisions are released. - Page 28 10. Click “Exit”, disconnect the USB cable from the charger After troubleshooting, click “Try Again” to continue. Once Control Module, and cycle the power to the unit. a connection has been established, the Midtronics MUP file and version information will be displayed. The software updating process is now complete.
-
Page 29: Chapter 8: Maintenance & Troubleshooting
Test Messages • Periodically clean the clamps using a mixture of baking soda and water, or a mild hand-soap, and a small bristle brush. If troubleshooting does not solve the problem, call Midtronics Customer Service at 1.800.776.1995. Handling Test Cables Message Explanation •... -
Page 30: Power On Procedure
Chapter 7: Software Update (MUW) Power On Procedure Printing Data When the STATUS indicator is off, the printer is off. A brief Aim the Control Module’s IR data transmitter directly at press of the MODE button turns on the printer and turns on the printer’s IR receiver (below the MODE button). -
Page 31: Printer Troubleshooting
AA NiMH rechargeable batteries are • Check to see what configuration your printer generally available anywhere batteries are sold. is in. The printer is set up at Midtronics to operate in IrDA mode, which is compatible with the charger’s communications protocol. -
Page 32: Appendix A: Glossary
The utility also allows the Administrator to clear test Dynamic Conductance: Advanced Midtronics test technology totals, reset system defaults, change the ADMIN PIN or enable/ that uses multiple inputs, tests, advanced processing, and disable it. - Page 33 Menu) that will transfer test data stored in the charger to a MUW: Midtronics Update Wizard. Software available on the computer. The utility will consist of a software and hardware TIS system that allows you to update the charger software.
-
Page 34: Appendix B: Templates
Appendix B: Templates Appendix B: Templates Header Template Line 1 Line 2 Line 3 Line 4 Line 5 Line 6 Line 7 Line 8 Coupon Template Line 1 Line 2 Line 3 Line 4 Line 5 Line 6 Line 7 Line 8... - Page 35 Appendix B: Templates...
- Page 36 PATENTS This product is made by Midtronics, Inc., and is protected by one or more U.S. and foreign patents. For speci c patent information, contact Midtronics, Inc. at +1 630 323-2800. LIMITED WARRANTY Midtronics products are warranted to be free of defects in materials and workmanship for a period of one (1) year from date of purchase.
Need help?
Do you have a question about the GR8 and is the answer not in the manual?
Questions and answers