Table of Contents
Advertisement
Advertisement
Table of Contents

Subscribe to Our Youtube Channel
Related Manuals for Midtronics GRX-3000


Summary of Contents for Midtronics GRX-3000
- Page 1 November 2010 167-000231A GRX-3000 Battery Diagnostic Station INSTRUCTION MANUAL...
- Page 2 This page intentionally left blank.
-
Page 3: Table Of Contents
Extended Charge Mode Safety Precautions Top-Off Mode Aborting a charge session Chapter 1: Before You Begin Completing a charge session Assembly of the GRX-3000 State-of-Health (SOH) Assemble the cart Chapter 6: Manual Charging Attaching the Charger Cables Attaching the Power Cord... - Page 4 GRX-3000 Problems with the Display The display does not turn on The display is dim Update Format Card Language Coupon Shop info Chapter 10: Errors and warnings Reverse Connection Check Clamp connection Frozen Battery Battery Temperature above limit Midtronics bv.
-
Page 5: Safety Guidelines
Safety Guidelines GRX-3000 Safety Guidelines General Safety Precautions IMPORTANT SAFETY INSTRUCTIONS. IT IS OF UTMOST Remove marine “boat” batteries and charge IMPORTANCE THAT BEFORE USING YOUR CHARGER, them on shore. YOU READ THIS MANUAL AND FOLLOW THE SAFE- Charging marine batteries on-board requires spe- TY AND OPERATING INSTRUCTIONS EXACTLY. -
Page 6: Preparing To Charge The Battery
Safety Guidelines GRX-3000 Non-rechargeable batteries may burst when Hazardous voltage. charging causing personal injury and damage. An improper connection can result in electric shock To avoid electrical shock or burn, never alter the char- ger’s original AC cord and plug. Disconnect plug from To avoid electrical shock or burn, never alter outlet when charger is idle. -
Page 7: Charger Location
Safety Guidelines GRX-3000 Recommended minimum AWG* size for extension cords for battery chargers AC input rating amperes AWG* size of cord Length of cord, feet (m) Equal or greater than: But less than: (7.6) (15.2) (30.5) (45.6) *American Wire Gauge... -
Page 8: Removing The Battery
Safety Guidelines GRX-3000 Safety Precautions 7.8 For positive-grounded vehicle, connect the NEGATIVE (BLACK) clamp from the charger to the NEGATIVE Inspect the battery for damages and check the electrolyte (NEG., N, –) ungrounded post of battery. Then connect level. If the electrolyte level is too low, replenish it and the POSITIVE (RED) clamp to the POSITIVE (POS., P, +) -
Page 9: Chapter 1: Before You Begin
Chapter 1: Before You Begin GRX-3000 Chapter 1: Before You Begin Disposal Do not dispose of this device with normal domestic waste! To comply with the European Directive 2002/96/EC on Waste Electrical and Electronic Equipment and its implementation as national law, electrical equipment that has reached the end of its life must be collected separately and returned to an approved recycling facility Any device that you no longer require must be returned to our agent, or find out about the approved collection and recycling facilities in your area. -
Page 10: Assembly Of The Grx-3000
Chapter 1: Before You Begin GRX-3000 Assembly of the GRX-3000 Insert the screws through the holes in the cover and and securely tighten the screws. The GRX Battery Diagnostic Station is shipped in two pieces: The cart and the charge engine. -
Page 11: Chapter 2: Overview
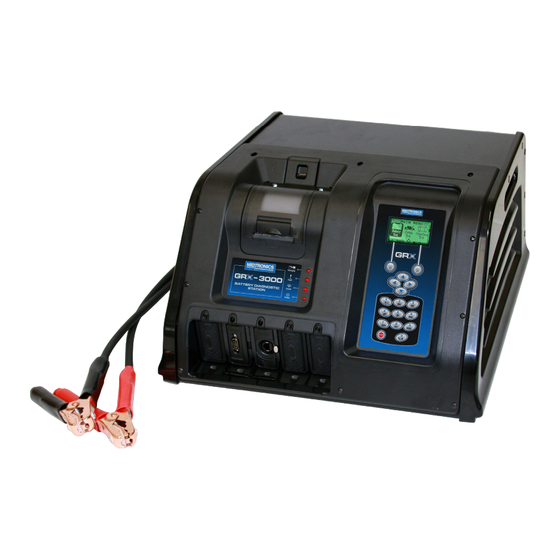
Chapter 2: Overview GRX-3000 Chapter 2: Overview GRX Battery Diagnostic Station: Front View The controls to the GRX Battery Diagnostic Station are accessible on the front panel. Optional slide-in thermal printer Alphanumeric keypad Allows you to print results after the charge cycle. -
Page 12: Grx Battery Diagnostic Station: Side View
Chapter 2: Overview GRX-3000 GRX Battery Diagnostic Station: Side View On the right side of the unit you can find an SD card slot and mini USB connection. Data Card slot Available for future software updates and data storage. -
Page 13: Display And Keypad
Chapter 2: Overview GRX-3000 Display and Keypad STOP Key GRX Battery Diagnostic Station can be controlled with Press the STOP key at any time to stop the active mode. an integrated display and keypad or with an external tester ... -
Page 14: Data Entry Methods
Chapter 2: Overview GRX-3000 Data Entry Methods Alphanumeric Entry Some selections require you to To perform a particular test or function, the GRX Battery use the alphanumeric keypad. Diagnostic Station requires different types of information. These “user-defined” selections This means that the methods you use to enter information... -
Page 15: Main Menu
Chapter 2: Overview GRX-3000 Main Menu The starting point for all functions in the charger. Some icons lead directly to the function while others lead to two or more options underneath it. Menu Icon Description Diagnostic Mode automatically tests, charges, and provides battery decision using the information you select in a series of screens. -
Page 16: Chapter 3: Getting Started
Chapter 3: Getting Started GRX-3000 Chapter 3: Getting Started Time The instructions in this section will help you quickly put your GRX to work. Use the LEFT () or RIGHT () ARROW keys to high- light the hour, minutes, or AM or PM. -
Page 17: Chapter 4: Preparing To Charge
Chapter 4: Preparing to Charge GRX-3000 Chapter 4: Preparing to Charge Inspecting the Battery Before starting the test, visually inspect the battery for: • Cracked, buckled, or leaking case. If you see any of these defects, replace the battery. DO NOT CHARGE THE BATTERY. • Corroded, loose, or damaged cables and connections. -
Page 18: Chapter 5: Diagnostic Charging
Chapter 5: Diagnostic Charging GRX-3000 Chapter 5: Diagnostic Charging Battery Standards The GRX Battery Diagnostic Station will determine the internal condition of a battery before attempting to apply a charge to it. Rating Description Range System Before performing a diagnostic charge on a battery installed... -
Page 19: Charging Modes
Chapter 5: Diagnostic Charging GRX-3000 Charging Modes NOTE: The actual time needed to charge the battery may be less than the estimated time depending on the battery’s The Diagnostic Charging mode knows several individual charge acceptance and condition during the charge. -
Page 20: State-Of-Health (Soh)
Chapter 5: Diagnostic Charging GRX-3000 Battery Decisions: Diagnostic Charge IMPORTANT: When you start a new test, the last bat- tery test in memory will be overwritten. Remember Battery Decision Recommended Action to record or print the results if you need to retain them. -
Page 21: Chapter 6: Manual Charging
Chapter 6: Manual Charging GRX-3000 Chapter 6: Manual Charging Press the UP () or DOWN () ARROW key, or use the The GRX guides you through the steps of selecting your battery test parameters and interpreting the results. numeric keys to enter the CHARGING VOLTAGE. You... -
Page 22: Chapter 7: Power Supply
Chapter 7: Power Supply GRX-3000 Chapter 7: Power Supply Press ENTER. The Power Supply function should be used when ever the vehicle comes in to the workshop for regular maintenance The GRX will test the battery with conductance. or ECU re-flashing. -
Page 23: Chapter 8: Printing / View Menu
Chapter 8: Printing / View Menu GRX-3000 Chapter 8: Printing / View Menu Version Info The Print/View Menu enables you to view and print the re- sults of the charge cycles before you perform another cycle The VERSION utility displays the current software version, and overwrite the results in memory. -
Page 24: Chapter 9: Utility Menu
Chapter 9: Utility Menu GRX-3000 Chapter 9: Utility Menu From the MAIN Menu, highlight the UTILITY icon and press the SELECT key. Use the RIGHT () ARROW to select one of the following icons: CONFIG CHARGER, DISPLAY, LANGUAGE, SHOP INFO, COUPON, FORMAT CARD, UPDATE... -
Page 25: Date
Chapter 9: Utility Menu GRX-3000 If you used the ARROW keys, press the SAVE soft key to save your setting or the BACK soft key to return to the menu. If you use the alphanumeric keypad to enter the number preceding the option button, no additional keypress is needed to save your selection. -
Page 26: Display
Chapter 9: Utility Menu GRX-3000 Display The DISPLAY option allows you to adjust the contrast of the text on the display. Contrast Level The contrast level is 0 (lightest) to 10 (darkest). To change it: Press the UP () or DOWN () ARROW key to change the contrast. - Page 27 Chapter 9: Utility Menu GRX-3000 Shop info The SHOP INFO utility enables you to create a header for your printed test results showing your business location information. Screen 1 1–WORKSHOP NAME — 2–STREET NAME 3–CITY 4–ZIP CODE Screen 2 5–COUNTRY —...
- Page 28 Chapter 10: Errors and warnings GRX-3000 Chapter 10: Errors and warnings Battery Temperature above limit During a charge cycle there might be messages coming from the charger indicating something is wrong. Below is a summary of possible messages and explanations.
- Page 29 PATENTS The GRX-3000 Battery Diagnostic Station is made in the U.S.A. by MIDTRONICS, INC. and is protected by one or more of the following U.S. Patents: 5757192; 5821756; 6051976; 6081098; 6091245; 6104167; 6313608; 6329793; 6424158; 6456045; 6885195. United Kingdom Patent: 240 1952; 2406656. German Patent: 0990150.
Need help?
Do you have a question about the GRX-3000 and is the answer not in the manual?
Questions and answers