
Subscribe to Our Youtube Channel
Related Manuals for Midtronics GR8-1250


Summary of Contents for Midtronics GR8-1250
- Page 1 June 2009 167-000155A GR8-1250 WalMaRT Multitasking Battery And Electrical Diagnostic Station INSTRUCTION MaNUal...
- Page 2 This page intentionally left blank.
-
Page 3: Table Of Contents
Contents GR8-1250 WalMaRT Contents Safety Guidlines Chapter 4: Test Preparation General Safety Precautions Inspecting the Battery Personal Precautions Testing Out-of-Vehicle (Battery Test) Preparing To Charge The Battery Connecting to the Battery Grounding / AC Power Cord Connections Chapter 5: Battery Test... - Page 4 Contents GR8-1250 WalMaRT Chapter 9: Setup Chapter 10: Troubleshooting Clock Chapter 11: Charger Maintenance Mode Time Replacing the Paper Roll Format Test Cable Maintenance Date Attaching the Charger Cables Shop Users Entering A New User ID Deleting A User ID...
-
Page 5: Safety Guidlines
GR8-1250 WalMaRT Safety Instructions Safety Guidlines General Safety Precautions IMPORTANT SAFETY INSTRUCTIONS. IT IS OF UTMOST Remove marine “boat” batteries IMPORTANCE THAT BEFORE USING YOUR CHARGER, and charge them on shore. YOU READ THIS MANUAL AND FOLLOW THE SAFETY AND OPERATING INSTRUCTIONS EXACTLY. SAVE THESE Charging marine batteries on-board requires specially designed equipment for marine use. -
Page 6: Preparing To Charge The Battery
Safety Instructions GR8-1250 WalMaRT Non-rechargeable batteries may Hazardous voltage. An improper connection can result in burst when charging causing electric shock personal injury and damage. To avoid electrical shock or burn, never alter Only charge rechargeable lead-acid the charger’s original AC cord and plug. Dis- maintenance-free, low-maintenance or deep- connect plug from outlet when charger is idle. -
Page 7: Charger Location
GR8-1250 WalMaRT Safety Instructions Table 1 - Recommended minimum AWG* size for extension cords for battery chargers AC input rating amperes AWG* size of cord Length of cord, feet (m) Equal or greater than: But less than: (7.6) (15.2) (30.5) (45.6) - Page 8 Safety Instructions GR8-1250 WalMaRT 7.8 For positive-grounded vehicle, connect the NEGATIVE 8.1 Check the polarity of battery posts. POSITIVE (POS., P, +) (BLACK) clamp from the charger to the NEGATIVE (NEG., post usually has larger diameter than NEGATIVE (NEG., N, –) ungrounded post of battery. Then connect the POSI- N, –) post.
-
Page 9: Chapter 1: Before You Begin
GR8-1250 WalMaRT Chapter 1: Before You Begin Chapter 1: Before You Begin Battery acid is highly corrosive. If acid enters your eyes, im- Safety Reminder mediately flush them thoroughly with cold running water for at least 15 minutes and seek medical attention. If bat-... -
Page 10: Registering Your Battery Diagnostic Station
Module. For its locations, see the illustration on page To register, log on at www.midtronics.com, click on Support, then Warranty Registration and have your serial number ready. If your Battery Diagnostic Station needs repair, call Midtronics Customer Service 1-800-776-1995. Servicing the charger yourself may void your warranty. - Page 11 GR8-1250 WalMaRT Chapter 1: Before You Begin Attach the upper mounting bracket to the bottom bracket Tighten the screws on both connectors. with the three Phillips screws circled in the following illus- tration. Attach the Multitask Bridge to the front of the GR Charge En- gine using the magnet on the back of the Bridge housing.
-
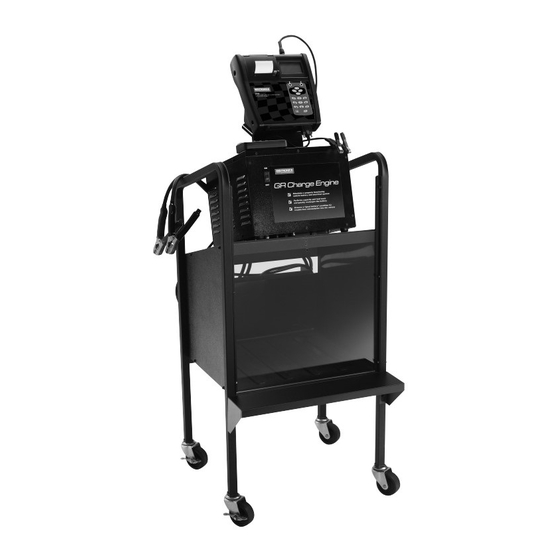
Page 12: Chapter 2: Overview
Chapter 2: Overview GR8-1250 WalMaRT Chapter 2: Overview Battery Diagnostic Station: Front View The controls to the Battery Diagnostic Station are accessible on the front of the Control Module and the GR Charge Engine. Control Module ... -
Page 13: Battery Diagnostic Station: Rear View
GR8-1250 WalMaRT Chapter 2: Overview Battery Diagnostic Station: Rear View Connectors for the charger cables, serial cable, and power cord are on the back of the GR Diagnostic Charge Engine. The serial number, which you will need in order to register the Battery Diagnostic Station, is on the back of the Control Module. -
Page 14: Display And Keypad
Chapter 2: Overview GR8-1250 WalMaRT Display and Keypad The GR8 display and keypad work together to help you quickly find and use the right tools at the right time. The display also keeps you on track with onscreen navigation aids, directions and messages. The illustration shows how the elements on the screen relate to the keypad. -
Page 15: Data Entry Methods
GR8-1250 WalMaRT Chapter 2: Overview Data Entry Methods Scroll Bar To perform a particular test or function, the GR8 requires Another navigational aid is the scroll bar on the right side of different types of information. This means that the methods the screen. -
Page 16: Main Menu
Lists the software version, version date, and in the GR8 to suit your needs. serial number. Provides a list of topics and definitions. Also includes Midtronics Customer Service phone numbers. *Menu icons marked with an asterisk (*) are mapped on the following pages. Required test leads... -
Page 17: Setup Menu
GR8-1250 WalMaRT Chapter 2: Overview Setup Menu The Setup Menu has several functions to customize the use of your GR8—from the language of the user interface to the contrast of the display. The most important, however, is the ADMIN (administrative) function which controls user access. -
Page 18: Chapter 3: Getting Started
Screen may take up to ten seconds to boot up while testing This menu also provides troubleshooting information and the internal software integrity. phone numbers for Midtronics Customer Service, in case you encounter a problem and/or need technical assistance. Select the HELP icon from the Main Menu. -
Page 19: Chapter 4: Test Preparation
GR8-1250 WalMaRT Chapter 4: Test Preparation Chapter 4: Test Preparation Inspecting the Battery Connecting to the Battery Before starting the test visually inspect the battery for: Connect the testing clamps to the battery in accordance with all precautions and safety instructions. -
Page 20: Chapter 5: Battery Test
Chapter 5: Battery Test GR8-1250 WalMaRT Chapter 5: Battery Test Test Requirements Select the APPLICATION. AUTOMOTIVE The GR8 guides you through the steps of selecting your battery test parameters and interpreting the MOTORCYCLE results. Before you start the test, review the instruc- tions in Chapter 4: Test Preparation on page 21. -
Page 21: Additional Test Requirements
GR8-1250 WalMaRT Chapter 5: Battery Test Unstable Battery Detected Table 3 - Battery Ratings A battery that is weak or that has just been charged may retain Ratings Description Range enough electrical activity to be detected by the analyzer Cold Cranking Amps (specified and will adversely affect the test results. -
Page 22: State Of Health
If you tested the battery in vehicle, disconnect the battery cables and retest using the Battery Test before replacing it. CHARGE & RETEST Fully charge and test the battery using a Midtronics Diagnostic Charger. REPLACE BATTERY Disconnect the battery cables and replace the battery. -
Page 23: Chapter 6: Diagnostic Charging
GR8-1250 WalMaRT Chapter 6: Diagnostic Charging Chapter 6: Diagnostic Charging The GR8 1250 battery analyzer and diagnostic Select the POST TYPE. The REMOTE option appears for the charger will determine the internal condition of a IN VEHICLE test. battery before attempting to apply a charge to it. -
Page 24: Charging Modes
Chapter 6: Diagnostic Charging GR8-1250 WalMaRT Charging Modes If you select JIS, the analyzer will ask for the JIS part number. Scroll to the part number. To increase your Diagnostic Charging has four modes (Initial Analysis, Deep Scan scrolling speed, hold the UP or DOWN ARROW key, or use... -
Page 25: Diagnostic Mode
GR8-1250 WalMaRT Chapter 6: Diagnostic Charging Diagnostic Mode Top-Off Mode Once the GR8 determines that the battery is good, needs Following the Diagnostic Charge Mode process the GR8 will charging, and is safe to charge, it proceeds to Diagnostic Charge prompt you to stop the process or continue on in Top-Off Mode. -
Page 26: Completing A Charge Session
Chapter 6: Diagnostic Charging GR8-1250 WalMaRT Completing a Charge Session The GR8 displays one of three battery decisions (GOOD BATTERY, REPLACE BATTERY, REPLACE-BAD CELL) and an The charge session is complete when the proper amount of analysis, which includes the battery State-of-Health and State- charge is put back into the battery or the remaining estimated of-Charge. -
Page 27: Chapter 7: Info Menu
GR8-1250 WalMaRT Chapter 7: Info Menu Chapter 7: Info Menu The Info Menu has three utilities to help you print USER TOTALS and view your test data and track the usage and Total tests by User ID (and by UNREG user) since the first history of your GR8. -
Page 28: Chapter 8: New Battery Test
Chapter 8: New Battery Test GR8-1250 WalMaRT Chapter 8: New Battery Test The New Battery Test in the Main Menu enables For the next few seconds the GR8 evaluates the battery, you to quickly check new batteries in your inven- then displays the results starting from the last battery tory. -
Page 29: Chapter 9: Setup
GR8-1250 WalMaRT Chapter 9: Setup Chapter 9: Setup Clock Format Use the UP or DOWN ARROW or press the corresponding The CLOCK ADJUST utility has four settings. Use the numerical key (1 or 2) to move the dot to the option UP or DOWN ARROW key to highlight the setting button of your choice. -
Page 30: Shop
Chapter 9: Setup GR8-1250 WalMaRT Shop To erase a character, press the LEFT ARROW key. Insert a character by pressing the alphanumeric key asso- The SHOP INFO utility allows you to create a header ciated with the character as many times as needed. You... -
Page 31: Deleting A User Id
GR8-1250 WalMaRT Chapter 9: Setup To clear the default characters, press the LEFT ARROW key. Edit the displayed User ID. To add a space, move the cursor forward by pressing the Press the SAVE button to save your changes. RIGHT ARROW key. -
Page 32: Edit Coupon
Chapter 9: Setup GR8-1250 WalMaRT Edit Coupon The EDIT COUPON utility allows you to create and To create and edit a coupon, see the procedure under “Shop” store a promotional coupon or message on the in this chapter for using the keypad to enter and backspace printed test results you give tor your customers. -
Page 33: Admin
GR8-1250 WalMaRT Chapter 9: Setup admin Change Admin Pin This function allows you to enter a new Admin Pin. Select the ADMIN icon to display a list of adminis- trative functions: Clear Test Totals This function allows you to clear the test totals by User ID and ... -
Page 34: Format
Chapter 9: Setup GR8-1250 WalMaRT User Screen Format This utility allows you to customize screen infor- Select this utility to format an data card to receive mation. Data may be entered manually or using a data or erase all data on the card. The Battery Diag- data card. - Page 35 GR8-1250 WalMaRT Chapter 10: Troubleshooting Chapter 10: Troubleshooting he table below will help you troubleshoot test messages. If troubleshooting does not solve the problem, call Midtronics Customer Service at 1.800.776.1995. Table 11: Troubleshooting MESSAGE Option EXPLANATION VOLTAGE OUT OF RANGE! Attention light flashes at Tool detects inccorect voltage in battery test.
- Page 36 Chapter 10: Troubleshooting GR8-1250 WalMaRT MESSAGE Option EXPLANATION DATA CARD ERROR DATA If the data card is not Format the data card by selecting SETUP/FORMAT from the Main CARD NOT FORMATED. NO formatted. Attention Menu. DATA WILL BE WRITTEN light flashes at 0.5...
-
Page 37: Mode 29 Chapter 11: Charger Maintenance
GR8-1250 WalMaRT Chapter 11: Charger Maintenance Chapter 11: Charger Maintenance Replacing the Paper Roll attaching the Charger Cables The printer uses thermal paper in a roll with the dimensions The two connectors for the charger cables are located on 2.25 in x 85 ft. (57 mm x 25.9 m). You can purchase replacement the back of the GR8. - Page 38 PATENTS The GR8 Battery Diagnostic Station is made in the U.S.A. by Midtronics, Inc. and is protected by one or more of the following U.S. Patents: 4,816,768; 4,825,170; 4,881,038; 4,912,416; 5,572, 136; 5,585,728; 5,592,093; 5,757,192; 5,821,756; 5,831,435; 5,914,605; 6,051,976; 6,091,245; 6,163,156; 6,249,124; 6,304,087; 6,310,481; 6,316,914; 6,323,650; 6,351,102; 6,359,441; 6,363,303; 6,392,414;...
Need help?
Do you have a question about the GR8-1250 and is the answer not in the manual?
Questions and answers