
Related Manuals for Midtronics GRX-3080 JLR EU


Summary of Contents for Midtronics GRX-3080 JLR EU
- Page 1 GRX-3080 JLR EU Battery Diagnostic Station - Standalone version INSTRUCTION MANUAL...
- Page 2 This page intentionally left blank.
-
Page 3: Table Of Contents
GRX-3080 JLR EU STANDALONE CONTENTS Safety Guidelines Hard to Charge Mode Bulk Charge Mode / Fill Mode General Safety Precautions Extended Charge Mode Personal Precautions Top-Off Mode Preparing to Charge the Battery Aborting a charge session Grounding and Power Cord Connections... - Page 4 GRX-3080 JLR EU STANDALONE Write fail Temperature units Power Supply Voltage Buzzer Diagnostic Voltage Limit Diagnostic Amp Limit Pag Code Display Contrast Level Problems with the Display Language Shop info Coupon Format Card Update BMIS Data Send WiFi Settings Scan for Network...
-
Page 5: Safety Guidelines
Safety Guidelines GRX-3080 JLR EU STANDALONE Safety Guidelines General Safety Precautions Remove marine “boat” batteries and charge IMPORTANT SAFETY INSTRUCTIONS. IT IS OF UTMOST them on shore. IMPORTANCE THAT BEFORE USING YOUR CHARGER, Charging marine batteries on-board requires specially YOU READ THIS MANUAL AND FOLLOW THE SAFE- designed equipment for marine use. -
Page 6: Preparing To Charge The Battery
Safety Guidelines GRX-3080 JLR EU STANDALONE Grounding and Power Cord Connections Non-rechargeable batteries may burst when charger must be grounded 4.1 The to reduce risk of charging causing personal injury and damage. electric shock. The charger is equipped with an electric To avoid electrical shock or burn, never alter the charger’s... -
Page 7: Charger Location
Safety Guidelines GRX-3080 JLR EU STANDALONE Recommended minimum AWG* size for extension cords for battery chargers AC input rating amperes AWG* size of cord Length of cord, feet (m) Equal or greater than: But less than: (7.6) (15.2) (30.5) (45.6) -
Page 8: Removing The Battery
Safety Guidelines GRX-3080 JLR EU STANDALONE Safety Reminder 7.8 For positive-grounded vehicle, connect the NEGATIVE (BLACK) clamp from the charger to the NEGATIVE (NEG., N, –) ungrounded post of battery. Then connect For safe, efficient, and accurate charging and testing, review the POSITIVE (RED) clamp to the POSITIVE (POS., P, +) -
Page 9: Chapter 1: Before You Begin
Chapter 1: Before You Begin GRX-3080 JLR EU STANDALONE Chapter 1: Before You Begin Disposal Do not dispose of this device with normal domestic waste! To comply with the European Directive 2002/96/EC on Waste Electrical and Electronic Equipment and its implementation... -
Page 10: Assembly Of The Grx-3080
Chapter 1: Before You Begin GRX-3080 JLR EU STANDALONE Assembly of the GRX-3080 Center the three holes in mounting bracket over the bolts, and lower the bracket onto the charger. Reinstall The GRX-3080 Battery Diagnostic Station is shipped in two the hardware in this order: the flat washer first, the lock pieces: The cart and the charge engine. -
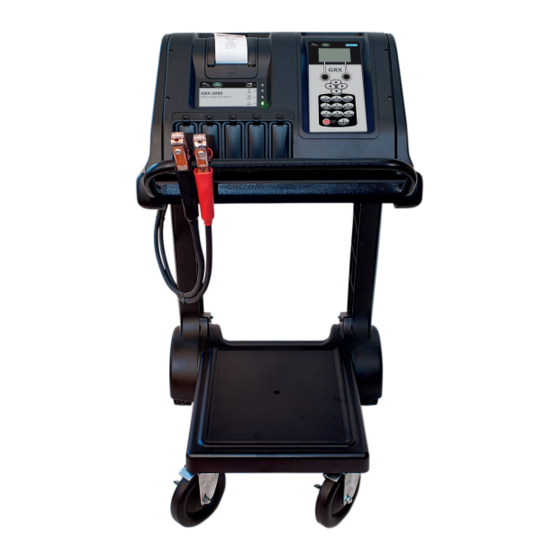
Page 11: Chapter 2: Overview
Chapter 2: Overview GRX-3080 JLR EU STANDALONE Chapter 2: Overview GRX Battery Diagnostic Station: Front View The controls to the GRX Battery Diagnostic Station are accessible on the front panel. Optional slide-in thermal printer Display Allows you to print results after the charge cycle. -
Page 12: Grx Battery Diagnostic Station: Side View
Chapter 2: Overview GRX-3080 JLR EU STANDALONE GRX Battery Diagnostic Station: Side View On the right side of the unit you can find an SD card slot and mini USB connection. Data Card slot Available for future software updates and data storage. -
Page 13: Display And Keypad
Chapter 2: Overview GRX-3080 JLR EU STANDALONE Display and Keypad Voltmeter The GRX Battery Diagnostic Station can be controlled with When you first connect the GRX to a battery it functions as an integrated display and keypad or with an external tester a voltmeter. -
Page 14: Data Entry Methods
Chapter 2: Overview GRX-3080 JLR EU STANDALONE Data Entry Methods Alphanumeric Entry Some selections require you to To perform a particular test or function, the GRX Battery use the alphanumeric keypad. Diagnostic Station requires different types of information. These “user-defined” selections... -
Page 15: Main Menu
Chapter 2: Overview GRX-3080 JLR EU STANDALONE Main Menu Utility Menu The starting point for all functions in the charger. Some icons This menu allows you to set certain preferences and view lead directly to the function while others lead to two or more options. -
Page 16: Chapter 3: Getting Started
Chapter 3: Getting Started GRX-3080 JLR EU STANDALONE Chapter 3: Getting Started Time Format The instructions in this section will help you quickly put your GRX to work. Use the UP () or DOWN () ARROW key, or press the matching numerical keys to move the dot to the option button of your choice. -
Page 17: Chapter 4: Preparing To Charge
Chapter 4: Preparing to Charge GRX-3080 JLR EU STANDALONE Chapter 4: Preparing to Charge Inspecting the Battery Before starting the test, visually inspect the battery for: • Cracked, buckled, or leaking case. If you see any of these defects, replace the battery. DO NOT CHARGE THE BATTERY. -
Page 18: Chapter 5: Diagnostic Charging
Chapter 5: Diagnostic Charging GRX-3080 JLR EU STANDALONE Chapter 5: Diagnostic Charging The GRX Battery Diagnostic Station will determine the Press the NEXT soft key to continue. internal condition of a battery before attempting to apply a Battery Standards charge to it. -
Page 19: Charging Modes
Chapter 5: Diagnostic Charging GRX-3080 JLR EU STANDALONE Charging Modes NOTE: The actual time needed to charge the battery may be less than the estimated time depending on the battery’s The Diagnostic Charging mode knows several individual charge acceptance and condition during the charge. -
Page 20: Completing A Charge Session
Chapter 5: Diagnostic Charging GRX-3080 JLR EU STANDALONE Completing a charge session The charge session is complete when the proper amount of charge is put back into the battery or the remaining estimated time to charge counts down to zero. -
Page 21: Chapter 6: Pdi / Storage
Chapter 6: PDI / Storage GRX-3080 JLR EU STANDALONE Chapter 6: PDI / Storage The PDI and Storage Mode is used for predelivery testing as Battery Standards well as periodical testing of batteries in stored vehicles. Rating Description Range Before performing a diagnostic charge on a battery installed... -
Page 22: Charging Modes
Chapter 6: PDI / Storage GRX-3080 JLR EU STANDALONE Charging Modes Hard to Charge Mode (HTC Mode) The GRX uses the first portion of the total charge cycle The Diagnostic Charging mode knows several individual to closely monitor the acceptance of charge current and charge cycles such as: Hard to Charge, Bulk Charge, Top- energy going in to the battery. -
Page 23: Completing A Charge Session
Chapter 6: PDI / Storage GRX-3080 JLR EU STANDALONE Completing a Charge Session The charge session is complete when the proper amount of charge is put back into the battery or the remaining estimated time to charge counts down to zero. -
Page 24: Chapter 7: Battery Storage
Chapter 7: Battery Storage GRX-3080 JLR EU STANDALONE Chapter 7: Battery Storage The Battery Storage Mode is used for periodic testing of Press the UP () or DOWN () ARROW key, or use the stored batteries. numeric keys to enter the BATTERY RATING in Ah. -
Page 25: Hard To Charge Mode (Htc Mode)
Chapter 7: Battery Storage GRX-3080 JLR EU STANDALONE The GRX continues to test the battery throughout the IMPORTANT: When you start a new test, the last bat- charge cycle and may determine at some point that the tery test in memory will be overwritten. Remember... -
Page 26: Chapter 8: Power Supply
Chapter 8: Power Supply GRX-3080 JLR EU STANDALONE Chapter 8: Power Supply The Power Supply function should be used when ever the vehicle comes in to the workshop for regular maintenance or ECU re-flashing. Re-flashing an ECU can take up to several hours and during that period a lot of current can be drawn from the battery. -
Page 27: Chapter 9: Manual Charging
Chapter 9: Manual Charging GRX-3080 JLR EU STANDALONE Chapter 9: Manual Charging The GRX guides you through the steps of selecting your Battery Standards battery test parameters and interpreting the results. Before Rating performing a manual charge cycle on a battery installed in... -
Page 28: Chapter 10: Print / View Menu
Chapter 10: Print / View menu GRX-3080 JLR EU STANDALONE Chapter 10: Print / View menu Problems with the Internal Printer The Print/View Menu enables you to view and print the re- sults of the charge cycles before you perform another cycle and overwrite the results in memory. -
Page 29: Chapter 11: Utility Menu
Chapter 11: Utility Menu GRX-3080 JLR EU STANDALONE Chapter 11: Utility Menu From the MAIN Menu, highlight the UTILITY icon and Press the SAVE soft key to save your setting or the BACK press the SELECT key. soft key to return to the menu screen without saving the changes. -
Page 30: Temperature Units
Chapter 11: Utility Menu GRX-3080 JLR EU STANDALONE Temperature units Pag Code Press the UP () or DOWN () ARROW or press the Enter the PAG code. corresponding numerical key (1 or 2) to move the dot to Press the SAVE soft key to save your setting or the BACK the option button of your choice. -
Page 31: Shop Info
Chapter 11: Utility Menu GRX-3080 JLR EU STANDALONE Shop info Format Card The SHOP INFO utility enables you to create a header for Select this utility to format a data card to receive data or your printed test results showing your business location erase all data on the card. -
Page 32: Manual Entry
Chapter 11: Utility Menu GRX-3080 JLR EU STANDALONE entered, press NEXT to continue. Press STOP to exit the Select the KEY slot for the WEP network that you want to character map and return to the Utility menu. use and press SELECT. -
Page 33: Chapter 12: Errors And Warnings
Chapter 12: Errors and warnings GRX-3080 JLR EU STANDALONE Chapter 12: Errors and warnings Battery Temperature above limit During a charge cycle there might be messages coming from the charger indicating something is wrong. Below is a summary of possible messages and explanations. - Page 34 PATENTS This product is made by Midtronics, Inc., and is protected by one or more U.S. and foreign patents. For speci c patent information, contact Midtronics, Inc. at +1 630 323-2800. LIMITED WARRANTY Midtronics products are warranted to be free of defects in materials and workmanship for a period of one (1) year from date of purchase.
Need help?
Do you have a question about the GRX-3080 JLR EU and is the answer not in the manual?
Questions and answers