Table of Contents
Advertisement
Quick Links
Advertisement
Table of Contents

Subscribe to Our Youtube Channel
Related Manuals for Midtronics GRX-3000


Summary of Contents for Midtronics GRX-3000
- Page 1 March 2011 167-000205EN-A GRX-3000 Battery Diagnostic Station INSTRUCTION MANUAL...
-
Page 2: Table Of Contents
Contents GRX-3000 Contents Contents Chapter 4: Diagnostic Charging Diagnostic Charging Modes Safety Guidlines Selecting the Charging Parameters General Safety Precautions Initial Analysis Personal Precautions Dynamic Scan Test Preparing To Charge The Battery Diagnostic Charging Grounding & Power Cord Connections Aborting a Charge Session... - Page 3 Contents GRX-3000 Admin Options Clear Test Totals Reset Defaults Store ID# Buzzer Format Disk Update Chapter 7: Maintenance / Troubleshooting 25 Test Messages Display Problems Internal Printer Replacing the Paper Roll: Removing the Printer Reinstalling the Printer Connecting the Charger Cables...
-
Page 4: Safety Guidlines
Safety Guidlines GRX-3000 Safety Guidlines General Safety Precautions 1.7 To reduce risk of electric shock, unplug the charger from the AC outlet before attempting any maintenance or IMPORTANT SAFETY INSTRUCTIONS. IT IS OF UTMOST cleaning. Turning off the controls will not reduce this risk. -
Page 5: Preparing To Charge The Battery
Safety Guidlines GRX-3000 2.7 Before working with a lead-acid battery, remove personal metal items such as rings, bracelets, necklaces, watches, etc. A lead-acid battery can produce a short circuit current Hazardous voltage. high enough to weld such items causing a severe burn. -
Page 6: Charger Location
Safety Guidlines GRX-3000 Recommended minimum AWG* size for extension cords for battery chargers AC input rating amperes AWG* size of cord Length of cord, feet (m) Equal or greater than: But less than: (7.6) (15.2) (30.5) (45.6) *American Wire Gauge 5. - Page 7 Safety Guidlines GRX-3000 7.8 For positive-grounded vehicle, connect the NEGATIVE 8.1 Check the polarity of battery posts. POSITIVE (POS., P, +) (BLACK) clamp from the charger to the NEGATIVE (NEG., post usually has larger diameter than NEGATIVE (NEG., N, –) ungrounded post of battery. Then connect the POSI- N, –) post.
-
Page 8: Chapter 1: Before You Begin
Chapter 1: Before You Begin GRX-3000 Chapter 1: Before You Begin Safety Reminder Conventions Used in This Manual To help you learn how to use your GRX, the manual uses these For safe, efficient, and accurate charging and testing, review... -
Page 9: Chapter 2: Overview
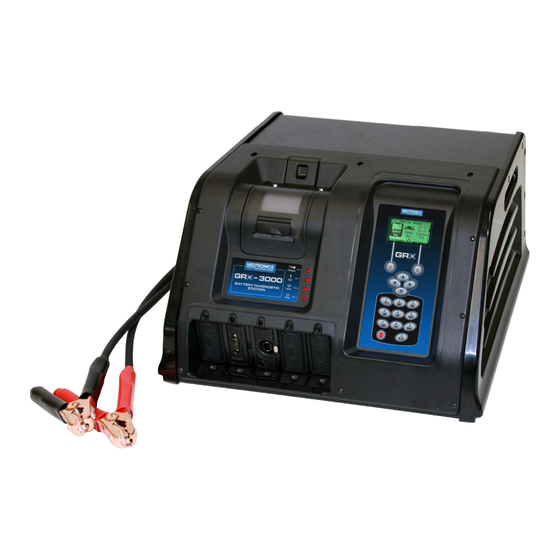
Chapter 2: Overview GRX-3000 Chapter 2: Overview Battery Diagnostic Station: Front View The controls to the Battery Diagnostic Station are accessible on the front panel of the GRX. Integrated Thermal Printer (optional) Arrow Keys For printing and sharing test results. -
Page 10: Battery Diagnostic Station: Side View
Chapter 2: Overview GRX-3000 Battery Diagnostic Station: Side View Display and Keypad USB and data card ports are located on the right side of the The GRX display and keypad work together to help you GRX charger housing. quickly find and use the right tools at the right time. The display also keeps you on track with onscreen navigation aids, directions and messages. -
Page 11: Data Entry Methods
Chapter 2: Overview GRX-3000 Alphanumeric Keypad STOP Key Use the STOP button to stop a battery charging session In some cases, you can use the alphanumeric keypad to that is in progress. enter numerical test parameters instead of scrolling to them with the arrow keys. -
Page 12: Option Buttons
Provides a list of topics and definitions. Also of items in the list. includes Midtronics Customer Service phone numbers. To select an item, the or key to highlight the item, and press the appropriate soft key. -
Page 13: Setup Menu
Chapter 2: Overview GRX-3000 Setup Menu The Setup Menu lets you customize your analyzer to suit your needs. Before testing, check default values to see what options you may want to change. Menu Icon Description Settings to adjust the time. -
Page 14: Chapter 3: Preparing To Charge
Chapter 3: Preparing to Charge GRX-3000 Chapter 3: Preparing to Charge Inspecting the Battery Inital Startup Before starting the test, visually inspect the battery for: The Battery Diagnostic Station is initially set to require a default USER ID to access the Main Menu. The instructions in •... -
Page 15: Logging In As An Unregistered User
Use or to scroll to the ID placeholder you want to use. troubleshooting information and phone numbers for Scrolling past the first line displays the previous screen. Midtronics Customer Service, in case you encounter a problem Scrolling past the fourth line displays the next screen. To and/or need technical assistance. -
Page 16: Chapter 4: Diagnostic Charging
Chapter 4: Diagnostic Charging GRX-3000 Chapter 4: Diagnostic Charging Diagnostic Charging Modes NOTE: If MOTORCYCLE is selected, you will be prompted to enter the battery part number The DIAGNOSTIC charging function uses different printed on the side of the battery. -
Page 17: Initial Analysis
Chapter 4: Diagnostic Charging GRX-3000 Initial Analysis Title Bar: CHARGING When you select the last charge parameter the Battery (blinking)/ TESTING Diagnostic Station begins the initial battery analysis. The Charge time progress of the analysis is shown by the left to right movement counter of a progress bar. -
Page 18: State-Of-Health (Soh)
Chapter 4: Diagnostic Charging GRX-3000 State-of-Health (SOH) REPLACE BATTERY Results: Diagnostic Charge Mode A factor that affects a battery’s ability to crank an engine is its Screen 1 of 3 actual condition or State-of-Health (SOH). It is a measure of the... -
Page 19: Chapter 5: Info Menu
Chapter 5: Info Menu GRX-3000 Chapter 5: Info Menu User Totals The Info Menu has six utilities to help you print and view your test data and track the usage and history of USER TOTALS show the total number of tests completed by your Battery Diagnostic Station. -
Page 20: Chapter 6: Setup Menu
Chapter 6: Setup Menu GRX-3000 Chapter 6: Setup Menu Clock The Setup Menu has different utilities that let you cus- tomize the user interface. These utilities have default The CLOCK ADJUST utility has four settings. Use or settings that you can change, depending on your re- ... -
Page 21: Date
Chapter 6: Setup Menu GRX-3000 Date Entering a New User ID Use ) or to highlight the month, day, or year. To rap- To create a USER ID, select: idly scroll, hold down or . ENTER NEW... -
Page 22: Display
Chapter 6: Setup Menu GRX-3000 Display Temp The LCD OPTIONS utility allows you to adjust the con- The TEMP. UNITS utility allows you to set the units of trast of the text on the display. measurement to either Fahrenheit or Celsius. To set... -
Page 23: Options
Chapter 6: Setup Menu GRX-3000 Options Store ID# In the OPTIONS section are three functions that allow you to Allows you to enter your store ID number. control user access to the Main Menu and Setup Menu. Each option is easily enabled or disabled by turning it ON or OFF. To save your settings after each selection, press SAVE. -
Page 24: Chapter 7: Maintenance / Troubleshooting
Display Problems The display does not turn on. Removing the Printer If the internal printer needs service, contact Midtronics • Make sure the power cord is plugged in and the ON/OFF Customer Service for a shipping instructions and a return switch is set to ON. -
Page 25: Reinstalling The Printer
Battery Diagnostic Station. The installation is now complete. In addition to the troubleshooting suggestions in this chapter, the Help Menu provides tips on troubleshooting problems with the printer, the cables, and loss of power. It also includes Midtronics Customer Service phone numbers. -
Page 26: Appendix
Appendix GRX-3000 Appendix Header Template To help you edit and center your header, use the template below to lay out your shop information below before entering it into the Battery Diagnostic Station Header Template Line 1 Line 2 Line 3...
Need help?
Do you have a question about the GRX-3000 and is the answer not in the manual?
Questions and answers