Table of Contents
Advertisement
Advertisement
Table of Contents

Related Manuals for Midtronics GRX-5100


Summary of Contents for Midtronics GRX-5100
- Page 1 HEV Battery Service Tool Hazardous voltage. An improper connection can result in serious injury or death. To avoid electrical shock or burn, never alter the GRX-5100’s original AC cord and plug. Discon- nect plug from outlet when GRX-5100 is idle. INSTRUCTION MANUAL...
- Page 2 GRX-5100 HEV Battery Service Tool This page intentionally left blank.
-
Page 3: Table Of Contents
GRX-5100 HEV Battery Service Tool Contents General Safety Guidelines Chapter 3: Stack/Pack Discharge Maintenance Stack/Pack Discharge Results Personal Precautions Chapter 4: Stack Balance Grounding & Power Cord Connections Stack Balance Results GRX-5100 Location Chapter 5: Tool Info Chapter 1: Introduction & Overview... - Page 4 GRX-5100 HEV Battery Service Tool This page intentionally left blank.
-
Page 5: General Safety Guidelines
GRX-5100. erly to the GRX-5100 input connector or chassis. Similarly, 1.4 Do not operate the GRX-5100 if it has received a sharp other power ground lines including those to application blow, been dropped or otherwise damaged in any way;... -
Page 6: Personal Precautions
IF THE PLUG DOES NOT FIT THE OUTLET, HAVE A PROPER 2. Personal Precautions OUTLET INSTALLED BY A QUALIFIED ELECTRICIAN. 3.2 This GRX-5100 is for use on a nominal 120 volts or 240 volts circuit (240 volt power cord not included). Only technicians certified to work on HEV systems may use this equipment. -
Page 7: Grx-5100 Location
The GRX-5100 must never be mounted next to or above heat generating equipment. 4.2 Locate the GRX-5100 as far away from the battery as the cables permit. 4.3 Never place the GRX-5100 directly above the battery be- ing charged;... -
Page 8: Chapter 1: Introduction & Overview
Always use the necessary safety precautions when working with Manual Conventions batteries to prevent severe injury or death. Follow all Toyota/ To help you learn how to use your GRX-5100, the manual uses Lexus/Scion instructions and SAE safety recommendations, these symbols and typographical conventions:... -
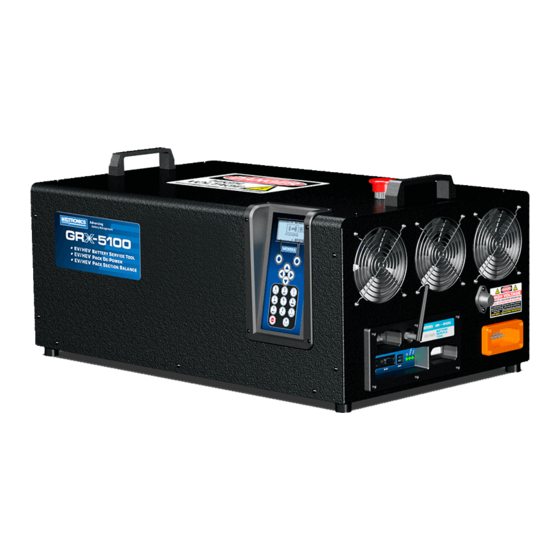
Page 9: Front View
GRX-5100 HEV Battery Service Tool Chapter 1: Introduction & Overview Front View Connection Panel Lifting Handles Emergency STOP Button Keyboard & Display Right End Panel External 12V Auxiliary Power ... -
Page 10: Included Accessories
GRX-5100 HEV Battery Service Tool Chapter 1: Introduction & Overview Included Accessories Midtronics Toyota Letter Description Part Number Part Number Designation A296 01413-00010 Universal Fuse Box A501 01413-00013 High Voltage Cable A A502 01413-00014 High Voltage Cable B A503 01413-00015... -
Page 11: Display And Keypad
GRX-5100 HEV Battery Service Tool Chapter 1: Introduction & Overview Display and Keypad STOP Key Press the STOP key to abort a battery servicing session. The display and keypad work together to help you quickly find and use the right tools at the right time. The display also ... -
Page 12: Data Entry Methods
GRX-5100 HEV Battery Service Tool Chapter 1: Introduction & Overview Scrolling Lists Refer to the following table for the characters associated with each alphanumeric key. Scrolling lists contain items that extend above and below the screen. Character The first number above the right soft key indicates the position in the list ... -
Page 13: Tool Info Menu
Setting preferences are located in Chapter 6: Utility Menu. is being used. REGION Changing User Preferences Before using your GRX-5100, you may want to change some of Initial Startup the default settings. When using the ARROW keys to select option buttons, press SELECT or NEXT to continue to the next step. -
Page 14: Chapter 2: Rescue Charge
To avoid electrical shock or burn, never alter the GRX-5100’s original AC cord and plug. Discon- nect plug from outlet when GRX-5100 is idle. IMPORTANT: Make sure to properly prepare the bat- tery pack by following all required Toyota/Lexus/ 10. -
Page 15: Chapter 3: Stack/Pack Discharge
Before de-powering a battery pack or stack, make sure all of 10. Confirm the appropriate repair procedures for this vehicle. the external components connected to the GRX-5100 are in good working order. 11. Confirm that the High Voltage Service Plug has been re- moved. -
Page 16: Stack/Pack Discharge Results
15. If PACK was selected in step 8, re-install the High Voltage Service Plug and press NEXT. If the connections between the GRX-5100 and the battery pack are correct, a BATTERY DETECTED screen is displayed. 16. Press NEXT to begin the discharging process. -
Page 17: Chapter 4: Stack Balance
To avoid electrical shock or burn, never alter the GRX-5100’s original AC cord and plug. Discon- Once the HV Connection has been completed, the GRX- nect plug from outlet when GRX-5100 is idle. 5100 performs a self test and then enters into STACK BALANCE mode. -
Page 18: Chapter 5: Tool Info
Chapter 5: Tool Info Chapter 5: Tool Info The Tool Info Menu has two (2) utilities to help you track the usage and history of your GRX-5100. Totals The TOTALS function counts the number of charges or de-powerings and tracks the results. -
Page 19: Chapter 6: Utility Menu
Chapter 6: Utility Menu Chapter 6: Utility Menu Date The Utility Menu has several functions that you can use to customize the GRX-5100 user interface. Select the DATE and press NEXT to continue, and press NEXT to continue. Clock Adjust Use ... -
Page 20: Temperature
NOTE: Updating the GRX-5100 software will take ap- proximately 30 minutes. Select the LANGUAGE. ENGLISH On the GRX-5100, remove the USB jump drive inserted in the USB-A port and Insert it in a USB port on an internet- SPANISH enabled, Windows-based computer. -
Page 21: Buzzer
USB-A port on the GRX-5100. Press SAVE to save the selection. At the Main Menu on the GRX-5100, navigate to the Up- The UTILITY menu is displayed. date icon in the Utility Menu and press SELECT. -
Page 22: Chapter 7: Error Messages
Internal LV temperature sensor broken Hardware Contact customer service to arrange service. 24-25 Internal LV temperature too low Hardware Allow the GRX-5100 to warm up. If error persists, contact customer service to arrange service. 26-27 Internal LV temperature too high Hardware Allow the GRX-5100 to cool down. -
Page 23: Hardware Error
If troubleshooting does not solve the problem, call the Special Service Tools hotline (1-800-933-8335). Hardware Error This error can be generated by damaged or improperly connected cables. To clear the error, turn off the GRX-5100, disconnect the cable connections and reconnect. Then power the GRX-5100 back up. - Page 24 The manufacturer is not liable for any incidental or consequential damages from breach of warranty. The warranty is void if the owner attempts to disassemble the GRX-5100, BCU-64, Fuse Box, cables or any other components.
Need help?
Do you have a question about the GRX-5100 and is the answer not in the manual?
Questions and answers