Advertisement
Table of Contents
Instruction manual
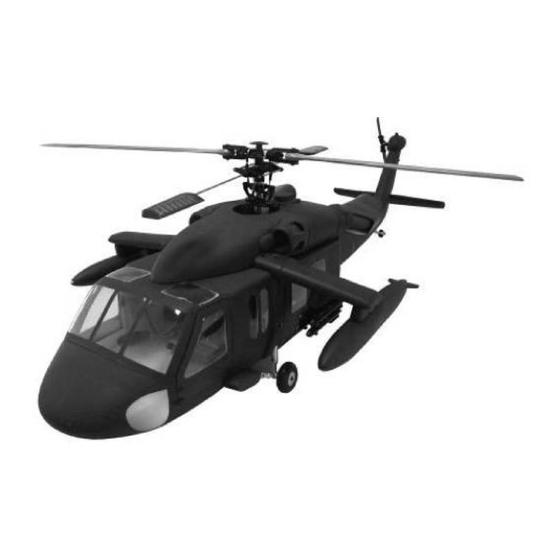
Scale Fuselage UH-60 (Blackhawk, Seahawk, Jayhawk)
500 size
1.
INTRODUCTION
Thank you for buying Roban Model products. The 500 size UH-60 scale fuselage is designed as an easy
to use product. Please read the manual carefully before assembling the model, and follow all
precautions and recommendations located within the manual. Be sure to retain the manual for future
reference, routine maintenance and tuning. The scale fuselage is designed for T-REX 500 Helicopter
series use. You can easily put it on your T-REX 500 for new clothing.
Important Note
Roban Model R/C Helicopters are advanced, high-performance devices, built incorporating the latest
technologies. They are not intended as toys, and improper use can potentially lead to serious injury, or
even fatal accidents. We implore you to read this manual thoroughly before operating these models.
Safety should be your utmost priority - not just your own, but also that of others and your surroundings
when piloting Roban Model products.
Liability Disclaimer:
The manufacturer and the seller cannot accept liability for the operation or misuse of this product.
Roban Model R/C helicopters are intended to be used exclusively by experienced adults in legally
sanctioned flying fields. Once sold, we cannot monitor or control the product's operation or usage.
Operation Guidelines:
Upon assembly of the scale fuselage, the weight and complexity of the structure will increase. To
mitigate risk of accidents and damages, we advise against attempting 3D flights.
Skill Requirements:
Advertisement
Table of Contents

Related Manuals for Roban UH-60


Summary of Contents for Roban UH-60
- Page 1 500 size INTRODUCTION Thank you for buying Roban Model products. The 500 size UH-60 scale fuselage is designed as an easy to use product. Please read the manual carefully before assembling the model, and follow all precautions and recommendations located within the manual. Be sure to retain the manual for future reference, routine maintenance and tuning.
- Page 2 The operation of R/C products necessitates a certain level of skill and familiarity. Any damages or dissatisfaction resulting from accidents, modifications, or operational mishaps are not covered under any warranty. Consequently, such products cannot be returned for repair or if you experience problems during operation or maintenance.
-
Page 3: Contents Of Kit
CONTENTS OF KIT Please check the contents of the kit prior to installation. SCOPE OF DELIVERY Item No. Description Quantity Landing gear Landing gear Landing gear Screw M3x16 Screw M3x12 T-connector Washer M3 Screw M2x8 Nut M2 Screw A2x8 Main frame Tail tube... - Page 4 Linkage Tail shaft Rear redirection Gear Tail gear Mounting blocks Holder Screw M2x16 Washer M2 Nut M2 Screw A2x8 Screw A2x6 Auxiliary tanks Screw A3x10 Screw A2x12 Bracket Boom Rockets Top suspension Bottom suspension Tail unit Pin 3mm Inner turbine outlet Outer turbine outlet Side windows Front window...
- Page 5 Scissors 20g Servo...
-
Page 6: Installation
INSTALLATION 4.1. Assemble the landing gear using 8 pieces of Screw M3x16/12 as shown. 4.2. Assemble the landing gear as shown. 4.3. Screw the landing gear firmly with Screw M3x16 as shown. - Page 7 4.4. Attach the brackets with Screw A2x8 as shown. 4.5. Assemble the rear landing gear as shown with 2 pieces of Screw M2x8. 4.6. Secure the ball head with Screw M2x8 as shown.
- Page 8 4.7. Install the provided main frame and the rear redirection. 4.8. Remove the rear frame. 4.9. Install the mounting blocks as shown.
- Page 9 4.10. Remove the rear cover. 4.11. Insert the mechanics into the fuselage. 4.12. Install the tail propeller. Attach it with the wooden holder and 2 pieces of Screw A2x6 and the fuselage.
- Page 10 4.13. Install the linkage. 4.14. Install the rear cover. 4.15. Install the mechanics with 2 pieces of Screw A2x8.
- Page 11 4.16. Install the mechanics with 2 pieces of Screw A2x8. 4.17. Glue the rocket launcher holder to the rocket as shown as shown. 4.18. Drill 2 holes each into the suspension and mount the rocket launcher with Screw A2x12.
- Page 12 4.19. Proceed with the external tank as in step 18. 4.20. Glue the rocket launcher and the tank with epoxy adhesive to the boom as shown. 4.21. Glue the booms as shown to the fuselage.
- Page 13 4.22. Glue the pins into the tail unit. 4.23. Drill two 3.2mm holes in the fuselage to accommodate the pins. 4.24. Glue the tail unit to the fuselage, aligned cleanly.
- Page 14 4.25. Glue in the exhaust outlets. 4.26. Glue in the inner outlets.
- Page 15 4.27. Glue the windows as shown. 4.28. Glue the scale parts as shown...
-
Page 16: Spare Parts List
5. SPAREPARTS LIST 500 UH-60 500UH60 引擎 UH500PJ001 engine 盖 hatch 500 UH-60 UH500PJ002 500UH60 前窗 front window 500UH60 全套 500 UH-60 UH500PJ003 窗 all windows 500 UH-60 UH500PJ004 500UH60 平尾 tail wings 500 UH-60 UH500PJ005 500UH60 武器 weapon set 500UH60 像真... - Page 17 500 UH-60 500UH60 侧板 UH500PJ011V2 side frames 碳纤 500UH60 像真 500 UH-60 UH500PJ012 座椅 cockpit set 500UH60LED 500 UH-60 UH500PJ013 灯 light kit 500 UH-60 UH500PJ014 500UH60 水印 decal set 500 UH-60 500 轴传通用 500WBX tail 尾波箱 gearbox 500 轴传通用...
- Page 18 6. ILLUSTRATION OF READY MOUNTED HELICOPTER Specifications: Length: 1080mm Height: 270mm Width: 420mm Weight: 700g Suitable for Align TREX500 und similar mechanics We wish you a lot of fun with the fuselage! Copyright 2024 – www.robanmodel.com...
Need help?
Do you have a question about the UH-60 and is the answer not in the manual?
Questions and answers