Advertisement
Quick Links
Evaporation Instruction Sheet
60-5272-002
Ecodyst EcoChyll X1
Self-Cooling Condenser
Installation Guide
keywords: Ecodyst EcoChyll X1, condenser, installation
X1 Device System Setup
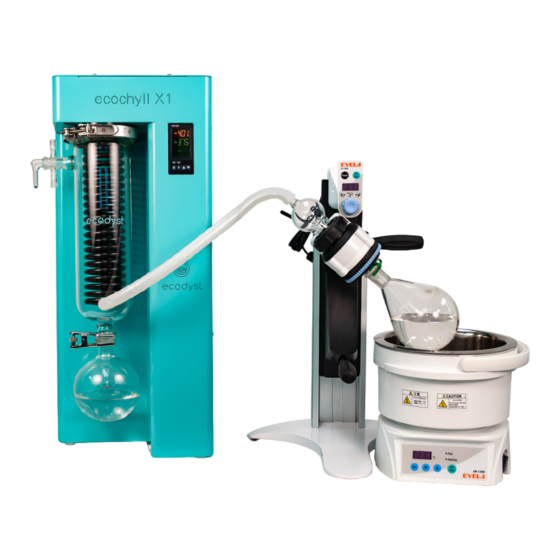
After a successful setup, your complete system should look like the image below.
Use and Disclosure of Data: Information contained herein is classified
as EAR99 under the U.S. Export Administration Regulations.
Export, reexport or diversion contrary to U.S. law is prohibited.
Advertisement

Subscribe to Our Youtube Channel
Related Manuals for Teledyne Ecodyst EcoChyll X1


Summary of Contents for Teledyne Ecodyst EcoChyll X1
- Page 1 Ecodyst EcoChyll X1 Self-Cooling Condenser Installation Guide keywords: Ecodyst EcoChyll X1, condenser, installation X1 Device System Setup After a successful setup, your complete system should look like the image below. Use and Disclosure of Data: Information contained herein is classified as EAR99 under the U.S.
- Page 2 Evaporation Instruction Sheet 60-5272-002 X1 Condensation System Setup Overview After a successful setup, your condensation system should look like the image below: Condenser Power Clamp Switch Condenser Controller Vacuum Port Rotavap Adapter Condenser Coupling Collar (from existing Rotavap) Condenser Coupling Spring Condenser (from existing Rotavap) Glass Body...
-
Page 3: Installation/Electrical Safety
Evaporation Instruction Sheet 60-5272-002 Operating Company’s Obligations General Safety Instructions The device has been constructed according to state-of-the-art Installation Site technology and recognized safety regulations. However, risks • The device must be positioned in a suitable location. may still arise during installation, operation and maintenance. •... - Page 4 Evaporation Instruction Sheet 60-5272-002 X1 Condensation System Setup Checklist Line Item Description EcoChyll S 115V Complete with Condenser Body to Include: Condenser Glass Body, 100mm O-Ring Groove Flange with inlet hose connection Rotavap Adapter for connecting existing Rotavap system to EcoChyll X1 100mm Quick Release Condensor Clamp 100mm Viton O-Ring...
- Page 5 Also, check the vacuum seal on the rotary evaporator. Rev 1.0 01/24 teledynelabs.com Teledyne LABS is continually improving its products and reserves the right to change product specifications, replacement parts, schematics, and instructions without notice. EAR99 Technology Subject to Restrictions Contained on the Cover Page...
Need help?
Do you have a question about the Ecodyst EcoChyll X1 and is the answer not in the manual?
Questions and answers