Pitney Bowes SendPro Mailstation Quick Installation Manual
Hide thumbs
Also See for SendPro Mailstation:
- User manual (67 pages) ,
- Quick installation manual (16 pages) ,
- Installation requirements and connectivity setup manual (5 pages)
Advertisement
Quick Links
SendPro
Mailstation
®
Quick Installation Guide
1
Before you begin
Register for Your Account
Before you begin installing your new SendPro
Mailstation, you need toregister for
Your
Account.
To register for
Your Account
you will need your
8-digit
Pitney Bowes Limited
account number and
serial number that can be found on your welcome
email.
Choose how to connect to the internet
Decide what type of connection (wired or wireless) you wish to use.
Wired Connection
•
Takes about 10 minutes to set up
•
Requires access to a network port and power outlet.
Wireless connection
•
Takes about 15 minutes to set up
•
Requires access to a wireless network (router) and power outlet.
•
Require a wireless network name and password
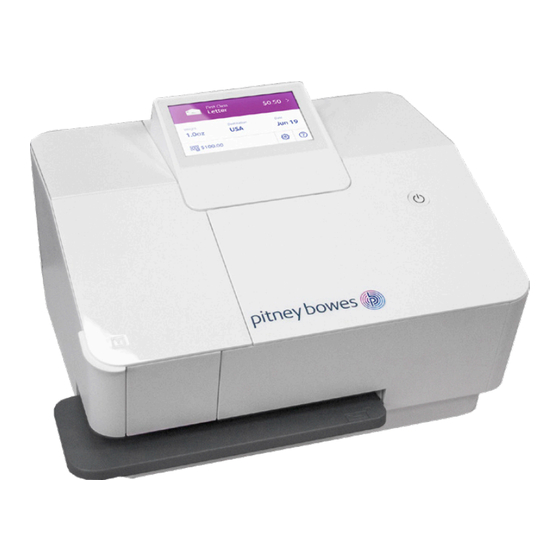
Get to know your device
Scale
(weigh vertically or flat)
Touchscreen
Ink cartridge
access -
ink cover
Insert envelopes straight in.
Please unfold this leaflet fully and carefully follow
the installation instructions (Steps 2-5).
2
Here's a diagram and
an explanation of the items
you should find in your box.
Power Cord LAN/ Internet Cable
UK
Ink Cartridge Tape Sheets
3
a. Remove all packing materials from the device.
Registering for
Your Account
pb.com/uk/register
b. Open the ink cover and remove the orange protector.
Do not install the ink cartridge until you are prompted via the
screen.
USB
access
door
c. Close the ink cover.
Power Button
SendPro Mailstation
Scale Stand
Scale
4
a. Connect to a power source.
b. Press the power button.
5
Follow the on screen prompts.
If you would prefer to watch a video or follow the
installation process on our website. please scan the
QR code on the right using your mobile device or
visit pb.com/uk/spmsinstall
If following online please start from step 3.
pb.com/uk/spmsinstall
See the back of this leaflet for more useful information about
your SendPro Mailstation from the Quick Start Guide.
Installing the
SendPro Mailstation
Advertisement

Related Manuals for Pitney Bowes SendPro Mailstation


Summary of Contents for Pitney Bowes SendPro Mailstation
- Page 1 Installing the Insert envelopes straight in. pb.com/uk/spmsinstall SendPro Mailstation See the back of this leaflet for more useful information about Please unfold this leaflet fully and carefully follow your SendPro Mailstation from the Quick Start Guide. the installation instructions (Steps 2-5).
- Page 2 Weight on the scale or tap to enter weight manually. pb.com/uk/spmsra Get to know PitneyShip Pro Below is an image of your PitneyShip Pro companion app SendPro Mailstation Dashboard. Download printers drivers and support with connecting to printers and Device Hub.
Need help?
Do you have a question about the SendPro Mailstation and is the answer not in the manual?
Questions and answers