
Related Manuals for Winmate FMAD-V Series


Summary of Contents for Winmate FMAD-V Series
- Page 1 Vehicle Mounted Computer Intel® Core™ i5-1235U 3.30 GHz (up to 4.40 GHz) 10.4”/ 12.1”/ 14” FMAD-V Series Quick Start Guide Version 1.1 Document Part No. 9152111I1164...
-
Page 2: Table Of Contents
FMAD-V Series Vehicle Mounted Computer Quick Start Guide Contents Contents ........................1 Copyright ............................3 Trademarks ..........................3 Disclaimer ............................. 3 Warranty ............................3 Advisory Conventions ........................4 FCC Regulations .......................... 4 CE Notice (European Union) ......................5 RF Exposure Information (SAR) ....................5 IC Regulations .......................... - Page 3 Preface 9. RAM Mount Installation ..................25...
-
Page 4: Copyright
Warranty Winmate Inc. warrants that each of its products is free from material and workmanship defect for a period of one year starting from the invoice date. If the customer discovers a defect, Winmate Inc. will, at its option, repair or replace the defective product at no charge to the customer, provided it is returned during the warranty period, with transportation charges prepaid. -
Page 5: Advisory Conventions
Preface Advisory Conventions Four types of advisories are used throughout the user manual to provide helpful information or to alert you to the potential for hardware damage or personal injury. These are Notes, Important, Cautions, and Warnings. The following is an example of each type of advisory. NOTE: A note is used to emphasize helpful information IMPORTANT:... -
Page 6: Ce Notice (European Union)
FMAD-V Series Vehicle Mounted Computer Quick Start Guide CE Notice (European Union) This device has been tested and found to conform to the limits set for a Class B product. EN 55022 — “Limits and Methods of Measurement of Radio Interference Characteristics of •... -
Page 7: Ic Radiation Exposure Statement
Preface The County Code Selection feature is disabled for products marketed in the US/Canada. For product available in the USA/ Canada markets, only channel 1~11 can be operated. Selection of other channels is not possible. IC Radiation Exposure Statement This EUT is compliance with SAR for general population/uncontrolled exposure limits in IC RSS-102 and had been tested in accordance with the measurement methods and procedures specified in IEEE 1528... -
Page 8: Unpacking
FMAD-V Series Vehicle Mounted Computer Quick Start Guide 1. Unpacking 1.1 Package Contents Before using this device, make sure that all the items listed below are included in your package: Quick Start Power Vehicle Power Cable with 150W Adapter Guide... -
Page 9: Components
2. Components 2. Components 2.1 Front View with FM10AD-V Item Description 10.4” Touch Screen Acts as one of the inputs for the device Camera 2 Megapixel front camera Digital Microphone For voice communication and voice recording Power Button and Press and hold the button for 3 second to turn on the device Indicator Light Sensor Light Sensor and... -
Page 10: Front View With Fm12Ad-V
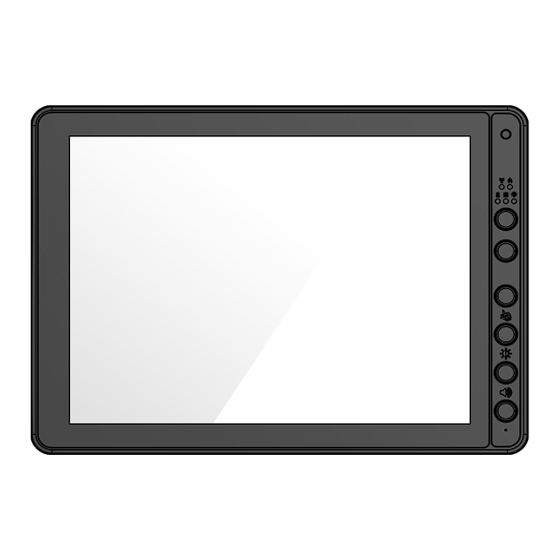
FMAD-V Series Vehicle Mounted Computer Quick Start Guide 2.2 Front View with FM12AD-V Item Description 12.1” Touch Screen Acts as one of the inputs for the device Camera 2 Megapixel front camera Wireless communication indicators Defroster indicators (Defroster is customized feature available by... -
Page 11: Front View With Fm14Ad-V
2. Components 2.3 Front View with FM14AD-V Item Description 14” Touch Screen Acts as one of the inputs for the device Camera 2 Megapixel front camera Microphone For voice communication and voice recording Wi-Fi Indicators UPS Battery Indicators Light Sensor and HDD Indicators LED indicators Power Indicator... -
Page 12: Rear View With Fm10Ad-V And Fm12Ad-V
FMAD-V Series Vehicle Mounted Computer Quick Start Guide 2.4 Rear View with FM10AD-V and FM12AD-V Item Description VESA Mount Hole VESA 75, 100, and RAM Mount... -
Page 13: Rear View With Fm14Ad-V
2. Components 2.5 Rear View with FM14AD-V Item Description Power Button Press and hold the button for 3 second to turn on the device Programmable Function keys that can be configured by using the Win- Function buttons Set® Utility VESA Mount Hole VESA 75, 100, and RAM Mount... -
Page 14: Side View
FMAD-V Series Vehicle Mounted Computer Quick Start Guide 2.6 Side View Item Description Connect to a local area network (LAN) using an Ethernet cable and LAN Port provide optional PSE with 30W. Connect a peripheral device such as a printer or scanner with serial D-SUB A: DB9 male with port . -
Page 15: Top And Bottom View
2. Components 2.7 Top and Bottom View Item Description WWAN Antenna Connect a WWAN external antenna and allow the device to be remotely Connector(optional) mounted on the vehicle. (Optional) GPS Antenna Connect a GPS external antenna and allow the device to be remotely Connector(optional) mounted on the vehicle. -
Page 16: Power Cable Installation
FMAD-V Series Vehicle Mounted Computer Quick Start Guide 3. Power Cable Installation 3.1 Wiring the Power Cable WARNING! / AVERTISSEMENT! This procedure requires a trained service personnel only, improper installation can cause serious damage to the vehicle or the device. -
Page 17: Connecting The Power Cable For Installation On The Vehicle
3. Power Cable Installation 3.3 Connecting the power cable for installation on the vehicle WARNING! / AVERTISSEMENT! Select a mounting location and make sure it is not located on the outside the vehicle. Sélectionnez un emplacement de montage et assurez-vous qu'il ne se trouve pas à l'extérieur du véhicule. - Page 18 FMAD-V Series Vehicle Mounted Computer Quick Start Guide Warning! When power is on, ignition pin connects to battery V+ will cause the power consumption even ignition is off. Power cable description: Color Symbol VCC+ Black VCC- Green Ground White Ignition input (optional) With Ignition Function 7.
-
Page 19: Power Management Mode
4. Power Cable Installation 4. Power Management Mode 4.1 Power Mode The FM-V Series VMC has four power modes: • Full ON • Standby / Sleep • Hibernate • Action Button Power Button Backlight Indicator Press the On button for “2 seconds” Turn On until the battery indicator On (solid green) and then release the button... -
Page 20: Thermal Optional
FMAD-V Series Vehicle Mounted Computer Quick Start Guide 5. Thermal Optional Users can adjust “Thermal Options” in the Win-Set “System Information” page. If the user selects "Performance Priority", the CPU power range is 13W to 15W. If the user selects "Thermal Priority", the CPU... -
Page 21: External / Vehicle Remote Antenna
6. External/ Vehicle Remote Antenna 6. External / Vehicle Remote Antenna The FM-V Series is equipped with SMA Connector for additional external antenna (optional WWAN and GPS), to install the antenna please perform the following: 1. Remove the rubber cap on the SMA connector before installing the antenna. 2. -
Page 22: Keyboard Options
FMAD-V Series Vehicle Mounted Computer Quick Start Guide 7. Keyboard Options The integrated keypad contains several programmable keys, which are user-programmable keys. Key Mapping is configured via the Win-Set ® utility on the control panel. See the Programmable key to remap these keys. -
Page 23: Integrated Keypad For Fm12Ad-V
6. Keyboard Options 7.2 Integrated Keypad for FM12AD-V The FM12AD-V has eight programmable keys from F1 to F8. The default values for these keys are: Press these keys in this order Default Key Value F1+F2 Touch Keypad Lock/Unlock F2+F3 Brightness adjustment (Panel+keypad) F3+F4 Volume adjustment Long press on F1... -
Page 24: Integrated Keypad For Fm14Ad-V
FMAD-V Series Vehicle Mounted Computer Quick Start Guide 7.3 Integrated Keypad for FM14AD-V The FM14AD-V has four programmable keys from F1 to F4. The default values for these keys are: Press these keys in this order Default Key Value F1+F2... -
Page 25: Defroster (Optional)
7. Defroster (Optional) 8. Defroster (Optional) In cold storage, outdoor or in intermodal facilities condensation may appear on the screen. A defroster clears condensation and thaw frost from the screen. Notice that Defroster is an optional feature for the FM10AD-V / FM12AD-V and may not be present in your device. To show the defroster status open Win-Set and go to the Defroster sub-menu to see the information about the defroster. - Page 26 FMAD-V Series Vehicle Mounted Computer Quick Start Guide 9. RAM Mount Installation Winmate recommends using RAM Mounting Parts as part of our device mounting solution. The rear cover of this device is designed to be mounted to RAM Mount solutions, which provides different mounting options to fit any industrial use or vehicle.
- Page 27 8. RAM Mount Installation Mounting 2 – Drill Solution Component RAM Mount Part Number Description RAM round base 3.68” Round Base with 2.25” Ball mounts - on the RAM-D-202U forklift A1-1 Screw SUS304 M8 x 40mm Screw Arm for 2.25” Ball (Length:8.375”) RAM Arm RAM-D-201U RAM Ball on the...
- Page 28 FMAD-V Series Vehicle Mounted Computer Quick Start Guide Mounting 3 – Keyboard Mounting Installation RAM Mount Component Description Part Number Winmate Keyboard Adapter 4 VESA Holes on the plate to Plate device and 4 AMPS holes to (designed by Winmate)
- Page 29 8. RAM Mount Installation Keyboard Assembly This part shows the steps to install the keyboard. 1. Fasten all four screws on the RAM mount ball on the back of the keyboard. 2. Fasten the keyboard adapter on the other end of the RAM mount ball. 3.
- Page 30 NOTE...
- Page 31 NOTE...
- Page 32 Winmate Inc. 9F, No.111-6, Shing-De Rd., San-Chung District, New Taipei City 24158, Taiwan, R.O.C www.winmate.com Copyright © 2024 Winmate Inc. All rights reserved.
Need help?
Do you have a question about the FMAD-V Series and is the answer not in the manual?
Questions and answers