Table of Contents
Troubleshooting

Subscribe to Our Youtube Channel
Related Manuals for Tuttnauer T-Lab Eco


Summary of Contents for Tuttnauer T-Lab Eco
- Page 1 Operation and Maintenance Manual T-Lab Eco Models T-Lab Eco V60 & V85 Cat. No. MAN205-0503001EN Rev. C March 2023 Tuttnauer Europe b.v., Hoeksteen 11, 4815 PR Breda, P.O. Box 7191, 4800 GD Breda, Netherlands.)Tel: +31/76-5423510, Ê Fax: +31/76-5423540...
-
Page 3: Table Of Contents
3.4 Utility Requirements 3.5 Water Quality 4. DEPICTION OF SYSTEM PARTS 4.1 Front View 4.2 Rear View - T-Lab Eco V60 4.3 Rear View - T-Lab Eco V85 5. INSTALLATION INSTRUCTIONS 5.1 Lifting and Carrying 5.2 Device Placement and Operating Instructions 5.3 Connection to Utility Supplies... - Page 4 7.3 Setting Date and Time 8. CONTROL PANEL 8.1 Home Screen Description and Functions 8.2 Starting a Cycle 8.3 Available Sterilization Programs 8.4 Cycle Succeeded and Cycle Failed Notifications 8.5 Aborting a Cycle 9. PREVENTIVE AND SCHEDULED MAINTENANCE 9.1 Daily Maintenance 9.2 Weekly Maintenance 9.3 Monthly Maintenance 10.
-
Page 5: General Information
The device features built-in memory to record up to 999 sterilization cycles. These can be exported to a USB device to be transferred to a PC. The device has a built-in Network Port for use with optional Tuttnauer’s R.P.C.R software when connected to your local network. -
Page 6: Applicable Regulation And Quality Standards
1.3 Applicable Regulation and Quality Standards Every autoclave meets the provisions of the following Directives and is in compliance with the following Standards: ISO 9001: Quality Management System ISO 14001: Environmental management system 2014/68/EU Pressure Equipment Directive ASME Section VIII Division 1 Safety requirements for electrical equipment for IEC 61010-1 / UL 61010-1: measurement, control, and laboratory use –... -
Page 7: Legend For Symbols Appearing On The Labels And In This Manual
1.4 Legend for Symbols appearing on the Labels and in this manual Manufacturer European Authorized Representative Year of Manufacturing Model Number Serial Number Consult the Operation and Maintenance Manual (User Manual) before use European compliance Mark of compliance with the European CE1128 Pressure Equipment Directive (Number xxxx identifies the Notified Body that performed the examination) - Page 8 Disposal according to electronic scrap ordinance This side up (during transport and shipment) Fragile (during transport and shipment) A warning or precaution as detailed in the Operation and Maintenance Manual (User Manual) Caution! Hot Surface Protective conductor terminal Page 4...
-
Page 9: Incoming Inspection
Tuttnauer’s obligation is limited to the repair or replacement of parts for the device. This warranty will be void if the unit is not purchased from an authorized Tuttnauer dealer. No other warranties or obligations are expressed or implied. -
Page 10: Safety Instructions
2. Safety Instructions The autoclave has unique characteristics. Please read and understand the operation instructions before first operation of the autoclave. The following issues may require instructions provided by the manufacturer: how to operate the autoclave, the door safety mechanism, the dangers involved in circumventing safety means, how to ensure that the door is closed, and how to select a correct sterilization program. -
Page 11: Safety Features
Examine the condition of assemblies on a regular basis. Make sure there are no leaks, breaks, blockages, whistles, or strange noises. It is required to conduct maintenance operations as instructed. Immediately notify the person in charge of any deviation or risk for the proper function of the device. 2.1 Safety Features This autoclave includes built-in safety features such as: Error message display... -
Page 12: Device Specifications
3. Device Specifications 3.1 Device Overall Dimensions Page 8... -
Page 13: Device Properties
3.2 Device Properties Dimension Property Depth 810 mm Overall dimensions Width 645 mm Height 985 mm Diameter 390 mm Chamber Height 505 mm 700 mm Depth 880 mm Maximum dimensions (door open) Height 1550 mm Net weight 111 kg 120 kg Shipping volume 0.92 ³... -
Page 14: Device Electrical Data
3.3 Device Electrical Data Value Property Total Power 5400W 3000W Voltage 1Ph / 220-240VAC Amperage 22.3A 13.1A Protection against electrical shock IEC 61010-1 Mains supply fluctuation +/- 10% Frequency (Hz) 50/60Hz 3.4 Utility Requirements Value Property Mineral free water See table in Water Quality Power supply 1 phase, 230VAC ±10%, 50/60Hz Recommended circuit breaker... -
Page 15: Water Quality
3.5 Water Quality The distilled or mineral-free water supply to the autoclave shall be according to the table below: Suggested Maximum Limits of Contaminants in Water for Steam Sterilization per EN13060 Substance Feed Water Condensate Evaporate residue ≤ 10 mg/l ≤... -
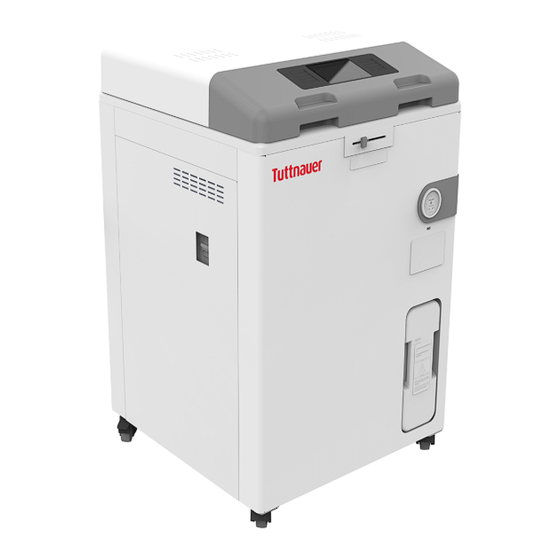
Page 16: Depiction Of System Parts
4. Depiction of System Parts 4.1 Front View Description Description Control Panel - Touch Screen USB Port Chamber Lid Drainage Water Tank Aeration Ventilation Lock Lever Opening Pressure Gauge ON/OFF Switch Page 12... -
Page 17: Rear View - T-Lab Eco V60
4.2 Rear View - T-Lab Eco V60 Description Description Cable Routing Exhaust Tube Electrical Cord Water Funnel Tank Safety Valve Cooling Fan Page 13... -
Page 18: Rear View - T-Lab Eco V85
4.3 Rear View - T-Lab Eco V85 Description Description Cable Routing Exhaust Tube Electrical Cord Water Funnel Tank Safety Valve Cooling Fan Page 14... -
Page 19: Installation Instructions
Check and verify that the electrical net is protected by a current leakage safety relay. Applicable for T-Lab Eco V85 only - The industrial plug rated 220-240V AC, 50/60Hz, 32A is certified according to IEC60309 for Europe, and UL498 for the US, and should be used for the mains connection of the appliance. -
Page 20: Initial Operation Of The Device
Keep the device away from sunlight and protect it from heat. 5.5 Initial Operation of the Device Note: Remove all packaging material before turning ON the device. Plug the electrical cord into the wall outlet. Turn ON the ON/OFF Switch located on the left side of the device. Fill the Chamber with approx. - Page 21 Confirm from the screen below, the removal of all packaging materials from the chamber and water tank. Important! Reset the Local Altitude prior to operating the Autoclave for the first time. To reset the Local Altitude: Log in as technician from the Quick option screen and press Settings Browse to Maintenance/Set boiling temperature from altitude.
- Page 22 This data is used for: Monitoring Viewing and downloading device history Software updates while validating the integrity of the update (applicable for users with Tuttnauer code) The data is backed-up on the device main board. Note: In case of connection failure, the data may be exported manually.
- Page 23 Press The Wi-Fi is connected successfully. Press Version Information Before starting the Autoclave, we recommend you check the Version information. From the Quick Option screen, press Info From the Info screen, select the Version information. The Version information is displayed. For an example, see below: Page 19...
- Page 24 Press to return to the main screen. Page 20...
-
Page 25: Pre-Sterilization Cleaning And Disinfection Of Instruments And Their Loading Into The Device
6. Pre-sterilization Cleaning and Disinfection of Instruments and their Loading into the Device Never use the autoclave to sterilize corrosive products (acids, bases, or phenols) volatile compounds or solutions (ethanol, methanol or chloroform), or radioactive Caution! substances. The most important stage begins with removing debris by cleaning and rinsing. Effective cleaning is affected by several factors: water quality, type, concentration and quality of a cleaner, effective washing method, and adequate rinsing and drying. - Page 26 6.0.2 Liquids Use only heat- proof glass containers. For Slow exhaust cooling (without air) the glass container should be covered but unsealed. Place the two temperature sensors into two separate liquid containers. These are used to control the program temperature and ensure the safety of the operating cycle. 6.0.3 Loading The loading of goods and instruments is done by means of two stacked baskets.
-
Page 27: Operating Instructions
7. Operating Instructions 7.1 Turning on the Device To avoid injuries, verify the pressure is 0 MPa before lifting the Chamber Lid. Plug the electric cord into the power source. Turn ON the power switch located on the left side of the device. Open the sterilizer by sliding right the Lock Lever to the UNLOCK position, and lift the Chamber Lid. -
Page 28: Filling Water
7.2 Filling Water Cautions! In the beginning of each day, check the water level in the chamber. Note: The Improper Water level icon appears when the chamber needs to be filled. A general alarm symbol will appear. The Proper Water level icon appears when the chamber is properly filled. - Page 29 Select the Set date and time icon Note: The only functionality to be performed by the user (on a regular basis) is setting the date and time. Select day, month and year, as depicted and press Set on completion: Page 25...
-
Page 30: Control Panel
8. Control Panel The display is a graphic LCD Touch Screen used to display the autoclave's current status, operational or error messages and for operating the device. Additional programs are accessible by using the side arrows Page 26... -
Page 31: Home Screen Description And Functions
8.1 Home Screen Description and Functions Icon Name Description Home icon Main screen selection icon Quick option Quick option selection icon Chamber temperature Momentary temperature in the chamber REF. 1 temperature Momentary temperature in the chamber Counter No. ID Daily / General cycle counter Date Indicates the date Time... - Page 32 Icon Name Description Liquid Unsealed 121°C Liquid Unsealed Sterilization Program Side arrow left Paging backward to the previous screen Solid Delicate 121°C Solid Delicate Sterilization Program Duplicates a sterilization program and enables modifying the settings. Custom Note: Requires validation by the user! Door opened Door status Door locked...
-
Page 33: Starting A Cycle
8.2 Starting a Cycle Before each cycle, check visually that the gasket is intact, not loose and clean. Load the autoclave properly (see Chapter 6). Choose the appropriate sterilization program from the screen below: The selected program is displayed: Close and lock the door by: Gently lowering the Chamber Lid Sliding the lock lever to the LOCK position When the door is closed, the open-door symbol... - Page 34 Press to start the cycle. The screen below displays the "Solid Delicate"program in progress: Page 30...
-
Page 35: Available Sterilization Programs
8.3 Available Sterilization Programs Attention! This device is not a medical device and not intended for medical use. 8.3.1 Description of the Sterilization Cycle Stages Air-removal: performed by the heating process from the chamber through the exhaust valve. Heating: temperature in the chamber is according to boiling temperature + 5°C. Sterilization: sterilization temperature is maintained constant during the sterilization time. -
Page 36: Cycle Succeeded And Cycle Failed Notifications
8.4 Cycle Succeeded and Cycle Failed Notifications 8.4.1 Cycle Succeeded When a cycle has ended successfully, the following "Successful" message is displayed: Press to confirm the successful cycle. 8.4.2 Cycle Failed In the event of a failure at any stage, the exhaust valve will be opened to release pressure from the chamber, the message "Fail"... -
Page 37: Aborting A Cycle
8.5 Aborting a Cycle It is possible to stop the cycle while the autoclave is operating. Press the Stop button at any stage of the process to stop the operation. If the cycle is aborted, the load is not sterile and a “fail” message will be displayed with an error message explaining the reason for the failure. -
Page 38: Preventive And Scheduled Maintenance
The instructions that follow can easily be carried out by the operating personnel and do not require a service technician. Should the need arise, technical assistance or a service technician can be requested by either calling your dealer or Tuttnauer Europe . 9.1 Daily Maintenance Caution! Make sure the autoclave is not hot before cleaning it. -
Page 39: Error Messages & Troubleshooting
10. Error Messages & Troubleshooting The troubleshooting section is provided in order to enable the user to solve minor malfunctions, prior to contacting our service department. However, only technical personnel having proper qualifications and holding technical documentation (including a technician manual) and adequate information are authorized to serve the apparatus (See tables below). -
Page 40: Troubleshooting
10.2 Troubleshooting Message Description This message is displayed when any analog input such as "Analog Input Error" Temperature sensor is disconnected or out of range during the cycle. "Chamber temperature This message is displayed if the temperature in the not in range" chamber is out of range. - Page 41 Message Description cycle can be started since no user is Log in with your User. currently logged on" "Settings don't match current application, Please try to load This message is displayed if the Settings don't match application first and the SW version. only afterward load the settings"...
- Page 42 Message Description This message is displayed if all temperature sensors "Chamber Temperature have not reached the required temperature within the Timeout - Ending" timeout parameter. "Chamber pressure not This message is displayed if pressostat is off. in range" This message is displayed if the water level is low in "No Water in Chamber"...
-
Page 43: Tsc Printer Installation (Optional)
General printer information. Setting printer definitions. 11.1 General printer information The printer(s) are optional and can be purchased/ordered from Tuttnauer by the customer. The printer can easily be installed and connected to the autoclave following the instructions below. The options includes: One printer connected to the autoclave, loaded either with thermal paper roll, or with label roll. -
Page 44: Setting Printer Definitions
11.2 Setting printer definitions To enable setting the printer, the user is required to log-in. From the main screen, press on the quick option icon Press to open the Settings screen. Select System parameters to set the Label Printer Type or Printer Type option. For paper roll printer, type 6 and press For label roll printer, type 1 and press Page 40... -
Page 45: Basket And Container
Model Type Dia. X Height (mm) Capacity Stainless steel wire basket 362 x 280 T-Lab Eco V85 Stainless steel container for waste products 350 x 450 Stainless steel wire basket 362 x 190 T-Lab Eco V60 Stainless steel container for waste products... - Page 46 Cat. No. MAN205-0503001EN Rev. C COPYRIGHT ©...
Need help?
Do you have a question about the T-Lab Eco and is the answer not in the manual?
Questions and answers
Where is the drain filter located in the tuttnauer v85 autoclave?
The provided context does not specify the exact location of the drain filter in the Tuttnauer V85 autoclave.
This answer is automatically generated