
Related Manuals for MKS Baratron 220D


Summary of Contents for MKS Baratron 220D
- Page 1 sales@artisantg.com artisantg.com (217) 352-9330 | Visit our website - Click HERE...
- Page 2 MKS Baratron ® Type 220D Absolute and Differential Pressure Transducer Instruction Manual 2 Technology Drive Andover, MA, USA 120364-P1 01810 Rev. C, 03/13 Instruction Manual Main: 978.645.5500 USA: 800.227.8766 www.mksinst.com...
- Page 3 MKS Instruments, Inc. (MKS) warrants that the equipment described above (the “equipment”) manufactured by MKS shall be free from defects in materials and workmanship for a period of one year from date of shipment and will for a period of two years from the date of shipment, correctly perform all date-related operations, including...
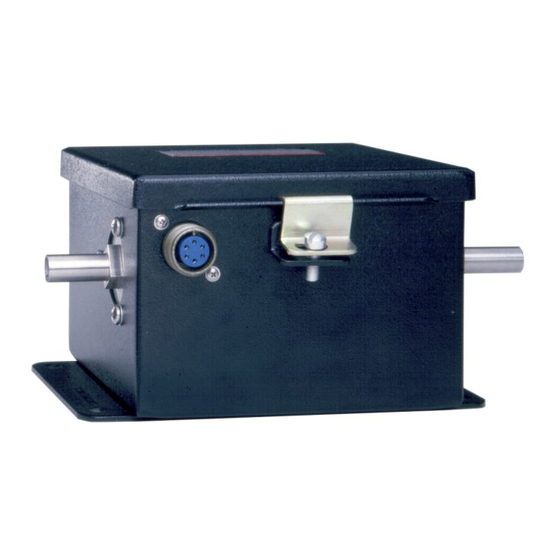
- Page 4 120364-P1 Rev. C, 3/13 MKS Baratron Type 220D Pressure Transducer...
- Page 5 All rights reserved. No part of this work may be reproduced or transmitted in any form or by any means, electronic or mechanical, including photocopying and recording, or by any information storage or retrieval system, except as may be expressly permitted in writing by MKS Instruments, Inc.
-
Page 6: Table Of Contents
Table of Contents Table of Contents Safety Information ........................1 Symbols Used in This Instruction Manual ..............1 Symbols Found on the Unit .................... 2 Safety Procedures and Precautions ................. 3 Sicherheitshinweise........................5 In dieser Betriebsanleitung vorkommende Symbole ............5 Am Gerät angebrachte Symbole .................. - Page 7 Table of Contents Dimensions ......................23 Mounting Instructions ..................25 Electrical Connections ..................26 Chapter Three: Overview ......................29 Circuit Description ......................29 Sensor ..........................29 Power Supplies ....................... 30 DC Powered Version ..................30 AC Powered Version ..................30 Current Output ....................
- Page 8 List of Figures and Tables List of Figures and Tables Figures Figure 1: Top View of the 220 Transducer ................. 23 Figure 2: Side View of the 220 Transducer ................24 Figure 3: Back View of the 220 Transducer (AC Powered Unit shown) ........24 Figure 4: Front View of the 220 Transducer (AC Powered Unit shown) ........
-
Page 10: Safety Information
Safety Information Symbols Used in This Instruction Manual Safety Information Symbols Used in This Instruction Manual Definitions of WARNING, CAUTION, and NOTE messages used throughout the manual. Warning The WARNING sign denotes a hazard. It calls attention to a procedure, practice, condition, or the like, which, if not correctly performed or adhered to, could result in injury to personnel. -
Page 11: Symbols Found On The Unit
Symbols Found on the Unit Safety Information Symbols Found on the Unit The following table describes symbols that may be found on the unit. Definition of Symbols Found on the Unit P r o t e c t i v e e a r t h Off (Supply) ( g r o u n d ) r t h ( g... -
Page 12: Safety Procedures And Precautions
DO NOT SUBSTITUTE PARTS OR MODIFY INSTRUMENT Do not install substitute parts or perform any unauthorized modification to the instrument. Return the instrument to an MKS Calibration and Service Center for service and repair to ensure that all safety features are maintained. - Page 13 Safety Procedures and Precautions Safety Information USE THE PROPER POWER SOURCE This product is intended to operate from a power source that does not apply more voltage between the supply conductors, or between either of the supply conductors and ground, than that specified in the manual.
-
Page 14: Sicherheitshinweise
Sicherheitshinweise In dieser Betriebsanleitung vorkommende Symbole Sicherheitshinweise In dieser Betriebsanleitung vorkommende Symbole Definition der mit WARNUNG!, VORSICHT! und HINWEIS überschriebenen Abschnitte in dieser Betriebsanleitung. Warnung! Das Symbol WARNUNG! weist auf eine Gefahrenquelle hin. Es macht auf einen Arbeitsablauf, eine Arbeitsweise, einen Zustand oder eine sonstige Gegebenheit aufmerksam, deren unsachgemäße Ausführung bzw. -
Page 15: Am Gerät Angebrachte Symbole
Am Gerät angebrachte Symbole Sicherheitshinweise Am Gerät angebrachte Symbole Der untenstehenden Tabelle sind die Bedeutungen der Symbole zu entnehmen, die an dem Gerät angebracht sind. Definitionen der am Gerät angebrachten Symbole Ein (Netz) Aus (Netz) Erde Schutzleiter IEC 417, Nr. 5007 IEC 417, Nr. -
Page 16: Sicherheitsvorschriften Und Vorsichtsmaßnahmen
Bauen Sie in das Instrument keine Ersatzteile ein, und nehmen Sie keine eigenmächtigen Änderungen am Gerät vor! Schicken Sie das Instrument zu Wartungs- und Reparatur-zwecken an einen MKS-Kalibrierungs- und -Kundendienst ein! Dadurch wird sicher-gestellt, daß alle Sicherheitseinrichtungen voll funktionsfähig bleiben. - Page 17 Sicherheitsvorschriften und Vorsichtsmaßnahmen Sicherheitshinweise Erdung und Verwendung geeigneter elektrischer Armaturen! In diesem Instrument liegen gefährliche Spannungen an. Alle verwendeten elektrischen Armaturen und Kabel müssen dem angegebenen Typ entsprechen und sich in einwand-freiem Zustand befinden. Alle elektrischen Armaturen sind vorschriftsmäßig anzubringen und zu erden. Richtiges Netzkabel verwenden! Das verwendete Netzkabel muß...
-
Page 18: Informations Relatives À La Sécurité
Informations relatives à la sécurité Symboles utilisés dans ce manuel d'utilisation Informations relatives à la sécurité Symboles utilisés dans ce manuel d'utilisation Définition des indications AVERTISSEMENT, ATTENTION et REMARQUE utilisées dans ce manuel. Avertissement L'indication AVERTISSEMENT signale un danger potentiel. Elle est destinée à... -
Page 19: Symboles Apparaissant Sur L'appareil
Symboles apparaissant sur l'appareil Informations relatives à la sécurité Symboles apparaissant sur l'appareil Le tableau suivant décrit les symboles apparaissant sur l'appareil. Définition des symboles apparaissant sur l'appareil Terre de protection Marche (sous tension) Arrêt (hors tension) Terre (masse) (masse) IEC 417, No. -
Page 20: Mesures De Sécurité Et Mises En Garde
NE PAS SUBSTITUER DES PIÈCES OU MODIFIER L'APPAREIL Ne pas utiliser de pièces détachées autres que celles vendues par MKS Instruments, Inc. ou modifier l'appareil sans l'autorisation préalable de MKS Instruments, Inc. Renvoyer l'appareil à un centre d'étalonnage et de dépannage MKS pour tout dépannage ou réparation afin de s'assurer que tous les dispositifs de sécurité... - Page 21 Mesures de sécurité et mises en garde Informations relatives à la sécurité UTILISATION D'UN CORDON D'ALIMENTATION APPROPRIÉ Utiliser uniquement un cordon d'alimentation en bon état et conforme aux exigences de puissance d'entrée spécifiées dans le manuel. Utiliser uniquement un cordon d'alimentation amovible avec des conducteurs dont la section est égale ou supérieure à...
-
Page 22: Información Sobre Seguridad
Información sobre seguridad Símbolos usados en el manual de instrucciones Información sobre seguridad Símbolos usados en el manual de instrucciones Definiciones de los mensajes de ADVERTENCIA, PRECAUCIÓN Y OBSERVACIÓN usados en el manual. Advertencia El símbolo de ADVERTENCIA indica un riesgo. Pone de relieve un procedimiento, práctica, condición, etc., que, de no realizarse u observarse correctamente, podría causar lesiones a los empleados. -
Page 23: Símbolos Que Aparecen En La Unidad
Símbolos que aparecen en la unidad Información sobre seguridad Símbolos que aparecen en la unidad En la tabla que figura a continuación se indican los símbolos que aparecen en la unidad. Definición de los símbolos que aparecen en la unidad Encendido Apagado (alimentación eléctrica) -
Page 24: Procedimientos Y Precauciones De Seguridad
No se debe instalar piezas que no sean originales ni modificar el instrumento sin autorización. Para garantizar que las prestaciones de seguridad se observen en todo momento, enviar el instrumento al Centro de servicio y calibración de MKS cuando sea necesaria su reparación y servicio de mantenimiento. - Page 25 Procedimientos y precauciones de seguridad Información sobre seguridad USAR EL CABLE ELÉCTRICO ADECUADO Usar únicamente un cable eléctrico que se encuentre en buenas condiciones y que cumpla los requisitos de alimentación de entrada indicados en el manual. Usar únicamente un cable desmontable instalado con conductores que tengan un área de sección transversal equivalente o superior a 0,75mm².
-
Page 26: Chapter One: General Information
US and local government export licenses under ECCN 2B230. The MKS Type 220D Pressure Transducer is a self-contained unit with the sensor, associated electronics, and power supply (AC version only) mounted in a NEMA1 enclosure. Both AC and DC versions are available. -
Page 27: How This Manual Is Organized
MKS, please obtain an RMA (Return Material Authorization) number from the MKS Calibration and Service Center before shipping. The RMA Number expedites handling and ensures proper servicing of your instrument. Please refer to the inside of the back cover of this manual for a list of MKS Calibration and Service Centers. Warning All returns to MKS Instruments must be free of harmful, corrosive, radioactive, or toxic materials. -
Page 28: Chapter Two: Installation
Chapter Two: Installation How To Unpack the Type 220 Unit MKS has carefully packed the Type 220 unit so that it will reach you in perfect operating order. Upon receiving the unit, however, you should check for defects, cracks, broken connectors, etc., to be certain that damage has not occurred during shipment. -
Page 29: Table 5: Interface Cables
Chapter Two: Installation comply with the Product Safety Directive 92/59/EC and Low Voltage Directive 73/23/EC, which cover general safety practices for design and workmanship. MKS products that meet these requirements are identified by application of the CE Mark. To ensure compliance with EMC Directive 2004/108/EC, an overall metal braided shielded cable, properly grounded at both ends, is required during use. -
Page 30: Generic Shielded Cable Description
Chapter Two: Installation Interface Cables Generic Shielded Cable Description Should you choose to manufacture your own cables for this or other instruments, follow the generic guidelines listed below: 1. The cable must have an overall metal braided shield, covering all wires. Neither aluminum foil nor spiral shielding will be as effective;... -
Page 31: Product Location And Requirements
Product Location and Requirements Chapter Two: Installation Product Location and Requirements The AC powered version of the Type 220 unit meets the following criteria: POLLUTION DEGREE 2 in accordance with IEC 664 Transient overvoltages according to INSTALLATION CATEGORY II Operating Environmental Requirements ... -
Page 32: Setup
Chapter Two: Installation Setup Setup Dimensions Note All dimensions are listed in inches with millimeters referenced in parentheses. 0.31 4 holes 6.75 7.50 (171.5) (190.5) 4.00 0.50 0.38 (101.6) (12.7) (9.5) 5.00 (127) Figure 1: Top View of the 220 Transducer 2.46 (62.6) 0.50... -
Page 33: Figure 2: Side View Of The 220 Transducer
Setup Chapter Two: Installation Figure 2: Side View of the 220 Transducer 6.00 (152.4) 1.45 1.21 (36.7) (30.6) Figure 3: Back View of the 220 Transducer (AC Powered Unit shown) O u t p u t C o n n e c t o r Figure 4: Front View of the 220 Transducer (AC Powered Unit shown) -
Page 34: Mounting Instructions
Chapter Two: Installation Setup Mounting Instructions The 220 transducer is designed to be mounted in any orientation and should be zeroed in the position in which it will be used. It is recommended, however, that the unit be mounted with the inlet port vertically downward as any foreign matter entering the pressure port will fall away from the diaphragm, thereby not affecting the measurement. -
Page 35: Electrical Connections
The external fuses are located above the power connector. Refer to Table 6 for the type of fuses used. Fuse Information Voltage Setting (V) Nominal Voltage Range (V) Fuse MKS Part Number 103 to 126 250 mA (T) 024-5833 207 to 253 125 mA (T) -
Page 36: Table 7: Output Connector Pinout For Ac Powered Units
Chapter Two: Installation Setup Output connections are made through the Output connector; an MS MS3106A-14S-6P connector. Refer to Figure 4, page 24, for the location of the Output connector. The pinout is listed in Table Output Connector Pinout for AC Powered Units Pin Number Assignment + DC Voltage Output... -
Page 37: Table 8: Output Connector Pinout For Dc Powered Units
Setup Chapter Two: Installation DC Powered Units Input power is supplied through the Output connector; an MS MS3106A-18-1S connector. Refer to Figure 4, page 24, for the location of the Output connector. The power is supplied from an external power supply which must meet the following minimum requirements. ... -
Page 38: Chapter Three: Overview
Chapter Three: Overview Circuit Description Chapter Three: Overview Circuit Description Output Connector Amplifiers Output Connector 0 to 20 mA or Sensor Pre-Amp (AC) 0 to 10 V 4 to 20 mA 0 to 10 V Current Amplifier Oscillator +15B Supply Demodulator Output (DC) -
Page 39: Power Supplies
4 to 20 mA current output, but is not isolated from it. Overrange Condition An absolute pressure transducer with full scale value below atmospheric pressure will produce an overranged output (on MKS digital display units, typically >13 VDC) unless they are connected to a vacuum system and pumped down. -
Page 40: Labels
Chapter Three: Overview Labels Labels The 220 pressure transducer has a serial number label that identifies the model code and serial number, as shown in Figure 8. MADE IN USA Serial #: 000031843 Model #: 220DD-00010A2B BARATRON PRESSURE TRANSDUCER ® Figure 8: Serial Number Label (AC version shown) Fuse and Line Voltage Information The rear panel of the 220 unit contains important information on the type of fuse and the line... - Page 41 Labels Chapter Three: Overview This page intentionally left blank.
-
Page 42: Chapter Four: Operation
Chapter Four: Operation How To Zero the Type 220 Transducer Chapter Four: Operation How To Zero the Type 220 Transducer You must zero the transducer initially when you install it into your system and periodically thereafter. Note Make sure that the unit is fully stabilized before attempting to adjust the zero. -
Page 43: Figure 10: Zero Potentiometer On The Amplifier Board
2. Turn the zero potentiometer on the Amplifier board inside the 220 unit, shown in Figure 10, until the output is 0.0 Volts. The zero adjustment may also be made at the front panel of an MKS supplied readout/power supply unit, if used. -
Page 44: Chapter Five: Maintenance
MKS Instruments immediately. If it is necessary to return the unit to MKS, obtain an RMA (Return Material Authorization) number from a MKS Service Center before shipping. Please refer to the inside back cover of this manual for a list of MKS Calibration and Service Centers. Warning All returns to MKS Instruments must be free of harmful, corrosive, radioactive, or toxic materials. - Page 45 General Information Chapter Five: Maintenance 6. Slide the fuse holder back into the Power Entry module. Be sure to snap the fuse holder completely into the instrument. 7. Connect the power cord.
-
Page 46: Appendix A: Product Specifications
Appendix A: Product Specifications Common Specifications Appendix A: Product Specifications Common Specifications 0.15% of Reading temperature coefficient Accuracy Ambient Operating Temperature 5 to 40 C (41 to 104 F) Dimensions 7.5” H x 6” L (without fittings) x 6” D 190.5 mm x 152.4 mm (without fittings) x 152.4 mm Fittings ½”... -
Page 47: Ac Version Specifications
AC Version Specifications Appendix A: Product Specifications AC Version Specifications CE Compliance Electromagnetic Compatibility EMC Directive 2004/108/EC Low-Voltage Requirements Low-Voltage Directive 73/23/EC II, according to EN 61010-1 Installation Category Pollution Degree 2, according to IEC 664 Product Safety Directive 92/59/EC Product Safety Requirements Fuse Ratings 115 V... -
Page 48: Appendix B: Model Code Explanation
Appendix B: Model Code Explanation Model Code Appendix B: Model Code Explanation Model Code The options of your 220 pressure transducer are identified in the model code when you order the unit. The model code is identified as follows: 220DXYYYYYZAB where: YYYYY 220D... - Page 49 Model Code Appendix B: Model Code Explanation Full Scale Range (YYYYY) The full scale range is indicated by a five digit code. Full Scale Range (Torr) Ordering Code 00001 00010 00100 1,000 01000 5,000 05000 10,000 10000 15,000 15000 20,000 20000 25,000 25000...
-
Page 50: Index
Index Index Interface cables, 20 Absolute transducer, 17 AC powered, 17, 22, 26, 30, 38 Labels, 31 Line voltage selector, 26 Cables, 20 CE compliance, 17, 20, 31, 37 Maintenance, 35 Circuit, 29 Manual organization, 18 Connectors, 27, 28, 40 Measurement type, 39 Current output option, 30 Model code, 39... - Page 51 Index...
Need help?
Do you have a question about the Baratron 220D and is the answer not in the manual?
Questions and answers