Dynojet POWER VISION 3 Installation Manual
Hide thumbs
Also See for POWER VISION 3:
- Installation manual (9 pages) ,
- Installation manual (8 pages) ,
- Installation manual (8 pages)
Table of Contents
Advertisement
Quick Links
POWER VISION 3
Installation Guide for: PV3-15-02
Model Coverage:
2011-2017 Harley Davidson Softail Models
96" Twin Cam / 103" Twin Cam
2012-2017 Harley Davidson Dyna Models
96" Twin Cam / 103" Twin Cam
2014-2016 Harley Davidson Touring Models
96" Twin Cam / 103" Twin Cam / 110" Twin Cam
2018-2020 Harley Davidson Softail Models
107" Milwaukee M8 / 114" Milwaukee M8
2017-2020 Harley Davidson Touring Models
107" M8 / 114" M8 / 117" M8
2014-2022 Harley Davidson Sportster 883 Models
2014-2022 Harley Davidson Sportster 1200 Models
2015-2019 Harley Davidson Street 500
2015-2021 Harley Davidson Street 750
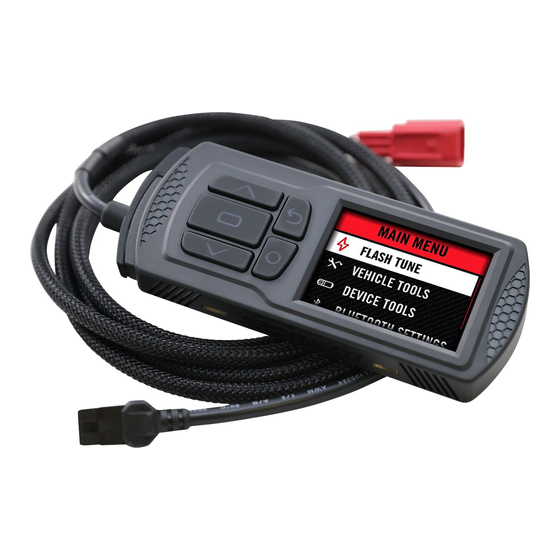
PARTS LIST
1
POWER VISION
1
REFLASH HARNESS
1
USB CABLE
PLEASE READ ALL DIRECTIONS BEFORE STARTING INSTALLATION
2
VELCRO
2
DYNOJET DECAL
IPV3-15-02.02
Advertisement
Table of Contents

Related Manuals for Dynojet POWER VISION 3


Summary of Contents for Dynojet POWER VISION 3
- Page 1 POWER VISION 3 Installation Guide for: PV3-15-02 Model Coverage: 2011-2017 Harley Davidson Softail Models 96” Twin Cam / 103” Twin Cam 2012-2017 Harley Davidson Dyna Models 96” Twin Cam / 103” Twin Cam 2014-2016 Harley Davidson Touring Models 96” Twin Cam / 103” Twin Cam / 110” Twin Cam 2018-2020 Harley Davidson Softail Models 107”...
- Page 2 INTRODUCTION Thank you for purchasing the Power Vision from Dynojet RETURN Research. At Dynojet, our mission is to make every ride the ultimate ride. The Power Vision allows you to tune 01:32 12.6V SCROLL Engine Speed Speed your stock ECU to achieve optimal performance from...
- Page 3 INSTALLING THE POWER VISION CONTINUED Route the Power Vision cable away from any moving or hot parts. Dynojet recommends using zip ties to secure the cable to existing non-moving components. Secure the Power Vision to the vehicle using the supplied Velcro or mounting hardware.
-
Page 4: Getting Started
Select the tune fi le (.djt) and press Enter to view the Tune Info. ECU WRITE MAY TAKE A WHILE, DO NOT TURN OFF POWER! Note: The Dynojet tune fi le (.djt) is a tune fi le which is PRESS TO CONTINUE different (better than stock performance or the necessary WRITING DATA... - Page 5 VIEWING THE VEHICLE INFORMATION This menu allows you to view the device status (paired/not paired), VIN #, Model ID, ECU serial number, tune compat, and checksum compat. Select Vehicle Tools>Vehicle Information. VIEWING THE DIAGNOSTIC CODES This menu allows you to read and clear diagnostic trouble codes.
- Page 6 LOGGING DATA The Power Vision is a powerful logging tool to diagnose running issues. 01:32 12.6V Engine Speed Speed Use the Power Vision to log all vehicle operating data and review the 3450 data in the Power Core software. Troubleshoot an issue such as knock, Gear speed/RPM limitation, throttle blade closure and more by keeping the 42.1...
-
Page 7: Viewing The Device Information
UPDATE DEVICE Go to www.dynojet.com. PV3_3.31.8699.24249.dfu From the top navigation menu, select Support>Downloads. Click Power Vision 3. Click the Firmware drop-down and download the Power Vision 3 Firmware for Harley-Davidson. Save the fi le to your device. Select Device Tools>Update Device. -
Page 8: Usb Mode
COPY BACKUP FILE This menu allows you to drop the paired vehicle stock fi le DEVICE TOOLS (.stk) to the device fi le system to open in Power Core. UPDATE DEVICE Select Device Tools>Copy Backup File. COPY BACKUP FILE COPY RECOVERY FILE COPY RECOVERY FILE This menu allows you to drop the most recently fl... -
Page 9: Using Autotune
Autotune Basic can be used on most bikes that have factory narrowband O2 sensors installed. Autotune Pro uses accessory wideband O2 sensors to read the AFR data from the engine’s exhaust. Autotune Pro however requires the installation of an appropriate Dynojet wideband O2 kit (P/N AT-130, AT-131, or AT-132). Enabling Autotune Connect the Power Vision to the vehicle. - Page 10 fi le, the correction fi le with enable settings turned on, is not saved to the PV3 fi le system. For best results, Dynojet recommends repeating the Logging Sample Data and Applying Values sections two to three times. Disabling Autotune Verify you are fi...
- Page 11 Note: The PV3 will forget all vehicles it remembers as being DELETE AT DATA Autotune Enabled. Dynojet recommends you disable Autotune Delete ALL AT session data for for all Autotune enabled vehicles before deleting all Autotune all vehicles? data.
- Page 12 AUTOTUNE LOGGING STATUS CODES Refer to the table below for Autotune logging status codes, explanations, and remedies. For state of the art technical support, please visit www.dynojet.zendesk.com. Code Meaning Explanation Remedy ATB OK Autotune Basic OK Autotune Basic is OK and is acquiring valid sample data.
- Page 13 Click Update to load the current fi rmware. If the Update button is grayed out, your Power Vision already has the latest fi rmware. Click Restore to reload all original Dynojet tune and stock fi les. Click Get Tunes to open the Dynojet Tune Finder. Follow the instructions to Upload your PV_Info.txt fi...
- Page 14 TRUTH TRUTH IN IN PERFORMANCE PERFORMANCE 800-992-4993 - DYNOJET.COM © 2019-2024 DYNOJET RESEARCH ALL RIGHTS RESERVED...
Need help?
Do you have a question about the POWER VISION 3 and is the answer not in the manual?
Questions and answers