Grundfos SCALA2 Installation And Operating Instructions Manual
Hide thumbs
Also See for SCALA2:
- User manual ,
- Installation and operating instructions manual (52 pages) ,
- Service instructions manual (31 pages)
Table of Contents
Advertisement
Advertisement
Table of Contents

Related Manuals for Grundfos SCALA2


Summary of Contents for Grundfos SCALA2
- Page 1 GRUNDFOS INSTRUCTIONS SCALA2 Installation and operating instructions...
- Page 3 SCALA2 English (GB) Installation and operating instructions ........4...
-
Page 4: Table Of Contents
..... 20 10.3 Expert settings, SCALA2 ... 21 10.4 Resetting to factory settings ..23... -
Page 5: General Information
1.1 Hazard statements 1.3 Target group The symbols and hazard statements below may These installation and operating instructions are appear in Grundfos installation and operating intended for professional as well as non-professional instructions, safety instructions and service users. instructions. -
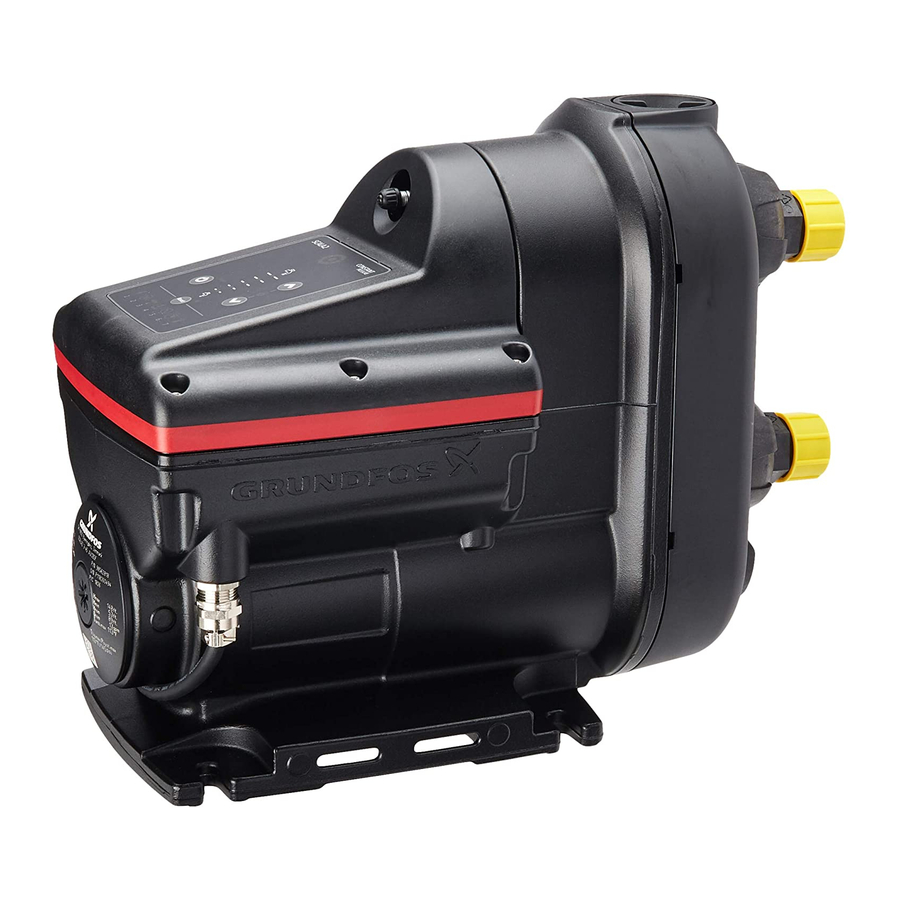
Page 6: Product Introduction
2.2 Intended use This pump has been evaluated for use 2.1 Product description with water only. Only use SCALA2 pumps according to the specifications stated in these installation and operating instructions. The pump is suitable for pressure boosting of fresh water in domestic water supply systems. -
Page 7: Identification
2.4 Identification 2.4.2 Type key Example: SCALA2 3-45 A K C H D E 2.4.1 Nameplate Code Explanation Designation SCALA Type range DK-8850 Bjerringbro Denmark XXXXXX X-XX XXXXXX Model A XXXXXXXX Rated flow rate XXX-XXXV XX/XXHz SN XXXXXXXX P1 YYWW Made in Serbia Max. -
Page 8: Receiving The Product
The relative air humidity must not exceed 95 %. The box contains the following items: Install the pump in such a way that no • 1 Grundfos SCALA2 pump undesirable collateral damage can arise • 1 quick guide due to leakage. -
Page 9: System Sizing
See the figures below. When using SCALA2 in installations with water heaters, you must use a non-return valve, pressure-relief valve or a thermal expansion tank between SCALA2 and the water heater. -
Page 10: Connecting The Pipe System
Make sure that the pump is not stressed 5.4 Condensation by the pipe system. When SCALA2 is installed in a warm room and is pumping cold water, there is a risk of condensation Always loosen and tighten the union nuts forming on the pump and associated components. -
Page 11: How To Reduce Noise In The Installation
5.5 How to reduce noise in the installation 5.6 Locking pin The pump may produce a clicking noise if there is We recommend using flexible hoses and positive pressure at the inlet of the pump. In this mounting the pump on a vibration-damping case, you can mount a locking pin to avoid this noise. -
Page 12: Installation Examples
3. Loosen and remove the drain plug. 4. Remove the locking pin with a small plier. Mains water pressure boosting, SCALA2 5. Mount and tighten the drain plug. Pos. Description 6. Open the inlet and outlet valves and turn on the Highest tapping point pump. - Page 13 When using SCALA2 in installations with water heaters, you must use a non-return valve, pressure- relief valve or a thermal expansion tank between SCALA2 and the water heater. This prevents the backflow pressure from exceeding the 10 bar pressure limit the pump is designed for.
- Page 14 5.7.4 Suction from freshwater tank 5.7.5 Inlet pipe length The overview below shows the different possible inlet pipe lengths, depending on the vertical pipe length. The overview is only intended as a guide. Suction from freshwater tank Pos. Description Highest tapping point Inlet pipe length Pipe hangers Isolating valve...
-
Page 15: Electrical Connection
6. Electrical connection 6.2 Plug connection DANGER Carry out the electrical connection Electric shock according to local regulations. Death or serious personal injury Check that the supply voltage and ‐ Check that the power plug delivered frequency correspond to the values stated with the product is in compliance with on the nameplate. -
Page 16: Starting Up The Product
7. Starting up the product 7.2 Starting the pump 1. Open a tap to prepare the pump for venting. Do not start the pump until it has been 2. Insert the power plug into the socket or turn on the filled with liquid. -
Page 17: Pressure Setting
7.3 Pressure setting 7.3.1 Boosting from a well or a tank If you are boosting from a well or a tank, make sure The pump can be set to provide a water pressure not to set the pressure setpoint too high. The between 1.5 to 5.5 bar (22 to 80 psi) at intervals of difference between the inlet pressure and outlet 0.5 bar (7 psi). -
Page 18: Shaft Seal Run-In
8. Handling and storing the product 7.3.2 Boosting from the mains The pressure settings 4, 4.5, 5.0 and 5.5 bar (58, 65, 8.1 Handling the product 73 and 80 psi) require a positive inlet pressure, and these settings must only be used when boosting from the water mains. -
Page 19: Control Functions
9. Control functions 9.1.1 Pressure indicator, SCALA2 The pressure indicator shows the required outlet 9.1 Menu overview, SCALA2 pressure from 1.5 to 5.5 bars (22 to 80 psi) in 0.5 bar (7.5 psi) intervals. The illustration below shows a pump set to 3 bar (44 psi) indicated by two green lights, and a pump set to 3.5 bar (51 psi) indicated by one green light. -
Page 20: Setting The Product
10. Setting the product 9.1.2 Indicator lights for SCALA2 The pump will remember the controller settings even Indications Description if it is turned off. 10.1 Setting the outlet pressure Operating indications Adjust the outlet pressure by pressing the Up and Down buttons. -
Page 21: Expert Settings, Scala2
10.3 Expert settings, SCALA2 Expert settings are for installers only. The expert settings allow the installer to toggle between the following functions: • self-learning • auto reset • micro-leakage detection • maximum continuous operating time. 10.3.1 Accessing the expert settings Proceed as follows: 1. - Page 22 All alarms must be reset manually by means of the the setpoint back to 5 bar (72 psi). Reset button. Related information 9.1.2 Indicator lights for SCALA2 User-defined setpoint (left) and self-learned setpoint (right) How to reset the self-learned setpoint 1. You can manually reset the settings by pressing any button on the operating panel.
-
Page 23: Resetting To Factory Settings
Scan the QR code below for more information on precharging the pressure tank. Maximum runtime exceeded 10.4 Resetting to factory settings The pump can be reset to factory setting by pressing the Down and Reset buttons simultaneously for 5 seconds. http://net.grundfos.com/qr/i/92887983... -
Page 24: Customer Service Information
4. Close the isolating valves and/or drain the pipes. 11.2 Customer service information 5. Gradually open and remove the priming plug. See For further information on service parts, see Grundfos the figure above (1). Product Center on www.product- selection.grundfos.com. -
Page 25: Starting Up The Product After Standstill
12. Starting up the product after 13. Taking the product out of operation standstill If the pump is taken out of operation for a period of time, for example during the winter, it must be 1. Check that the pump is not blocked. disconnected from the power supply and placed in a 2. -
Page 26: Fault Finding
‐ Before starting any work on the product, make sure that the power supply has been switched off and that it cannot be accidentally switched on. 14.1 Grundfos Eye operating indications Grundfos Eye Indication Description Power off No lights are on. -
Page 27: The Pump Is Not Running
14.3 The pump is not running 14.5 The pump is not running, and indicator light 2 is on Grundfos Eye: Grundfos Eye: No lights are on. Two opposite red indicator lights are flashing simultaneously. Cause Remedy Indicator light 2 is on, indicating that the pump Power supply failure. -
Page 28: The Pump Is Not Running, And Indicator Light 4 Is On
14.6 The pump is not running, and indicator 14.8 The pump is not running, and indicator light 4 is on light 6 is on Grundfos Eye: Grundfos Eye: Two opposite green Two opposite green indicator lights are indicator lights are permanently on. -
Page 29: The Pump Is Running, And Indicator Light 7 Is On
14.10 The pump is running, and indicator 14.12 Insufficient pump performance, and light 7 is on indicator light 7 is on Grundfos Eye: Grundfos Eye: Two opposite green Two opposite green indicator lights are indicator lights are rotating. rotating. Indicator light 7 is on,... -
Page 30: System Overpressure, And Indicator Light 5 Is On
14.13 System overpressure, and indicator 14.14 After a reset, the pump runs light 5 is on briefly, and indicator light 4 is on Grundfos Eye: Grundfos Eye: Two opposite green Two opposite green indicator lights are indicator lights are rotating. -
Page 31: Technical Data
15. Technical data 15.3 Electrical data 15.1 Operating conditions Stand-by Supply Frequency power max. voltage [V] [Hz] Temperature [°C (°F)] Max. ambient temperature 1 × 208-230 V, 60 Hz: 45 (113) 1 × 200-240 50/60 1 × 115 V, 60 Hz: 45 (113) 1 ×... -
Page 32: Dimensions And Weights
15.4 Dimensions and weights Dimensions of SCALA2 Weight [mm] [mm] [mm] [mm] [mm] [kg] [inch] [inch] [inch] [inch] [inch] [lb] SCALA2 11.9 15.9 NPT 1" NPT 1"... -
Page 33: Disposing Of The Product
This product has been designed with focus on the To provide feedback about this document, scan the disposal and recycling of materials. The following QR code using your phone’s camera or a QR code disposal values apply to all variants of Grundfos app. SCALA2 pumps: •... - Page 34 For New Jersey there is no prohibition on returning a defective product at a purchaser’s cost. If Grundfos is required by applicable State law to pay for the cost of shipment under applicable State law, then a purchaser should contact a Grundfos Authorized Service Partner to arrange for shipment.
- Page 35 Garantías Magnusson-Moss y cualquier otra legislación federal y/o estatal aplicable. Para el caso de productos que no sean de consumo, consulte los términos de la garantía de Grundfos definidos en la cláusula 10 de los términos y condiciones de venta de productos y servicios de Grundfos para los EE. UU., disponibles https://www.grundfos.com/legal/grundfos-customer-terms/usa-grundfos-general-terms-for-sales-of-products- and-services.
- Page 36 Les produits vendus mais non fabriqués par Grundfos sont couverts par la garantie fournie par le fabricant des dits produits et non par la garantie de Grundfos. Grundfos n'est responsable ni des dommages ni de l'usure des produits causés par des conditions d'exploitation anormales, un accident, un abus, une mauvaise utilisation, une altération ou une réparation non...
- Page 37 Argentina Columbia Hong Kong Bombas GRUNDFOS de Argentina S.A. GRUNDFOS Colombia S.A.S. GRUNDFOS Pumps (Hong Kong) Ltd. Ruta Panamericana km. 37.500industin Km 1.5 vía Siberia-Cota Conj. Potrero Unit 1, Ground floor, Siu Wai industrial 1619 - Garín Pcia. de B.A.
- Page 38 Lithuania Serbia Turkey GRUNDFOS Pumps UAB Grundfos Srbija d.o.o. GRUNDFOS POMPA San. ve Tic. Ltd. Smolensko g. 6 Omladinskih brigada 90b Sti. LT-03201 Vilnius 11070 Novi Beograd Gebze Organize Sanayi Bölgesi Tel.: + 370 52 395 430 Tel.: +381 11 2258 740...
- Page 39 98880508 03.2024 ECM: 1388158 www.grundfos.com...
Need help?
Do you have a question about the SCALA2 and is the answer not in the manual?
Questions and answers