Table of Contents
Advertisement
Quick Links
Windows are trademarks of Microsoft Corporation, U.S.A. and other countries.
The company names and product names mentioned in this manual are generally the trademarks or registered
trademarks owned by the respective companies.
All rights reserved. Copying or reproduction of this product, whether in part or whole, is expressly prohibited
without permission.
This product is copyrighted work of Kyowa Electronic Instruments Co., Ltd. All rights reserved.
The contents of this manual are subject to change without prior notice.
INSTRUCTION MANUAL
Thank you for purchasing a product of Kyowa Electronic Instruments Co. Ltd.
Read this Instruction Manual carefully in order to make full use of the high
performance capabilities of the product.
Do not use the product in methods other than described in this Manual.
This manual covers only the hardware operating instructions. For details on the
DCS-100A Dynamic Data Recording Software, see the DCS-100A Instruction
Manual for [EDX-100A Operation].
UNIVERSAL RECORDER
IM-A-668L January 2024
EDX-100A
HARDWARE
Advertisement
Table of Contents
Troubleshooting

Related Manuals for KYOWA EDX-100A


Summary of Contents for KYOWA EDX-100A
- Page 1 All rights reserved. Copying or reproduction of this product, whether in part or whole, is expressly prohibited without permission. This product is copyrighted work of Kyowa Electronic Instruments Co., Ltd. All rights reserved. The contents of this manual are subject to change without prior notice.
-
Page 3: Table Of Contents
CONNECTING SENSORS ............................... 19 LAN INTERFACE DEFAULT SETTINGS ..........................22 CONNECTING INTERFACE ..............................24 3-6-1 LAN Connection: Connecting by Installing a Hub Between EDX-100A and the PC ..........24 3-6-2 USB Connection: Directly Connected to the PC ......................25 3-6-3 USB Connection: Connecting by Installing a Hub Between EDX-100A and the PC .......... - Page 4 OF CHANNELS ..................................51 11-3 EXTERNAL TRIGGER FUNCTION ............................52 11-4 EXTERNAL CLOCK SIGNAL AND EDX-100A MEASUREMENT PROCEDURE ............53 11-4-1 Outline ....................................53 11-4-2 About software version ................................53 11-4-3 Notes for External Clock Input ............................53 11-4-4 Connection method ................................54 11-4-5 How to Set Measuring Conditions ............................
-
Page 5: Standard Accessories
EDX-100A)and RCU-41A Remote Control Unit (hereinafter referred to as the RCU-41A). STANDARD ACCESSORIES The following accessories are packed with the EDX-100A. When unpacking, check the contents to ensure that all accessories are enclosed. DCS-100A Dynamic Data Recording Software Instruction Manual ················································... -
Page 6: Safety Precautions (Be Sure To Read The Safety Precautions Prior To Use.)
SAFETY PRECAUTIONS (Be sure to read the safety precautions prior to use.) The EDX-100A is designed in accordance with detailed contents described in “9. HARDWARE SPECIFICATIONS.” Do not use the EDX-100A in an environment exceeding the scope of those specifications. Doing so may cause damage to the EDX-100A. PRIOR TO USE For safe use of the EDX-100A, be sure to read the safety precautions described below. - Page 7 AC power outlet before connecting to it. Inflammable Environment To prevent the risk of fire and explosion, do not operate the EDX-100A in an area exposed to flammable gases, vapors or dust. Abnormal Condition...
- Page 8 0 V. Confirm that the voltage between the negative side of the DC voltage and the GND terminal of the EDX-100A is approximately 0 V. When connecting an input, correctly connect the positive and negative sides.
- Page 9 Do not use the EDX-100A under poor power quality conditions. Operate the EDX-100A within the range of 10 V DC to 18 VDC when a DC power supply is used or 100 VAC to 240 VAC (50/60 Hz) when an optional AC adapter (UIA345-12) is used. The power supply used for the EDX-100A should not experience a momentary power loss and should be free from noise.
- Page 10 Up to 2. Or, deterioration or malfunction of the instrument may result. ● The EDX-100A limits the positions and the number of CAN-40A and CAN-41A. Mount one CAN-40A or CAN-41A to the final slot. ● When CVM-41A using, number of channels that can be set to bridge excitation BV10 V or sensor power supply 10 VDC (±5 V) mode, will be installed number of card ×...
-
Page 11: Limited Life Parts And Precentive Maintenance
Preventive maintenance and replacement parts are a cost-effective way of keeping the performance and extending the service life of the EDX-100A. Regardless of the replacement parts, the EDX-100A itself gradually deteriorates with age. Before the expected service life is reached, consider replacing the EDX-100A with a new one or the latest series as preventive maintenance. -
Page 12: Notations Used In The Instruction Manual
4. When using an external battery, use the one with sufficient capacity to cover the length of measuring time. For details of the current consumption of the EDX-100A, see “9-1 OVERALL SPECIFICATIONS.” 5. Prior to data recording, be sure to insert a CF card into the card slot of the main unit. -
Page 13: Product Overview
○ Multiconditioner function compatible with a variety of sensors ○ Voice memo recording The EDX-100A is available in 3 channel types according to the type of the chassis. Data can be recorded from the following number of channels: 32 channels: EDX-100A –... -
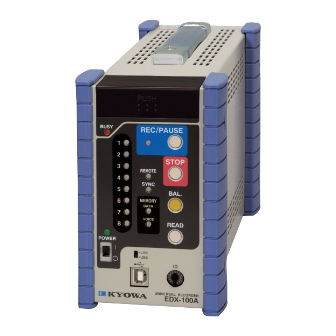
Page 14: Parts Names And Main Functions
FRONT PANEL (13) (14) (15) (16) (17) (10) (18) (11) (12) EDX-100A-1H EDX-100A-2H EDX-100A-4H (1) Handle ........... A handle. You can choose a model with or without a handle. EDX-100A-1 With no handle EDX-100A-2 EDX-100A-4 EDX-100A-1H With a handle EDX-100A-2H EDX-100A-4H (2) “CF CARD”... - Page 15 ○ When measurement is conducted with only one EDX-100A, it is called stand-alone measurement. ○ Synchronous master unit is an EDX-100A that sends sampling clock and DPM carrier to slave units during synchronous operation. Trigger measurement of the synchronous operation can only be set for synchronous master unit.
- Page 16 OK Conditioner card not installed Note 1: The EDX-100A is in measurement disabled state. Refer to “6-1 TROUBLESHOOTING THE MAIN UNIT EDX-100A” and remove the cause. Note 2: Replacing the built-in backup battery is required. As the used battery must be returned for replacement with a new one, contact the KYOWA or our representatives.
- Page 17 Note 5: It is recommended to replace the CF card with the one having sufficient capacity. Note 6: The EDX-100A may be faulty. As the faulty product must be taken back to the KYOWA for troubleshooting and repair, contact us or our representative.
-
Page 18: Rear Panel
EDX-100A units (scheduled to be enabled). (3) CONT OUT connector ....The CONT OUT connector is used for facilitating the synchronized operation of multiple EDX-100A units (scheduled to be enabled). (4) LAN connector ......A LAN connector. - Page 19 (5) Power-supply fuse ......Power supply fuse (φ5 × 20 mm) EDX-100A-1(H) 3.15 A EDX-100A-2(H) EDX-100A-4(H) 6.3 A (6) Power supply connector ....Power supply connector. Voltage range of this power supply connector is 10 to 18 VDC. For connector models and pin Nos., see “8.
-
Page 20: Installing The Edx-100A
INSTALLING THE EDX-100A INSTALLATION PROCEDURE This section describes the required steps used to install the EDX-100A and prepare for measurements. Use the following steps to complete the installation..Connect and ground the DC power supplies and AC Section 3-2 Connecting the power supply adapter. -
Page 21: Connecting The Power Supply
Supply power to the EDX-100A through the accessory DC power cable. Connect the power cable connector to the power supply connector located on the rear side of the EDX-100A. Connect the cable ends as follows: [Red and white cable ends]... -
Page 22: Connecting The Ac Adapter
Also, be sure to ground the EDX-100A. The EDX-100A should never be connected to the power supply if the power supply voltage is outside the voltage range specified above or if the voltage potentials of the terminals for the power supply exceed the level of power supply voltage relative to the ground. -
Page 23: Connecting Sensors
CONNECTING SENSORS Before connecting sensors, do not forget to turn OFF the EDX-100A. When connecting conditioner cards other than the CDV-40B/A (-F), see the instruction manual for applicable sensors. This section explains how to connect sensors to the Strain/Voltage Measurement Card CDV-40B/A (-F). - Page 24 EDX-100A. In case the EDX-100A can not recognize the conditioners, the CH LED of the EDX-100A would not light up and no measurement is made. • Strain generators: CAB-120D, 350D and WDS-10 cannot be used because the F and A terminals are short-circuited.
- Page 25 Do not apply an input voltage exceeding the range specified for the CDV-40B/A (-F). Doing so will pose a risk of electric shock, degrade performance and cause damage to the EDX-100A. Take the following precautions when measuring the DC voltage of a battery, power supply or the like.
-
Page 26: Lan Interface Default Settings
Set the LAN interface conditions by creating a LAN interface condition file (file name: EDX100A.IP) in the CF card and insert the CF card into the EDX-100A to let it read and set the LAN interface conditions. Details of the determined file are described below. - Page 27 Before connecting the EDX-100A and PC via the USB cable, be sure to setup the USB device driver. • For using the DCS-100A (1) When setting up the DCS-100A, be sure to setup the USB device driver for the EDX-100A at the same time. For details, see the DCS-100A INSTRUCTION MANUAL For set-up.
-
Page 28: Connecting Interface
CONNECTING INTERFACE This section describes details of interface connection diagram. 3-6-1 LAN Connection: Connecting by Installing a Hub Between EDX-100A and the PC Connection diagram for the stand-alone EDX-100A is described in the following. LAN Straight cable LAN Straight cable... -
Page 29: Usb Connection: Directly Connected To The Pc
3-6-2 USB Connection: Directly Connected to the PC USB cable LAN/USB switch → USB ID switch → “F” 3-6-3 USB Connection: Connecting by Installing a Hub Between EDX-100A and the PC USB cable USB cable USB hub (commercially available) LAN/USB switch → USB ID switch →... -
Page 30: Connecting Multiple Edx-100A Units For Synchronous Operation
ID switch → “3” Always set the ID switch of the head EDX-100A to master [ID = “0”] and the rest of the EDX-100A units to [ID = “1 to 7”] by taking care not to set the same ID No. In addition, assign the ID switch Nos. in due order from “0”... -
Page 31: Measurement
The EDX-100A is capable of online measurement as well as offline measurement. ○ Online measurement ..In this measuring method, EDX-100A and the PC are connected via the LAN or USB interface, and data is recorded using the control software (DCS-100A) or the software developed by the user. - Page 32 Turn ON the EDX-100A and the PC. Turn ON the EDX-100A and the PC. If the power switch is turned ON, all LEDs on the front panel other than the POWER LED light up in due order from green → red →...
-
Page 33: Offline Measurement Procedure
DCS-100A. the PC and save it on the CF card. Set measuring conditions. Turn ON the EDX-100A, insert the CF card with measuring (The determined measuring conditions condition file to the EDX-100A, and press the READ remain in memory even after the switch to set the measuring conditions. - Page 34 Check input status with the CH LED. Press the BAL. switch for more than 1 second to perform balancing, if necessary. Check the input status with the CH LED. For details of the CH LED, see the appropriate table in “2-1 FRONT PANEL.” For details of the input, see “3-1 CONNECTING SENSORS.”...
- Page 35 Insert the CF card into the PC’s drive. When data recording is completed, extract the CF card from the EDX-100A and insert the card into the PC’s drive. The recorded data is copied to another drive, if necessary. CF card...
-
Page 36: Recording Voice Memo
Total recording time of 1,048 seconds (approx. 17 minutes) Total recording times of 255 times NOTE • Unlike the EDX-2000A, data recording (REC) does not start by pressing the VOICE MEMO switch. • The EDX-100A cannot playback the recorded voice memo solely by itself. Use the DAS-200A (optional). -
Page 37: Turning On/Off The Power
TURNING ON/OFF THE POWER Flip up the POWER switch on the EDX-100A front panel to the “” side to turn ON and, to the “○” side to turn OFF the EDX-100A. When the power is ON, the POWER LED on the front panel lights up green. -
Page 38: Rcu-41A Remote Control Unit
RCU-41A REMOTE CONTROL UNIT Parts names and various functions of the RCU-41A are described below: (1) VOICE MEMO switch ....Talking to the microphone (MIC) (5) while pressing this switch lets you record the voice memo. See "4-4 RECORDING VOICE MEMO.” (2) REC/PAUSE switch ..... - Page 39 NOTE • Unlike the EDX-2000A, data recording (REC) does not start by pressing the VOICE MEMO switch. • Before connecting the RCU-41A, do not forget to turn OFF the EDX-100A. MEMO Use the DAS-200A (optional) to playback the recorded voice data.
-
Page 40: Troubleshooting Before Calling For Repair Service
In addition, if the system is damaged caused by methods other than as specified in this instruction manual, or if the user has disassembled or modified the system, Kyowa Electronic Instrument Co. Ltd is not liable for offering any repair services. - Page 41 TROUBLESHOOTING FOR THE CDV-40B/A (-F) STRAIN/VOLTAGE MEASUREMENT CARD.” • Is a card not applicable with the EDX-100A inserted? Only one CAN card can be used. The DAC-40A card cannot be used. • Are all the measurement ON/OFF parameters set to OFF in Channel...
-
Page 42: Troubleshooting For The Cdv-40B/A (-F) Strain/Voltage Measurement Card
When using the strain gage, noise can be reduced by connecting the GND interference is exceeding. terminal of the EDX-100A to the test specimen to which the strain gage is attached. See “3-3 CONNECTING SENSORS.” Is there an inverter motor, machining equipment, welder or AC power supply for power systems placed near the input cable for the EDX-100A? At this time, set the input cable far apart from the power source. -
Page 43: Maintenance
If the EDX-100A is not operating properly, the CH LED remains OFF even if the measuring conditions are set. At this time, extract the conditioner card and re-insert once again. -
Page 44: Initializing Edx-100A
(6) Wait a few moments. If you hear the buzzer issuing a "bip, bip, bip" sound, the REMOTE LED and SYNC LED light up in green at the same time. (7) Turn OFF the power, wait for about 5 seconds, then turn ON the power once again to initialize the EDX-100A to factory default. -
Page 45: Connector Pin Assignment
CONNECTOR PIN ASSIGNMENT CDV-40B/A (-F) CENTRALIZED CONNECTOR Pin No. Name Pin No. Name −IN −BV −IN −BV −IN −BV −IN −BV −IN −BV Model No.: DN-50S −IN Manufacturer: Hirose −BV −IN −BV −IN −BV Shielded Shielded POWER SUPPLY CONNECTOR Pin No Name Positive side Positive side... -
Page 46: Hardware Specifications
EDX-100A-1H With handle EDX-100A-2H EDX-100A-4H [Note] Number of slots: Number of slots for conditioner cards (2) Number of input channels ..Maximum 32 channels for EDX-100A-4 (when four 8-channel cards are installed) (3) Analog input Strain/Voltage/Acceleration Measurement Card: CVM-40A, CVM-41A... - Page 47 DPM-42B-I(-F), CCA-40A(-F), CDV-44AS, CDA-44AS, CDA-45AS, CVM-40A, CVM-41A, AD-40AS (-F) (16) Sync operation function .... Maximum 8 EDX-100A units can be cascade connected for synchronous operation. The recorded data is separately recorded in each of the EDX-100A installed CF cards. After collecting the respective recorded EDX data through online or offline into the PC, they are combined into 1 file.
- Page 48 Sets the EDX identification No. LAN/USB: Selects a communication interface (LAN/USB) (21) Indicator ........Number of EDX-100A status LEDs: Number of channel status LEDs: Number of channel(s) (22) External control connector ..CONT IN and CONT OUT (for remote control and synchronous operation) (23) Operating temperature range ..
-
Page 49: External View
10. EXTERNAL VIEW 10-1 EDX-100A-1 UNIVERSAL RECORDER 10-2 EDX-100A-2 UNIVERSAL RECORDER... -
Page 50: Edx-100A-4 Universal Recorder
10-3 EDX-100A-4 UNIVERSAL RECORDER 10-4 EDX-100A-1H UNIVERSAL RECORDER (with handle) -
Page 51: Edx-100A-2H Universal Recorder (With Handle)
10-5 EDX-100A-2H UNIVERSAL RECORDER (with handle) 10-6 EDX-100A-4H UNIVERSAL RECORDER (with handle) -
Page 52: Rcu-41A Remote Control Unit
10-7 RCU-41A REMOTE CONTROL UNIT... -
Page 53: Appendix
Item 1) [File name] and item 2) [File No.] of the recorded data file name are set using the DCS-100A. The EDX-100A checks the [Name of recorded data file in the CF card] and [Name of recorded data file from the DCS-100A]. - Page 54 9999, an error occurs (the BUSY LED lights up red) under the following conditions, thus disabling the data recording. • When the EDX-100A is turned ON with the CF card inserted • When the CF card is inserted • When the new data recording starts At this time, change the [File name] 1) using the DCS-100A or replace the CF card with the one containing no recorded data.
-
Page 55: Relations Between Maximum Sampling Frequency And Recordable Time And The Number Of Channels
11-2 RELATIONS BETWEEN MAXIMUM SAMPLING FREQUENCY AND RECORDABLE TIME AND THE NUMBER OF CHANNELS (1) CF Card with capacity 2 GB or more (Reference) Number of Measuring Channels Sampling Frequency 100 kHz 125 Minutes 50 kHz 250 Minutes 83 Minutes 20 kHz 10 Hours 208 Minutes... -
Page 56: External Trigger Function
EDX-100A.) (1) External trigger signal pins assignment and connector External trigger pins are assigned on the connector (CONT IN) of the EDX-100A rear face. Do not use pins other than 13 and 15 pins. [CONT IN] D-sub high-density 15 male pins (EDX-100A side) -
Page 57: External Clock Signal And Edx-100A Measurement Procedure
(1) Input a steady external clock signal that will not vary with time. (2) While the EDX-100A is measuring data, an external clock signal should be sent to the EDX-100A. When the external clock signal is not sent to the EDX-100A, the EDX-100A cannot start measuring data. If the frequency of the external clock signal exceeds ±5% tolerance or if the external signal is stopped during the... -
Page 58: Connection Method
11-4-4 Connection method Input the external clock signal into the CONT IN connector, located on the back panel of the EDX-100A, by referring the following points. (1) Connect the external clock signal into the CONT IN connector. Connect the CONT IN connector as follows. -
Page 59: How To Set Measuring Conditions
11-4-5 How to Set Measuring Conditions Set the measuring conditions of the EDX-100A by using the DCS-100A. Procedures are described as follows. (1) Point to Set and select Set Measure Condition menu to open the Set Measure Condition window. Input the frequency of the external clock signal. -
Page 60: Measurement Procedure With External Clock
11-4-6 Measurement Procedure with External Clock While the EDX-100A is in the measuring status, the external clock signal should be transmitted. Conduct measurements in the same manner as you use the internal clock. The period of transmitting the external EDX-100A: Measuring data... -
Page 61: External Clock Error
11-4-7 External clock error If the external clock error occurred, the SYNC LED flashes red on the EDX-100A to indicate the error status. When conducting the online measurement by using the DCS-100A at that time, the error message appears on the window. -
Page 62: Cont In Connector And Cont Out Connector
11-5 CONT IN CONNECTOR AND CONT OUT CONNECTOR 11-5-1 CONT IN connector The pin assignment of the CONT.IN connector are as follows. Connector: D-sub, high density, 15-pin, maleDRHX-E15P-NJ-CT (Chuo Musen Denki Corporation.) Pin No. Name Description Reserved Connect nothing. Reserved Connect nothing.
Need help?
Do you have a question about the EDX-100A and is the answer not in the manual?
Questions and answers