Renesas RZ/G2L Quick Start Manual
Evaluation board kit
Hide thumbs
Also See for RZ/G2L:
- Startup manual (64 pages) ,
- User manual (62 pages) ,
- Startup manual (19 pages)
Table of Contents
Advertisement
Quick Links
RZ/G2L Evaluation Board Kit
This document provides quick-start instructions for how to bring up an RZ/G2L Evaluation Board Kit (EVK), and
®
how to boot Linux
by using the RZ/G2L Verified Linux Package (VLP) pre-built image.
Important: To ensure the RZ/G2L EVK is set up correctly, complete the steps in the order listed in "Quick Start
Procedure".
Contents
1.
EVK Information ............................................................................................................................................. 2
1.1
How to Get the EVK .............................................................................................................................. 2
1.2
EVK Contents ........................................................................................................................................ 2
2.
Quick Start Procedure ................................................................................................................................... 3
Run the "Pre-built" Image ...................................................................................................................... 3
2.1
2.1.1.
Prepare the microSD Card ...................................................................................................... 3
2.1.2.
Write the Bootloader and U-boot ............................................................................................ 4
2.1.2.1.
2.1.2.2.
2.1.2.3.
2.1.2.4.
2.1.3.
Start Up Linux ....................................................................................................................... 11
2.2
Build the Linux Environment ................................................................................................................ 13
3.
Revision History .......................................................................................................................................... 13
R01QS0072EJ0100 Rev.1.00
Mar 28, 2024
Prepare the Hardware .............................................................................................. 5
Prepare for Serial Communication ........................................................................... 6
Send the Flash Writer .............................................................................................. 8
Write the Bootloader ................................................................................................ 9
Quick Start Guide
Page 1
© 2024 Renesas Electronics
Advertisement
Table of Contents

Related Manuals for Renesas RZ/G2L


Summary of Contents for Renesas RZ/G2L
-
Page 1: Table Of Contents
® how to boot Linux by using the RZ/G2L Verified Linux Package (VLP) pre-built image. Important: To ensure the RZ/G2L EVK is set up correctly, complete the steps in the order listed in “Quick Start Procedure”. Contents EVK Information ............................. 2 How to Get the EVK .......................... -
Page 2: Evk Information
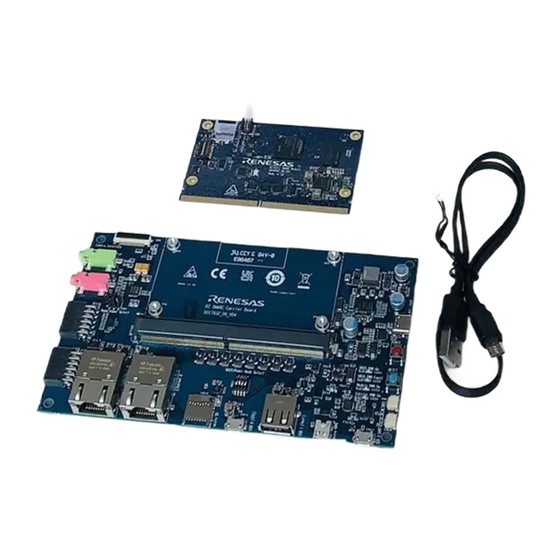
Direct). If requesting to buy the RZ/G2L Secure Type, please contact EVK Contents The RZ/G2L EVK is the most suitable board kit for RZ/G2L evaluation. The EVK consists of a module board and a common carrier board. The EVK conforms to the SMARC v2.1 standard, and is comprised of the following: ■... -
Page 3: Quick Start Procedure
2. Quick Start Procedure Complete the following quick-start steps in the order listed. Run the “Pre-built” Image After obtaining the RZ/G2L EVK, download the RZ/G2L VLP pre-built image and try running it. Please download the RZ/G2L_VLP3.0.5_Pre-built_Images_EN.zip file and decompress the file on your PC. -
Page 4: Write The Bootloader And U-Boot
“fip-smarc-rzg2l_pmic.srec” included in the first partition “boot” of SD card prepared by Step2-1 to your PC. Main Specification of the EVK The components of the RZ/G2L EVK that are used in this step include the following. Page 4 R01QS0072EJ0100 Rev.1.00... -
Page 5: Prepare The Hardware
RZ/G2L Evaluation Board Kit Quick Start Guide 2.1.2.1. Prepare the Hardware Attach the power-delivery (PD) capable USB Type-C cable to the USB Type-C port (“Power input”). The LEDs (“VBUS_PWR_ON” and “Module_PWR_ON”) should now be illuminated. Set the board to SCIF Download mode to write to the serial flash memory on the EVK board. -
Page 6: Prepare For Serial Communication
RZ/G2L Evaluation Board Kit Quick Start Guide Press the red button (SW9) to turn on the power. The LED4 (Carrier PWR On) should illuminate. When turning off the power, press and hold the red button for 2 seconds then check that the LED4 (Carrier PWR On) is turned off. - Page 7 RZ/G2L Evaluation Board Kit Quick Start Guide Select “Setup” > “Serial port” to set the settings about serial communication protocol on the software. Set each setting as follows: ■ Baud rate: 115200 ■ Date: 8 bit ■ Parity: none ■...
-
Page 8: Send The Flash Writer
RZ/G2L Evaluation Board Kit Quick Start Guide 2.1.2.3. Send the Flash Writer Send an image of the Flash Writer using terminal software after the message “please send !” is shown. Select the “File” > “Send file” menu. Select “Flash_Writer_SCIF_RZG2L_SMARC_PMIC_DDR4_2GB_1PCS.mot” and then click “Open”... -
Page 9: Write The Bootloader
RZ/G2L Evaluation Board Kit Quick Start Guide 2.1.2.4. Write the Bootloader Before writing the loader files, change the Flash Writer transfer rate from default (115200bps) to high speed (921600bps) with the “SUP” command of the Flash Writer. >SUP Scif speed UP Please change to 921.6Kbps baud rate setting of the terminal. - Page 10 RZ/G2L Evaluation Board Kit Quick Start Guide Write another loader file by using bolded commands again. Send “fip-smarc-rzg2l_pmic.srec” using the terminal software in the same manner as in section 2.1.2.3 after the message “please send !” is shown. >XLS2 ===== Qspi writing of RZ/G2 Board Command ============= Load Program to Spiflash Writes to any of SPI address.
-
Page 11: Start Up Linux
RZ/G2L Evaluation Board Kit Quick Start Guide 2.1.3. Start Up Linux Set the board to SPI Boot mode to start the Bootloader. Change the SW11 as below (SW11-2 ON → OFF). Insert your microSD card to the slot (CN10) on the carry board. - Page 12 RZ/G2L Evaluation Board Kit Quick Start Guide Turn the power off and on by pressing red button SW9 again to boot up the board. When “smarc-rz/g2l login:” is displayed, enter “root” to login. (A password is not required.) Version: 3.0.3...
-
Page 13: Build The Linux Environment
RZ/G2L Evaluation Board Kit Quick Start Guide Build the Linux Environment Section 2.1 describes how to start up the RZ/G2L by using the RZ/G2L VLP pre-built image. If you would like to configure your Linux environment from the VLP build stage, please download the file...
Need help?
Do you have a question about the RZ/G2L and is the answer not in the manual?
Questions and answers