Advertisement
Quick Links
Advertisement

Related Manuals for WATSON Tonic Single Sided Powerpole


Summary of Contents for WATSON Tonic Single Sided Powerpole
- Page 1 ASSEMBLY Tonic Single Sided Powerpole V.23.1 10/2023 360.394.1300 watsonfurniture.com...
- Page 2 Hardware M6-1 x 12 SCREW (0001140) Tonic Powerpole Components SPLICE PLATE END BRACKET INFEED CEILING BAR CEILING BAR CLAMP POWER POLE POWER POLE POWER POLE END COVER END SEGMENT (RIGHT SHOWN) (RIGHT SHOWN) Tools P2 Phillips 6mm Hex Drill/ Electric Drill Driver Bit Driver Bit 2 TONIC DUAL SIDED POWERPOLE ASSEMBLY INSTRUCTIONS...
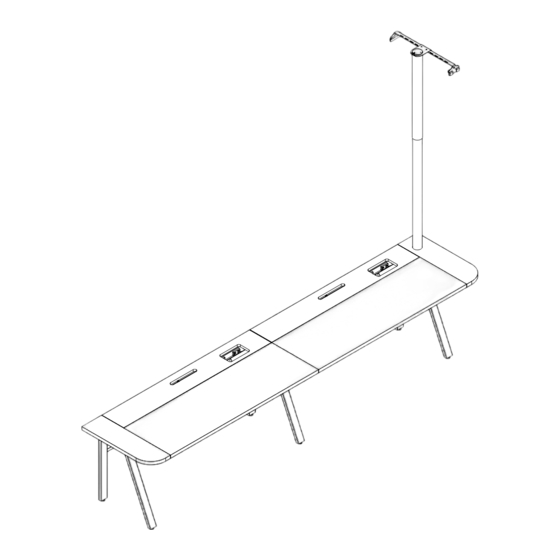
- Page 3 Power Pole Install (Optional) Drop the power pole into the power pole end segment Note: These instructions are subsequent to step 8. Secure Surfaces and Alignment, in the Tonic Single Sided Workbench Assembly Instructions. 3 TONIC DUAL SIDED POWERPOLE ASSEMBLY INSTRUCTIONS...
- Page 4 Attach Clamp to Ceiling Bar Fit the ceiling bar clamp into the slots at the end of the ceiling bar, and rotate into place, as shown below. Mount Ceiling Bar to Ceiling Hook the ceiling bar on the 2’ ceiling grid and screw the dlamp to the ceiling bars with one screw (0001140) on each side.
- Page 5 Connect Power Pole to Ceiling Hook the power pole onto the ceiling bar, and align the pole with the bracket at the desired position. Screw pole to the ceiling bar using (4) screws (0001140). M6-1 x 12 SCREW (0001140) 5 TONIC DUAL SIDED POWERPOLE ASSEMBLY INSTRUCTIONS...
- Page 6 Run Cables Down Pole (A) Run the cables down from the roof through the pole, then through the opening of the rail end (B). Wire as normal. 6 TONIC DUAL SIDED POWERPOLE ASSEMBLY INSTRUCTIONS...
Need help?
Do you have a question about the Tonic Single Sided Powerpole and is the answer not in the manual?
Questions and answers