Hollyland LARK M2 / Solo / Duo / Combo - Radio System Manual
- User manual (24 pages) ,
- Quick manual (20 pages) ,
- User manual (23 pages)
- Also fits for
- Lark m2 solo
- Lark m2 duo
- Lark m2 combo
Advertisement
Product Version Overview
LARK M2 Solo (Android)

LARK M2 Solo (iOS)

LARK M2 Duo (iOS)

LARK M2 Duo (Camera)

LARK M2 Combo

* The quantity of the items depends on the product configuration.
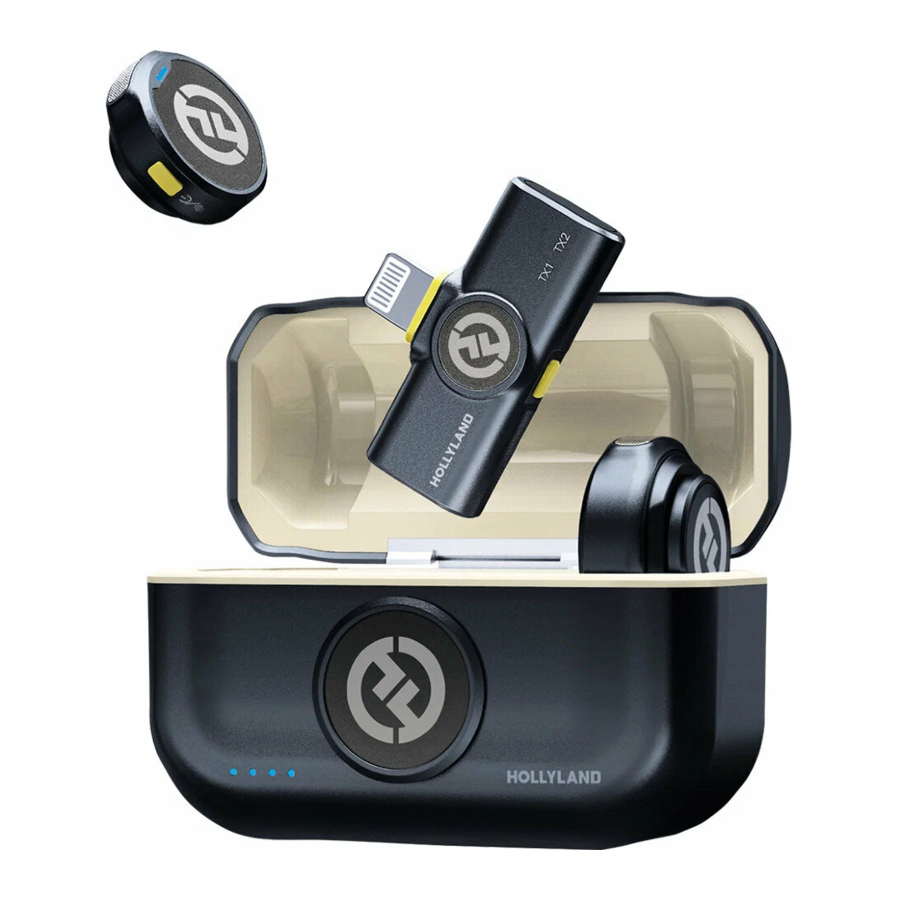
Interface Description
Mobile Version

Camera Version

TX:Transmitter

Mobile Version RX: Receiver (iOS/Android)
")
*The plug interface varies between Android and iOS versions.
Camera Version RX: Receiver

Mobile Version Installation and Connection Guide
- Preferred Placement for TX: Attach it to your collar. If you speak loudly, place it higher up on your chest. Use either a clip or magnet for attachment.
- Place the magnet on the inside of your collar and attach the TX to the magnet on the outer side.


- Firstly, clip the back clip to your collar and attach the TX to the clip.


* If the volume of the recorded voice is fluctuating, it's probably because the microphone isn't placed properly. So, make sure that the microphone is unobstructed. If you're recording outside, use a windscreen to minimize wind and breath noise.
Connect RX (iOS) to iPhone

Connect RX (Android) to Android Phone

Charge your mobile device with RX while using it.

Camera Version Installation and Connection Guide
Connecting Receiver to Camera

- Attach the receiver to a camera via the hot shoe or cold shoe using the back clip.
- Connect the 3.5mm audio output interface on the receiver to the 3.5mm audio input interface on the camera using a 3.5mm TRS to TRS cable.
- Set the recording volume of the camera to the lowest and the output volume of the receiver to the medium to ensure the best recording level.
* Optional: USB-C to USB-C or USB-C to Lightning cables are available for connecting to smartphones.
Product Indicator Lights Guide
TX Indicator Lights
| Description | Status |
| Blue light flashing | TX and RX not connected |
| Blue light steady | TX and RX connected |
| Green light steady (In use) | Noise Cancellation ON |
| Pink light steady | TX updating |
| Orange light steady | TX charging |
| Green light steady (While charging) | TX fully charged |
| Red light flashing slowly | TX low battery |
Mobile Version RX Indicator Lights
| Description | Status |
| Blue light flashing | TX and RX not connected |
| Blue light steady | TX and RX connected |
| Green light steady (In use) | Noise Cancellation ON |
| Pink light steady | RX updating |
| Red light flashing slowly | TX low battery |
Camera Version RX Indicator Lights
| Description | Status |
| Blue light flashing | TX and RX not connected |
| Blue light steady | TX and RX connected |
| Green light steady (In use) | Noise Cancellation ON |
| Pink light steady | RX updating |
| Orange light steady | RX charging |
| Green light steady (While charging) | RX fully charged |
| Red light flashing slowly | TX low battery |
| RX two red lights flashing quickly | RX low battery |
| Blue light steady (Volume/Mode Indicator) | Stereo |
| Green light steady (Volume/Mode Indicator) | Mono |
| One light steady (Volume/Mode Indicator) | Low volume |
| Two lights steady (Volume/Mode Indicator) | Medium volume |
| Three lights steady (Volume/Mode Indicator) | High volume |
Charging Case Indicator Lights
| One LED ON | Charging case at 25% battery |
| Two LEDs ON | Charging case at 50% battery |
| Three LEDs ON | Charging case at 75% battery |
| Four LEDs ON | Charging case at 100% battery |
| One LED ON, steady red | Low battery. The transmitter and the receiver cannot be charged using the charging case. |
| One LED steady when connected to USB | Charging case is charging |
| Four LEDs sequence on | Charging case updated |
Product Usage
Automatic On/Off
Remove the device from the charging case to turn on automatically. Place the device back in the case to turn off automatically.
Manual On/Off
Press and hold the TX power button, or the Camera Version RX power button for 3 seconds: To turn on/off

Press and hold the TX power button for 3 seconds

Press and hold the RX power button for 3 seconds
Noise Cancellation
- Press the noise cancellation button on the TX to turn noise cancellation on or off. When activated, the TX status light turns green.
![]()
- Press the noise cancellation button on the mobile version RX to turn noise cancellation on or off. When activated, the RX status light turns green.
![]()


Manual Pairing
- With the TX turned off, press and hold the pairing button for 6 seconds to start pairing. The TX status light will quickly flash blue when in pairing mode.
![]()
- For mobile version RX, connect to a phone and hold the pairing button for 3 seconds to start pairing. The RX status light will quickly flash blue when in pairing mode.
![]()


- With the camera version RX turned on, hold the pairing button for 3 seconds to start pairing.
![]()

*The transmitter and the receiver pre-paired from the factory.
Automatic Charging
When the TX status light slowly flashes red or both status lights on the camera RX flash red quickly, place them in the charging box. The status lights will turn solid orange during charging and solid green once fully charged.
Manual Charging
When the TX status light slowly flashes red or both status lights on the camera RX flash red quickly, use the magnetic charger to charge the TX. The light will remain solid orange during charging and turn green once fully charged, going off after approximately 0.5 hours.

When both status lights on the camera RX flash red quickly, charge the RX using the charging cable. The RX status light will be solid orange during charging and turn green when fully charged, going off after approximately 0.5 hours.

Volume Adjustment - Only Supported by Camera Version RX
Default volume setting is medium, with low, medium, and high options. Turn the volume knob clockwise to increase volume.

Turn the volume knob counterclockwise to decrease volume.

Mode Switching - Only Supported by Camera Version RX
Connect to Smartphone: Green light on, supports only mono mode.
Connect to Camera: Blue light on for stereo mode, green light on for mono mode.
Press the RX mode switch button to switch modes.

Note:
- The mobile version only supports mono mode.
- It is recommended to use only one RX at a time for the combo version. Using two RX simultaneously is not supported.
App Information
LARK SOUND
The LARK SOUND app is available for download on Xiaomi, Huawei, and Apple App Stores. Official QR code scanning is also supported.
* For the camera version, you need to purchase a USB-C to USB-C or USB-C to Lightning cable to use the app on your smartphone.

LARK SOUND
The LARK SOUND app is a perfect match for Hollyland wireless microphones. With the app, you'll have access to a range of smart features, such as parameter configurations and firmware updates, that work together seamlessly to enhance your microphone performance.

Requires iOS 12.0 or higher

Requires Android 8.0 or higher

Specifications
| Mic Sensitivity | –37dBFS±2dB@1 kHz, 94dB SPL |
| Modulation Mode | GFSK |
| Wireless Transmission | 2.4GHz |
| Transmission Range | Mobile Version: Up to 984ft (300m) for LOS/197ft (60m) for NLOS |
| Camera Version: Up to 984ft (300m) for LOS/131ft (40m) for NLOS | |
| Mic Polar Pattern | Omnidirectional |
| Frequency Response | 20 Hz–20 kHz |
| Signal-to-Noise Ratio | 70dB |
| Sound Pressure Level | 115dBSPL |
| Recorded Audio Format | 48 kHz/24-bit WAV |
| Battery Voltage | TX: 3.87V Camera Version RX: 3.87V Mobile Version Charging Case: 3.8V Camera Version Charging Case: 3.8V |
| Battery Capacity | TX: 97mAh Camera Version RX: 145mAh Mobile Version Charging Case: 750mAh Camera Version Charging Case: 1950mAh |
| Operating Time | TX: About 8 hours Camera Version RX: About 8 hours Mobile Version Charging Case: Approx. two times of charging for 2 TX Camera Version Charging Case: Approx. three times of charging |
| Charging Time | TX: About 1.5 hours Camera Version RX: 1.5H Mobile Version Charging Case: <1.5 hours Camera Version Charging Case: <2 hours |
| Charging Temperature | 0°C to 45°C |
| Operating Temperature | –10°C to 60°C |
| Weight | TX: Approx. 9g (0.3oz) Mobile Version RX: Approx. 6g (0.2oz) Camera Version RX: Approx. 14.8g (0.5oz) Mobile Version Charging Case: Approx. 65.6g (2.3oz) Camera Version Charging Case: Approx. 111g (3.9oz) |
| Charging power | 5V  2.4V 2.4V |
* The data provided above is based on laboratory testing results.
Support
If you encounter any problems in using the product or need any help, please contact Hollyland Support Team via the following ways:
 | Hollyland User Group |
 | HollylandTech |
 | HollylandTech |
 | HollylandTech |
 | support@hollyland.com |
 | www.hollyland.com |
Documents / Resources
References
Download manual
Here you can download full pdf version of manual, it may contain additional safety instructions, warranty information, FCC rules, etc.
Download Hollyland LARK M2 / Solo / Duo / Combo - Radio System Manual
Advertisement


Need help?
Do you have a question about the LARK M2 and is the answer not in the manual?
Questions and answers