
Related Manuals for Modena RX 9632


Summary of Contents for Modena RX 9632
- Page 1 Nomor: IMKG.544.02.2020 Buku Petunjuk Penggunaan Tudung Hisap Moderno RX 9632, RX 7632 RX 9622, RX 7622...
-
Page 2: Table Of Contents
Bagian 5: Perawatan Membersihkan Kabinet Membersihkan Filter Bagian 6: Penyelesaian Masalah Bagian 7: Tindakan Pencegahan Bagian 8: Spesifikasi Buku panduan ini menjelaskan semua yang perlu diketahui tentang produk baru Anda. Silakan hubungi Customer Care untuk bantuan lebih lanjut lewat situs resmi www.modena.com... -
Page 3: Bagian 1: Petunjuk Keselamatan
• Sebelum menghubungkan peranti dengan sumber listrik, pastikan kabel listrik dalam kondisi yang baik. Jika terjadi kerusakan pada kabel listrik , penggantian harus dilakukan oleh tenaga berkompeten atau hubungi Sentra Servis MODENA untuk proses penggantian. • Ruangan harus memiliki ventilasi yang baik pada saat tudung hisap digunakan pada kompor berbahan gas atau bahan bakar lainnya. -
Page 4: Bagian 2: Nama-Nama Bagian
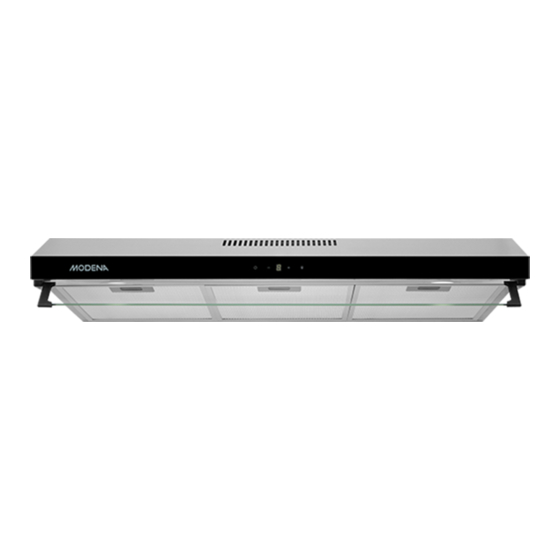
BAGIAN 2: NAMA-NAMA BAGIAN Filter karbon Tombol pengatur arah aliran udara Panel kontrol Lampu Filter aluminium Pengait filter BAGIAN 3: PEMASANGAN Tudung hisap merupakan peralatan yang berfungsi sebagai penghisap asap serta aroma masakan yang timbul ketika sedang memasak. Dengan adanya tudung hisap, dapur Anda akan terbebas dari partikel- partikel minyak yang dapat menimbulkan aroma tidak enak. -
Page 5: Memasang Tudung Hisap Pada Dinding
Memasang Tudung Hisap Pada Dinding Tudung hisap harus dipasang tegak lurus untuk menghindari minyak mengalir ke satu sisi dan menetes keluar dari tudung hisap Persiapan Sebelum Memasang Tudung Hisap Keluarkan tudung hisap dari kemasannya lalu letakkan pada tempat yang rata (misalnya meja). Buka filter dengan cara menggeser pengunci/pengait filter lalu tarik. -
Page 6: Pemasangan Tudung Hisap
Pemasangan Tudung Hisap Tudung hisap dapat dipasang pada dinding beton (tembok) atau pada bagian bawah dinding lemari dapur. Pemasangan pada dinding beton (tembok) Buatlah garis tengah pada dinding mana akan ditempatkan tudung hisap (1). Tempelkan template untuk mengebor pada dinding (2). Atau jika tidak dilengkapi template, tempelkan tudung... - Page 7 4. Pasang sekrup pada kedua lubang bagian atas dan sisakan jarak 1 cm antara kepala sekrup dan permukaan tembok (5). 5. Pasang tudung hisap pada tembok yang sudah dipasang sekrup dengan cara menggantung tudung hisap pada sekrup tersebut (6). 6. Bila posisi tudung hisap pada tembok sudah tepat, kencangkan kedua sekrup bagian atas tersebut (7).
-
Page 8: Cara Kerja
Cara Kerja Tudung hisap MODENA mempunyai 2 (dua) versi cara kerja yaitu: Ducting Sistem • Pada versi ini, tudung hisap bekerja dengan menghisap asap/ aroma masakan yang kemudian asap tersebut dibuang keluar melalui saluran pembuangan. • Diperlukan sistem ducting yang tahan panas/ api untuk membuang asap/ aroma melalui saluran pembuangan. -
Page 9: Penyambungan Arus Listrik
Penyambungan arus listrik Tudung hisap MODENA dirancang untuk tegangan listrik 220 Volt, phase tunggal dan frekwensi 50 Hz. Peralatan ini menggunakan kabel steker double insulasi (kabel isi 2), oleh karena itu jangan dihubungkan dengan arde (pembumian). -
Page 10: Bagian 4: Cara Penggunaan
Tombol untuk menaikkan kecepatan motor Tombol lampu Untuk mengaktifkan pengatur waktu. RX 9632 & RX 7632 Tekan tombol lampu dan tahan selama 1 hingga 3 detik, digital display akan berkedip dan akan menghitung mundur untuk 5 menit. Setelah 5 menit motor dan lampu akan mati secara otomatis dan suara alarm untuk 1 detik. -
Page 11: Bagian 5: Perawatan
20 – 30 menit setelah selesai memasak. BAGIAN 5: PERAWATAN Tudung hisap MODENA dirancang secara khusus untuk pemakaian jangka waktu panjang sehingga tidak memerlukan perawatan yang rumit. Namun, ada beberapa hal yang dianjurkan untuk merawat tudung hisap Anda agar kualitasnya tetap terjaga. -
Page 12: Bagian 6: Penyelesaian Masalah
• Bersihkan filter aluminium dan • Filter Aluminium kotor Daya hisap pasang kembali setelah kering. • berkurang Ganti Karbon filter dengan yang • Karbon filter kotor baru. Motor fan tidak Gulungan motor putus Hubungi Service Center MODENA. menyala... -
Page 13: Bagian 7: Tindakan Pencegahan
Bila tercium bau hangus / terbakar dari hood, segera matikan hood dan segera hubungi MODENA Service Center. • Lakukan service secara rutin pada kompor Anda setiap 3 (tiga) bulan sekali, karena jika terdapat kendala/masalah pada Tudung Hisap Anda, dapat segera diketahui dan diperbaiki. Hubungi MODENA Service Center... -
Page 14: Bagian 8: Spesifikasi
BAGIAN 8: SPESIFIKASI MODEL RX 9632 RX 9622 RX 7632 RX 7622 Jenis Slim hood Slim hood Slim hood Slim hood Bahan kabinet Stainless Stainless Stainless Stainless Warna kabinet Stainless Stainless Stainless Stainless Warna panel Hitam Hitam Hitam Hitam depan... - Page 16 Aluminium Filter and Metal Filter Carbon Filter Part 6: Troubleshooting Part 7: Precaution Part 8: Specification This guide book explains everything you need to know about your new product. Please contact our Customer Care should you need further assistance through www.modena.com...
-
Page 17: Part 1: Safety Warnings
Before connecting the unit to a power source, make sure the power cord is in good shape. If there is damage to the power cord, the replacement must be performed by qualified personnel or contact the MODENA Service Center for replacement process. -
Page 18: Part 2: Name Of Parts
PART 2: NAME OF PARTS 1. Carbon Filter 2. Direction airflow 3. Control panel 4. Lamp 5. Aluminum filter 6. Filter holder PART 3: INSTALLATION Exhaust hood is equipment which sucks smoke and cooking fragrance. With a vent hood, your kitchen will be free from oil particles that may produce bad odor. -
Page 19: Installing The Exhaust Hood On Wall
Installing the Exhaust Hood on Wall Exhaust hood must installed perpendicularly to prevent the oil from flowing to one side and dripping out of the vent hood Preparations to Be Made Before Installing the Exhaust Hood 1. Remove the exhaust hood from its packaging and put it on an even place (i.e. -
Page 20: Installation Of Exhaust Hood
Installation of Exhaust Hood Exhaust hood can be installed on the concrete (brick) wall or the bottom part of the kitchen set. Installing on concrete wall 1. Draw a centerline on the wall where the exhaust hood is to be installed (1). 2. -
Page 21: Installation On The Bottom Part Of Kitchen Set
5. Install the exhaust hood on the screwed wall by suspending the vent hood on the screw (6). 6. When the exhaust hood is positioned correctly on the wall, tighten both screws on the upper part (7). 7. To reinforce the exhaust hood handle on the wall, install the screws on both holes on the bottom part (8) and tighten them (9). -
Page 22: Operating Procedure
Operating Procedure MODENA Exhaust Hood has 2 (two) work methods as follows: Ducting / Exhaust System: In this mode, the exhaust hood • operates by sucking the smoke / cooking odor and then discharging it out of the vent. A heat / fire-resistant ducting system is required to discharge smoke / odor •... -
Page 23: Electricity Connection
Electricity Connection MODENA Exhaust Hood is designed for 220 volt electricity input, single phase with 50 Hz of frequency. This appliance uses a double-insulated power cord (2 parallel cords) and should not be connected to a grounding wire. -
Page 24: Touch Button
Speed increase button Lamp button To active the Timer RX 9632 & RX 7632 Press Lamp button and hold for 1 up to 3 seconds. The digital display will flash and into 5 minutes countdown. After 5 minutes, the motor and the lamp will be turn off automatically, the buzzer sound for 1 second RX 9622 &... -
Page 25: Part 5: Maintenance
PART 5: MAINTENANCE MODENA Exhaust Hood is specifically designed for long-term usage and doesn't require complicated maintenance. However, there are several things you can do to maintain its quality as follows: Cleaning the Cabinet: To clean the surface of exhaust hood cabinet from sticky oil particles, use cloth / sponge and soap water and dry it. -
Page 26: Part 6: Troubleshooting
• power Dirty carbon filter. • Replace the carbon filter with a new one. • Motor fan Contact MODENA Service • Broken motor coil. malfunctioning Center. • The vent hood is installed too close to the stove. Motor stops working •... -
Page 27: Part 7: Precaution
• Perform a routine service on your stove every 3 (three) months, because if there are problems / problems with your exhaust hood, it can be immediately identified and repaired. Contact MODENA Service Center PART 8: SPECIFICATION MODEL RX 9632... - Page 28 04/21 PT MODENA INDONESIA Jl. Industri Raya I Blok D-8, Jatiuwung, Tangerang 15135...
Need help?
Do you have a question about the RX 9632 and is the answer not in the manual?
Questions and answers