
Related Manuals for Modena IX 9330


Summary of Contents for Modena IX 9330
- Page 1 IX series BUKU PETUNJUK PENGGUNAAN TUDUNG HISAP DAN KARTU GARANSI EXHAUST HOOD MANUAL WARRANTY CARD 2017 www.modena.co.id...
- Page 2 Buku ini sangat disarankan untuk mudah dijangkau oleh siapapun yang akan menggunakan produk ini. Tersedia pula fasilitas layanan customer care bagi pengguna MODENA yang setia dan juga informasi- informasi penunjang lainnya di situs resmi www.modena.co.id. Silakan menghubungi kont ak yang tersedia bila ada hal-hal lain yang ingin ditanyakan berkaitan dengan produk ini.
- Page 3 NOMOR : 20/DJ-ILMEA/MG/V/2000 728 /ILMEA/IX/2003 DAFTAR ISI HLM. Kata Pengantar Bagian 1 : Nama-nama Bagian Bagian 2 : Instalasi Bagian 3 : Cara Penggunaan Bagian 4 : Pemeliharaan Bagian 5 : Masalah & Solusinya Bagian 6 : Spesifikasi...
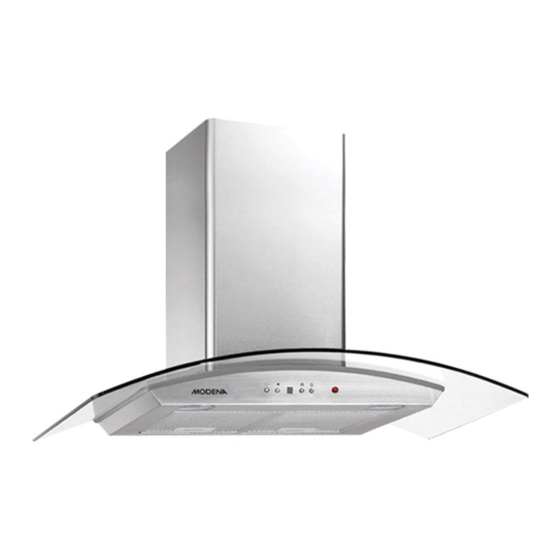
- Page 4 Bagian 1: Nama-nama Bagian * Gambar adalah gambaran secara umum dan belum tent u sama dengan produk yang anda terima. * Fitur dan kelengkapan tergant ung pada tipe produk Kontrol Panel Filter Alumunium/Cassette Aluminum Filter Pegangan Filter Aluminium/Cassette Aluminum Filter Handle Lampu Halogen Cerobong Utama Cerobong penyambung bagian atas...
- Page 5 Jika Anda ragu silakan menghubungi teknisi untuk bantuan. Perakitan dan sambungan listrik harus dilakuk an oleh teknisi Modena. Sambungan Listrik Unit diproduksi sebagai kategori I, oleh karena itu kabel ground dibutuhk an.
- Page 6 MEMASANG TUDUNG HIS AP Tudung hisap harus dipasang tegak lurus unt uk menghindari minyak mengalir ke satu sisi dan menetes keluar dari tudung hisap. Membuat lubang pada Plafon dan cara pemasangan bracket 1. Untuk memasang tudung hisap tipe island, plafon harus kuat dan mampu menahan berat sedikitnya 40 kg dan ketebalan dari plafon harus sedikitnya 30 cm.
- Page 7 6. Pasang cerobong atas pada plat holder dengan 4 buah sekrup, kemudian cerobong bawah merapat ke atas dan pasang pengait untuk menahan sementara. 7. Pasang spigot dengan 4 buah sekrup. 8. Pasang glass panel (untuk tipe tertentu) den gan 4 buah baut dan rubber ring sert a atur posisinya secara tepat.
- Page 8 CARA KERJA Tudung hisap MODENA mempunyai 2 (dua) versi cara kerja yaitu : Sistim DUCTING: Pada versi ini, tudung hisap bekerja dengan menghisap asap/aroma masakan yang kemudian asap tersebut dibuang keluar melalui s aluran pembuangan.
- Page 9 Sistim RE-CI RCULATING : Pada versi ini, tudung hisap bek erja dengan menghisap asap/ aroma masakan yang kemudian akan disaring melalui filter aluminium dan karbon filter secara berturut -turut. Asap yang telah disaring tersebut akan dialirkan kembali ke ruangan. Beberapa hal yang perlu diperhatikan untuk pemasangan tudung hisap sistem re-circulating antara lain: 1.
- Page 10 Untuk mengatur kecepatan mot or (Rendah – Sedang – Tinggi) Untuk mengaktifkan Shut-off timer (setelah 9 menit motor akan berhenti bekerja secara otomatis) Untuk menyalakan dan mematikan lampu TOMBOL ELEKTRONIK + displai LCD Untuk mengatur waktu penggunaan Untuk mematikan dan meny alakan lampu Untuk menggunakan motor dengan kecepatan rendah,sedang dan tinggi Untuk mengaktifkan dan mematikan unit Jika tombol ditekan maka unit akan bekerja dimana kecepatan mot or te rgantung...
- Page 11 c. Sentuh tombol sekali lagi untuk keluar dari pengaturan jam. Mengatur Timer Untuk mengatur Timer dapat dilakukan ketika motor atau lampu sedang bekerja. Waktu pada timer telah ditentukan dalam tiga periode, dengan rentang waktu selama 5 menit / 15 menit / 60 menit / Batal. a.
- Page 12 Filter aluminium dapat dicuci di dalam dishwasher. Jangan membengkokkan filt er pada saat mencucinya. Karbon Filter : Karbon filter harus diganti dengan yang baru paling tidak setiap 4 bulan pemakaian, atau jika karbon filter sudah tidak mampu menyerap aroma masakan. Lepaskan terlebih dahulu filt er alu minium.
- Page 13 Jarak antara unit dengan bidang Atur jarak menjadi 65 – 75 cm hisap tidak optimal memasak terlalu jauh. Bagian 6: Spesifikasi MODEL IX 9300 IX 9330 IX 9150 Jenis Island Hanging Island Hanging Island Hanging Stainless + tempered Stainless + tempered...
-
Page 15: Introduction
We also provide a customer care service for MODE NA users as well as other support information on our official website www.modena.co.id. Please contact us if you have other questions regarding this product. Enjoy your daily activities, we hope that our products may provide the best services to your family. -
Page 16: Table Of Contents
CONTENTS PAGE Introduction Part 1 : Name of Parts Part 2 : Installation Part 3 : How to Use Part 4 : Maintenance Part 5 : Problem & Solving Part 6 : Specification... -
Page 17: Part 1: Name Of Parts
Part 1: Name of Parts * The image is a general overview and is not necessarily the same as the product you recei v e. * Features and completeness depends on the type of products Cont rol Panel Cassette Aluminum Filter Cassette Aluminum Filter Handle Halogen Lamp Main Chimney... - Page 18 If in doubt please ask qualified electrician for help. Assembly and electrical connections must be carried out by Modena technicians. Electric Connection The appliance has been manufactured as class I, therefore earth cable is necessary.
- Page 19 Making a hole in the ceiling and how to install the bracket: 1. To attach the hood type of island, the ceiling must be strong and able to hold the weight of at least 40 kg and the thickness of the ceiling must be at least 30 cm. 2.
- Page 20 6. Install the chimney above the plate holder with 4 screws, then funnel down close to the top and attach a hook to hold temporarily. 7. Install the spigot with 4 screws. 8. Replace the glass panel (for certain types) with 4 pieces of bolts and rubber rings and adjust its position appropriately.
- Page 21 10. Insert the extensiblepipe to the spigot if it will use the duc ting system / exhaust, then lower down the chimney off the hook and make sure the chimney is attached properly to the suction hoodbody. WORK METHOD MODE NA Hood has 2 (two) work methods as follows: DUCTING SYSTEM: In this mode, the hood operat es by sucking the smoke / cooking odor and then discharging it out of the vent through the exhaust system.
-
Page 22: Part 3: How To Use
RECI RCULATING system: In this version, the vent hood sucks the smoke / cooking odor and filters it through an aluminum filter and carbon filter. The filtered smoke is then recirculated into the room. This system is used if the premise renders it impossible to install a ducting system. - Page 23 To adjust the speed level (Low – Medium – High) To activate the Shut-off timer (A fter 9 minuttes motor will s witch off automatically) To switch ON and switch OFF the Lamp Electronic Button + LCD Display To set the time of use To switch ON and switch OFF the light To adjust the speed level (Low –...
-
Page 24: Part 4: Maintenance
Setting the timer The Timer can be set when the motor or lamp is on. Timer duration is set in three priode: 5 minut es/ 15 minutes / 30 minutes/ Cancel. 4. To set the timer, touch the button once for 5 minutes, twice for 15 minutes, thrice for 30 minutes, four times to cancel, five time for 5 minut es and so on. -
Page 25: Part 5 : Problem & Solving
Replace it with a new one of the same type and make sure both pins have been installed correctly on the lamp socket. Part 5: Problem & Solving Please perform checking procedure on the following thin gs before contacting MODENA s ervice cent er when troubleshooting occurs: PROBLEM CAUS E... -
Page 26: Part 6 : Specification
Power cord looses Plug in to the power supply again. The fan blade is damaged. Switch of the unit Cont act MODENA Service Center. The fan mot or is not fixed tightly. Serious Vibration of the unit The unit is not hung properly on Take down the unit and check whether the bracket.
Need help?
Do you have a question about the IX 9330 and is the answer not in the manual?
Questions and answers