Advertisement
Quick Links
Installation Manual
for
Erin Gazebo Louvres, Wall Panels and Door
(2.5x2.5m and 3.2x3.2m)
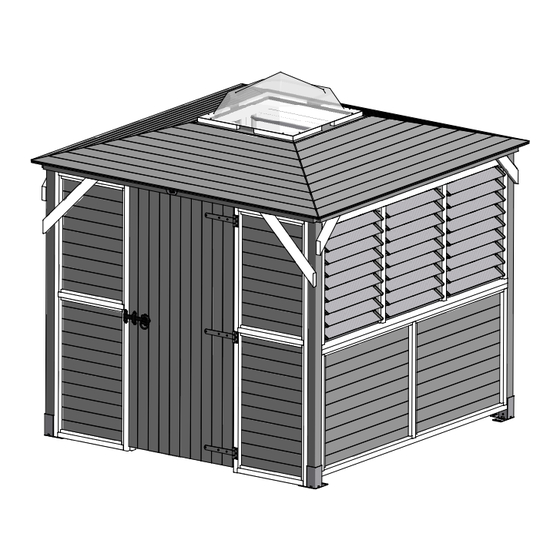
Please read the installation manual thoroughly before starting to assemble the
Erin Gazebo Louvres, Wall Panels and Door. This may not be the combination of
wall panels that you have purchased but this is just for illustration purposes.
For the installation of this product we recommend it is completed by minimum 2
people.
Unique Product Reference Number.
www.dunsterhouse.co.uk
Advertisement

Related Manuals for Dunster House Erin


Summary of Contents for Dunster House Erin
- Page 1 (2.5x2.5m and 3.2x3.2m) Please read the installation manual thoroughly before starting to assemble the Erin Gazebo Louvres, Wall Panels and Door. This may not be the combination of wall panels that you have purchased but this is just for illustration purposes.
- Page 2 Erin Gazebo Louvres, Wall Panels and Door GETTING READY *Prior to assembly, store all components in a cool, dry place away from direct contact with the ground, sunlight or moisture. *These instructions will assist you with the assembly of your louvres, wall panels and door. Do not refer to them for the construction of your gazebo, use the installation manual provided with your gazebo instead.
- Page 3 Erin Gazebo Louvres, Wall Panels and Door - Components list FRONT PANEL Pressure treated 2.5m Gazebo ..Panel width 0.63m 3.2m Gazebo ..Panel width 0.984m DOOR Pressure treated LINTEL Pressure treated 2150 2.5m Gazebo ..70x35x2150.A 3.2m Gazebo ..70x35x2860.A...
-
Page 4: Wall Panel
Erin Gazebo Louvres, Wall Panels and Door - Components list WALL PANEL "Quantities vary depending on your purchase" Pressure treated 2160 2.5m Gazebo ..Panel width 2.16m 2868 3.2m Gazebo ..Panel width 2.868m WALL PANEL LOUVRE "Quantities vary depending on your purchase"... -
Page 5: Inside View
Erin Gazebo Louvres, Wall Panels and Door Step 1 ERIN GAZEBO Position the wall panel between the posts and make it flush on both sides. Leave a 70mm gap between the wall panel and the floor using 70mm thick offcut timber or any other objects available. - Page 6 Erin Gazebo Louvres, Wall Panels and Door Step 2 You will need to swap the post supports for the smaller ones provided with the louvre to let Once all desired bottom wall panels are the lovres open properly. assembled, you can position the top wall WALL PANEL panels.
-
Page 7: Outside View
Erin Gazebo Louvres, Wall Panels and Door Step 3 After fixing the wall panels to the posts, screw them together through the panel's frame by using 4x90mm screws, as shown below in view E. Screw from the inside of the shelter. - Page 8 Erin Gazebo Louvres, Wall Panels and Door Step 4 The front wall panel can be provided with or without a door. To install the front wall panel, fix first the lintel behind the beam on the front side. Make sure the top brace is flush with the bottom of the beam and that the notches are facing up.
- Page 9 Erin Gazebo Louvres, Wall Panels and Door Step 5 Position one of the front panels in one of the corners, as shown below. Make sure the short section is positioned on top and then flush the front panel with the post and with the previously assembled lintel.
- Page 10 45x20x1900 Before positioning the door on the Erin Gazebo you will need to fix the hinges and latch provided with the door. To fix the latch you will need to pre-drill a 15mm hole to let the door handle spindle pass through.
- Page 11 Erin Gazebo Louvres, Wall Panels and Door Step 6 cont. Insert the door handle spindle through the pre-drill hole and fit the handle on the inside and the latch on the outside. Fix both parts using 10x20mm screws. Handle Latch...
- Page 12 Erin Gazebo Louvres, Wall Panels and Door Step 7 Position the door fitting in the middle of both front panels. Before screwing, make sure you leave a small 5mm gap on the top and a 10mm gap on the side.
- Page 13 Installation Manual Erin Gazebo Louvre Wall Panel (2.5x2.5m and 3.2x3.2m) This manual applies for customers who have purchased the Erin Gazebo Louvre Panel. Please read the installation manual thoroughly before starting to assemble the Erin Gazebo Louvre Wall Panel. Unique Product Reference Number.
- Page 14 Erin Gazebo Louvre Wall Panel - Components list LOUVRE FRAME 2160 Pressure treated 2.5m Gazebo ..Frame width 2.16m 2868 3.2m Gazebo ..Frame width 2.87m PAIR OF LOUVRE MECHANISMS for 2.5m Gazebo for 3.2m Gazebo 9 Blade clips each provided...
- Page 15 Erin Gazebo Louvre Wall Panel Instructions You have been provided with 3 or 4 pairs of louvre mechanisms, depending on your Gazebo. Notice that in each pair there is only one rail with handles. Take 9 blades per pair of louvres and fit them together as shown below.
- Page 16 Customer Services to enable them to locate your file Again, thank you for purchasing this Garden Building from Dunster House. We have a gallery on our website with many happy customers sending in photos of them enjoying our products. Please feel free to send in your pictures of your finished project.
Need help?
Do you have a question about the Erin and is the answer not in the manual?
Questions and answers