
Related Manuals for Dunster House Utopia 300


Summary of Contents for Dunster House Utopia 300
- Page 1 Installation Manual Utopia 300 Gazebo 3m x 3m H3-GS3X3MK2 Unique product reference number ................. www.dunsterhouse.co.uk...
- Page 2 In the unlikely event that you need to contact us, please do so in writing to: Email: cs@dunsterhouse.co.uk Post: FAO Customer Services, Dunster House Ltd - Factory 1, Caxton Road, Bedford, MK41 0LF Our Customer Services department is open 9:00 - 17:00, Monday to Friday. Please include your Sales Order number starting with SO or your postcode so we can locate your order.
- Page 3 Components required for Utopia 300 Gazebo 3m x 3m 1900 70x70x1900.B 4 of required 70x35x650.C 70x35x350.C 8 of required 8 of required 86x43x3000.C bottom cap Ø 4 of required 1 of required 3000 70x35x2400.C 2400 4 of required 70x35x850.CM 4 of required 70x35x850.C...
- Page 4 Components required for Utopia 300 Gazebo 3m x 3m 3168 SHIPx3168.A 4 of required SHIPx2960.A 2960 4 of required SHIPx2750.A 2750 4 of required SHIPx2542.A 2542 4 of required SHIPx2334.A SHIPx2125.A 2334 2125 4 of required 4 of required SHIPx1917.A SHIPx1708.A...
- Page 5 Utopia 300 Gazebo 3m x 3m Installation Manual Step 1 Make sure notches on components 70x70x1900.B are facing inside the Components required: Gazebo. Wall Posts - 70x70x1900.B (4 required) Roof Support Beam - 86x43x3000.C (4 required) 70mm Screws (16 required)
- Page 6 Utopia 300 Gazebo 3m x 3m Installation Manual Step 2 Components required: Post Brace - 70x35x650.C (8 required) 70mm Screws (24 required) 95mm Screws (8 required) Fix the post braces. Once the frame is assembled, fix the post braces 70x35x650.C in the positions shown using 3x 70mm screws and 1x 95mm screw per post brace.
- Page 7 Utopia 300 Gazebo 3m x 3m Installation Manual Step 3 70x35x1603.A Components required: 86x43x3000.C Post Beam - 70x35x1603.A (4 required) Roof Connector - 35x35x95 (1 required) 70x35x1603.A 70mm Screws (8 required) 95mm Screws (4 required) Fix the post beam (70x35x1603.A) and roof connector (35x35x95) to the Gazebo frame.
- Page 8 Utopia 300 Gazebo 3m x 3m Installation Manual Step 6 70x35x850.CM 70x35x850.C 86x43x2165.D Components required: Roof Beam - 70x35x850.C (4 required) 70x35x850.C 70x35x1603.A Roof Beam - 70x35x850.CM (4 required) 70x35x850.CM Roof Beam - 86x43x2165.D (4 required) 86x43x2165.D 70mm Screws (32 required)
- Page 9 Utopia 300 Gazebo 3m x 3m Installation Manual Step 8 Components required: Post Trim (70x35x350.C) (8 required) 70mm Screws (16 required) Fix the Post Trim (70x35x350.C) to the bottom of the Gazebo Wall Posts. On the base of the wall posts, fix 2x Post Trims (70x35x350.C) to each wall post on the outside of...
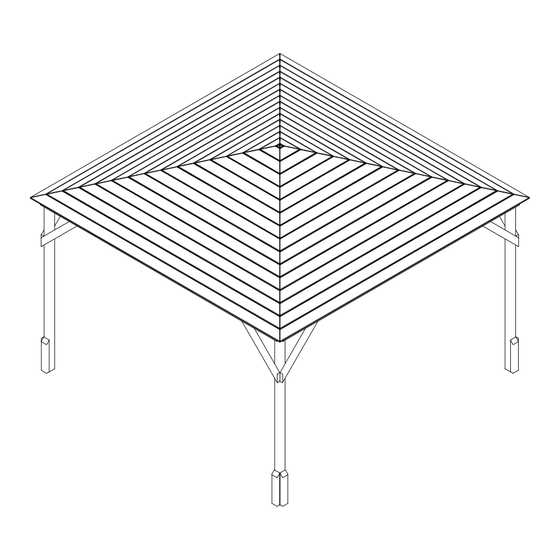
- Page 10 Utopia 300 Gazebo 3x3m Installation Manual Step 10 Once you have fixed the bottom row of shingles (with the cut outs pointing towards the roof) you can now fully cover the roof of your gazebo with shingles. All of the strips of shingles will now have the cut outs pointing towards the ground.
- Page 11 Utopia 300 Gazebo 3x3m Installation Manual Components required: Roll of felt Top of 1st layer of roof felt 10mm clout nails Lowest edge Roof Membrane Fully cover the roof with plastic waterproof membrane leaving a minimum of 30mm overhang. Use a staple gun or tacks to secure the membrane to the roof boards.
- Page 12 Utopia 300 Gazebo 3x3m Installation Manual Felt - Step 3 of 4 For each of the 4 ridges, cut a length of felt in half and nail alongside the ridge, overlapping by approximately 250mm. Use 10mm clout nails at approximately 50mm centers (Fig. 4).
- Page 13 Half Height Solid Wall Panel 2m 2m Solid Wall Panel Pressure Treated 1859.5 70x35x1860 - x2 Pressure Treated 1860 15x121x875 - x14 Pressure Treated 19x19x877 - x8 Pressure Treated 70x35x780 - x3 Pressure Treated 19x19x741 - x8 Pressure Treated Page 12...
- Page 14 Half Height Solid Wall Panel 2m 3m Solid Wall Panel Pressure Treated 2860 70x35x2860 - x2 Pressure Treated 2860 15x121x905 - x21 Pressure Treated 19x19x905 - x12 Pressure Treated 19x19x741 - x12 Pressure Treated 70x35x780 - x8 Pressure Treated Page 13...
- Page 15 Utopia Garden Shelter 3m x 4m 2m Glass Wall Panel Pressure Treated 1859.5 877.5 70x35x1860 - x2 Pressure Tated 1860 19x19x877 - x8 Pressure Treated Glass 875x790 - x1 19x19x741 - x8 Pressure Treated 70x35x780 - x3 Pressure Treated Page 14...
- Page 16 Additional Wall Panel Pack Installation Manual 3m Glass Wall Panel 2860 70x35x2860 - x2 Pressure Treated 2860 Glass 915x790 - x3 19x19x905 - x12 Pressure Treated 70x35x780 - x4 Pressure Treated 19x19x741 - x12 Pressure Treated Page 15...
- Page 17 Utopia Garden Shelter 3m x 4m Full Height Wall Panel Assembly • 3m Solid Wall Panel • 2m Solid Wall Panel • 70mm Screws • Position the solid wall panels between Posts as shown in the diagram bellow. • Connect Panels to posts using (6) 70mm Screws. (Repeat this process dependant on how many panels have been purchased).
- Page 18 Utopia Garden Shelter 3m x 4m Hall Height Wall Panel Assembly • 3m Solid Wall Panel • 2m Glass Wall Panel • 3m Glass Wall Panel • 70mm Screws • 2m Solid Wall Panel • See Previous page for Solid Wall Panel Installation. Glass Wall Panel Assembly SKIP STEP IF CUSTOMER HAS NOT PURCHASED ADDITIONAL GLASS WALL PANELS •...
Need help?
Do you have a question about the Utopia 300 and is the answer not in the manual?
Questions and answers