
Subscribe to Our Youtube Channel
Related Manuals for Dunster House H4-GS3X4PRG


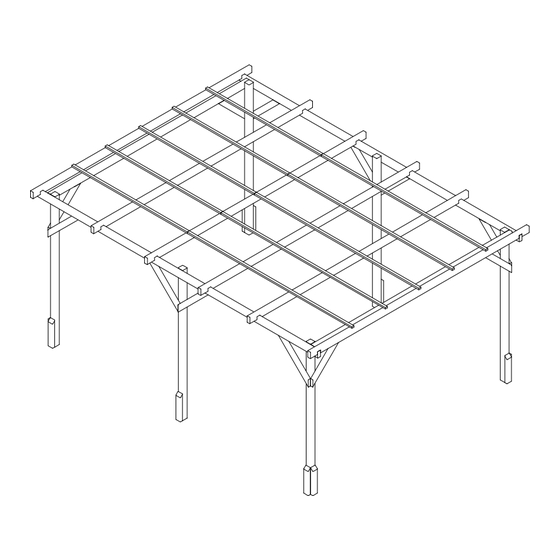
Summary of Contents for Dunster House H4-GS3X4PRG
- Page 1 Installation Manual Utopia Pergola 3m x 4m H4-GS3X4PRG Unique product reference number ................. www.dunsterhouse.co.uk...
- Page 2 Email: cs@dunsterhouse.co.uk Post: FAO Customer Services, Dunster House Ltd - Factory 1, Caxton Road, Bedford, MK41 0LF Our Customer Services department is open 9:00 - 17:00, Monday to Friday. Please include your Sales Order number starting with SO or your postcode so we can locate your order.
- Page 3 Components required for Utopia Pergola 3m x 4m 70x70x1965 6x Pressure Treated Post 1965 70x35x650.C 70x35x350.C 12x Pressure Treated Brace 10x Pressure Treated Post Fascia 86x43x3000 2x Pressure Treated Beam 3000 86x43x4230 2x Pressure Treated Beam 4230 86x43x3300.N 6x Pressure Treated Beam 3300 30x20x1745 30x20x2485...
- Page 4 Utopia Pergola 3m x 4m Installation Manual Step 1 Please remember to pre-drill all holes before fixing, to avoid the splitting of timber. Components required: Fix the components 86x43x3000 and 86x43x4230 in the positions shown using Post - 70x70x1965 (6 required) 2x 70mm screws per end.
- Page 5 Utopia Pergola 4m x 3m Installation Manual Step 2 Components required: Brace - 70x35x650.C (12 required) - Item 3 70mm Screws (36 required) 95mm Screws (12 required) Once the frame is assembled, fix the braces 70x35x650.C in the positions shown using 3x 70mm screws and 1x 95mm screw per brace.
- Page 6 Utopia Pergola 4m x 3m Installation Manual Step 3 Components required: Beam - 86x43x3300.N (6 required) - Item 1 70mm Screws (12 required) 70mm Screw Fix 6x 86x43x3300.N beams using 1x 70mm screw at either end of the beam. Ensure that the beams are evenly spaced, as shown in the diagram below.
- Page 7 Utopia Pergola 4m x 3m Installation Manual Step 4 50mm Screw Components required: Trim - 30x20x1745 (5 required) - Item 7 Trim - 30x20x2485 (5 required) - Item 8 50mm Screws (35 required) 50mm Screws 50mm Screw Once the main beams are in place, you are ready to fix 5x 30x20x1745 and 30x20x2485 trims on top of the beams.
- Page 8 Utopia Pergola 4m x 3m Installation Manual Step 5 Components required: Post Fascia - 70x35x350.C (10 required) - Item 2 70mm Screws (20 required) On the base of the posts, fix 2x 70x35x350.C to each post on the corners, and x1 on the middle posts on the outside of the Pergola.
- Page 9 Installation Manual Utopia Pergola (Additional Wall Panel Pack) Unique product reference number ................. http://www.dunsterhouse.co.uk Dunster House Ltd.
- Page 10 Utopia Pergola 3m x 4m - Pack may contain 2m Solid Wall Panel Pressure Treated 1860 Solid Wall Panel Pressure Treated 2860 Glass Wall Panel Pressure Treated 1860 LOOSE COMPONENTS Horizontal Beading Timber - Per Window Pressure Treated Vertical Beading Timber - Per Window Pressure Treated Page 10...
- Page 11 Utopia Pergola 3m x 4m - Pack may contain Glass Wall Panel Pressure Treated 2860 LOOSE COMPONENTS Horizontal Beading Trim - Per Window Pressure Treated Vertical Beading Trim - Per Window Pressure Treated ACCESSORIES PART NUMBER 70mm Screw For Panels Varies Varies 40mm Pin Nail For Beading Trims...
- Page 12 Utopia Pergola 3m x 4m - Additional Panel Assembly Full Height Wall Panel Assembly • 3m Solid Wall Panel • 2m Solid Wall Panel **Quantity of components will vary, depending on your purchase • 70mm Screws • Position the solid wall panels between posts as shown in the diagram below. •...
- Page 13 Utopia Pergola 3m x 4m - Additional Panel Assembly Half Height Wall Panel Assembly • 3m Solid Wall Panel • 2m Glass Wall Panel **Quantity of components will vary, • 3m Glass Wall Panel • 70mm Screws depending on your purchase •...
- Page 14 Principle of Glass Installation 1x - Glass 16x - Pin Nail **Quantity of components will vary, depending on your purchase 2x - Horizontal Beading Trim 2x - Vertical Beading Trim Please Note: This diagram represents how to install one window panel frame. Please apply this procedure to all window frames purchased.
Need help?
Do you have a question about the H4-GS3X4PRG and is the answer not in the manual?
Questions and answers