Advertisement
Quick Links
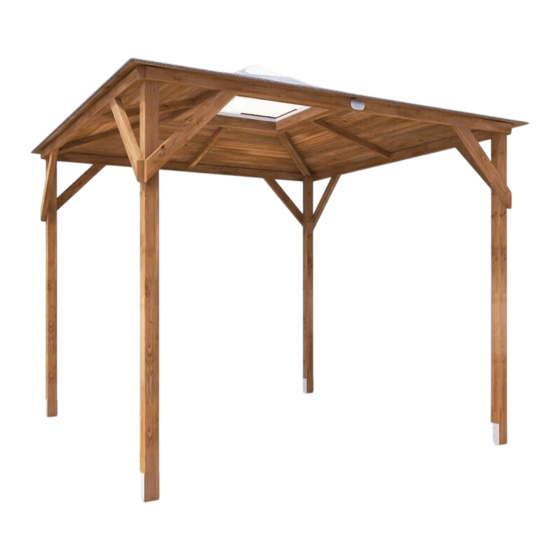
Please read the installation manual thoroughly before starting to assemble the
2.5mx2.5m Erin Gazebo.
For the installation of this product we recommend it is completed by a minimum of
2 people.
Installation Manual
for
Erin Gazebo
2.5m x 2.5m
H4-GS2525E
Unique Product Reference Number.
www.dunsterhouse.co.uk
V4
Advertisement

Related Manuals for Dunster House Erin H4-GS2525E


Summary of Contents for Dunster House Erin H4-GS2525E
- Page 1 Installation Manual Erin Gazebo 2.5m x 2.5m H4-GS2525E Please read the installation manual thoroughly before starting to assemble the 2.5mx2.5m Erin Gazebo. For the installation of this product we recommend it is completed by a minimum of 2 people. Unique Product Reference Number. www.dunsterhouse.co.uk...
- Page 2 In the unlikely event that you need to contact us, please do so in writing to: Email: cs@dunsterhouse.co.uk Post: FAO Customer Services, Dunster House Ltd - Factory 1, Caxton Road, Bedford, MK41 0LF Our Customer Services department is open 9:00 - 17:00, Monday to Friday. Please include your Sales Order number starting with SO or your postcode so we can locate your order.
- Page 3 2.5m x 2.5m Erin Gazebo - Components list 70x70x1965.A Pressure treated 1965 Post 65x35x2300.A Pressure treated Beam 2300 70x35x650.C Pressure treated Post support F2.2500.A Pressure treated Shiplap 2500 50x35x334.A Pressure treated Timber dome support 65x35x2300.A.ML Pressure treated Beam 2300 35x35x2118 Temporary post 2118 Page 2...
- Page 4 2.5m x 2.5m Erin Gazebo - Components list 70x35x880 Temporary post 70x35x2095 Temporary post 2095 2283 ROOF PANEL 2.5x2.5 Pressure treated Dome 875x875 Plastic Frame 875x875 ACCESSORIES DESCRIPTION 100mm screws 70mm screws 60mm screws 35mm screws 20mm screws Washer-cap (SMB092) 70mm timber post metal support Installation Manual Page 3...
-
Page 5: Step 1 - Required Components
2.5m x 2.5m Erin Gazebo Step 1 - required components 4x 70x70x1965.A 16x 35mm screws 4x SMB092 1965 Insert the post 70x70x1965.A into the metal bracket (SMB092) and secure by screwing through the post using 4x35mm screws per bracket. (x4) Make sure all of the brackets are facing the same Notch direction. - Page 6 2.5m x 2.5m Erin Gazebo Step 2 - required components 16x 70mm screws 3x 65x35x2300.A 2300 1x 65x35x2300.A.ML 2300 Position the beams 65x35x2300.A and 65x35x2300.A.ML flush on top of the posts 70x70x1965.A. Fix the beams into position using 2x70mm screws per end. Ensure that the notches on 70x70x1965.A are facing inside the gazebo in all 4 corners.
- Page 7 2.5m x 2.5m Erin Gazebo Step 2 cont. After assembling the beams 65x35x2300.A to posts 70x70x1965.A, use a tape measure to check the distance of the top and bottom diagonals. Make sure they are all the same before continuing with the installation.
- Page 8 2.5m x 2.5m Erin Gazebo Step 3 - required components 8x 70x35x650.C 24x 70mm screws 8x 100mm screws We recommend to fix one post support 70x35x650.C per corner (Fig. 1) to make sure the structure remains level and screw just 2x 70mm screws, one on the top (screw A) into the beams 65x35x2300.A / 65x35x2300.A.ML and one on the bottom (screw B) into the posts 70x70x1965.A.
- Page 9 2.5m x 2.5m Erin Gazebo Step 4 - required components 4x Roof panel 2x 35x35x2118 2118 2283 First roof panel Position the first roof panel into the notch of the post 70x70x1965.A and hold it in place by using one of the temporary posts 35x35x2118.
- Page 10 2.5m x 2.5m Erin Gazebo Step 4 cont. Position the third roof panel next to the second one and hold it in position by moving the temporary post 35x35x2118 from the corner joint. Second roof panel Third roof panel First roof panel ROOF PANEL 35x35x2118 Fourth roof panel...
- Page 11 2.5m x 2.5m Erin Gazebo Step 5 - required components 12x 60mm screws Once all four roof panels are positioned correctly, screw them together by using 3x60mm screws. Screw through one purlin to the other as shown below in view Do not forget to pre-drill before screwing.
- Page 12 2.5m x 2.5m Erin Gazebo Step 6 - required components 8x 100mm screws 8x 70mm screws 100mm screws Secure the roof by screwing through the beams 65x35x2300.A & 65x35x2300.A.ML using 2x100mm screws, two per each corner. View from top of the roof 70mm screws Fix the roof to the middle of the beams 65x35x2300.A and 65x35x2300.A.ML by...
- Page 13 2.5m x 2.5m Erin Gazebo Step 7 - required components 4x F2.2500.A 20x 35mm screws 2500 Position the Shiplap F2.2500.A around the edge of the roof leaving a small gap of approximately 2mm as shown below. Secure the Shiplap F2.2500.A by screwing through into the beam 65x35x2300.A using 5x35mm screws per component.
- Page 14 2.5m x 2.5m Erin Gazebo Step 9 - required components 1x PLASTIC FRAME 875x875 12x 20mm screws Position the Plastic frame on top of the roof. Then fix the frame to the roof by using 12x20mm screws, 3 per side. If you have chosen roof felt to cover the roof, you should fit it under the plastic frame and seal all the joints by using silicone (not provided) to avoid any leaks.
- Page 15 2.5 x 2.5m Erin Gazebo Step 11 - required components 16x Washer-cap 16x 20mm screws 1x Dome 875x875 Dome Position the dome on top of the roof. Ensure the dome is centralised on the 50x25x334.A timbers, with an equal overhang on each side. Fix into place by using 16x20mm screws, four per corner.
- Page 16 2.5 x 2.5m Erin Gazebo - Roof felt fitting instructions required components: Roll of felt • Clout Nails • Fully cover the roof with the plastic waterproof membrane leaving a minimum of 30mm overhang. Use a staple gun or tacks to secure the membrane to the roof boards.
Need help?
Do you have a question about the Erin H4-GS2525E and is the answer not in the manual?
Questions and answers