Advertisement
Quick Links
INSTALLATION MANUAL
Please note:
1. If you have bought shingles, please use our shingle installation instructions.
2. If you have bought a Single Carport/Garage or wall panel packs for your gazebo, please follow
the instructions provided at the end of these manuals for how to assemble the panels.
3. If you have bought a Single Garage, please refer to the instructions provided with the garage
door pack on how to assemble doors.
4. Fixings are supplied with Gazebo (except for those required to secure Bracket to base)
Manufacturer:
Dunster House Ltd.
Caxton Road
Bedford
Bedfordshire
England
MK41 0LF
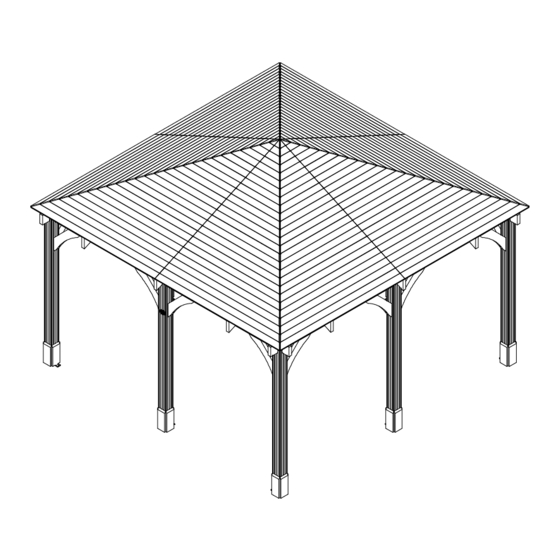
Leviathan Open Gazebo 4.0m x 4.0m
P5-4040GAZAT
Unique Product Reference Number:
__________________________________
Customer Service Department:
cs@dunsterhouse.co.uk
www.dunsterhouse.co.uk
Advertisement

Related Manuals for Dunster House Leviathan P5-4040GAZAT


Summary of Contents for Dunster House Leviathan P5-4040GAZAT
- Page 1 3. If you have bought a Single Garage, please refer to the instructions provided with the garage door pack on how to assemble doors. 4. Fixings are supplied with Gazebo (except for those required to secure Bracket to base) Unique Product Reference Number: Manufacturer: Dunster House Ltd. Caxton Road __________________________________ Bedford Customer Service Department: Bedfordshire cs@dunsterhouse.co.uk...
-
Page 2: You Will Need
In the unlikely event that you need to contact us, please do so in writing to: Email: cs@dunsterhouse.co.uk Post: Dunster House Ltd, Caxton Road, Elms Farm Industrial Estate, Bedford, MK41 0LF, England. Our Customer Service department is open 9 a.m. to 5 p.m. Monday to Friday. Please include your Sales Order (SO) number or post code in any correspondence with Customer Service to enable them to locate your file. - Page 3 Components required for Leviathan Open Gazebo 4.0m x 4.0m 120x120x2260.A 4x Post (Pressure Treated) 2260 120X120X2260.C 4x Middle Post (Pressure Treated) 2260 45x140x2170.A 4x Half Beam (Pressure Treated) 2170 45x140x2175.A 4x Half Beam (Pressure Treated) 2175 Page 3...
- Page 4 Components required for Leviathan Open Gazebo 4.0m x 4.0m 45x140x3060.A 4x Corner Rafter (Pressure Treated) 3060 45x140x2360.B 4x Rafter (Pressure Treated) 2360 45x140x1035.A 45x140x1035.B 4x Rafter (Pressure Treated) 4x Rafter (Pressure Treated) 1035 1035 20x120x300.A 45x140x630.A 32x Post Trim (Pressure Treated) 16x Brace (Pressure Treated) 45x45x3075 1x Support...
- Page 5 Components required for Leviathan Open Gazebo 4.0m x 4.0m ROOF BOARDS ROOF BOARD SIZES Pressure Treated DIM 'A' F.83.A F.165.A F.247.A F.329.A F.411.A F.492.A F.574.A F.655.A F.735.A F.818.A F.900.A F.981.A F.1062.A F.1143.A F.1224.A Dim 'A' F.1306.A F.1388.A F.1470.A F.1551.A F.1633.A F.1713.A F.1794.A F.1874.A...
- Page 6 Assembly Steps for Leviathan Open Gazebo 4.0m x 4.0m ** Avoid splitting timber parts by pre-drilling all screw holes ** - M6x45mm Hex.Head Bolt - M10x120mm Hex, Head Screw - M6 Claw nut - 35mm, 70mm, 100mm, 120mm, Screws - Circular Washer - SMB015 Bracket - Bracket LS30 - 70x70x55 L Bracket...
- Page 7 Assembly Steps for Leviathan Open Gazebo 4.0m x 4.0m ** Avoid splitting timber parts by pre-drilling all screw holes ** Step 1: COMPONENTS REQUIRED • Using (2x) 100mm screws per post, fix the posts and beams as shown in the diagram PART NUMBER below.
-
Page 8: Top View
Assembly Steps for Leviathan Open Gazebo 4.0m x 4.0m ** Avoid splitting timber parts by pre-drilling all screw holes ** Step 2: COMPONENTS REQUIRED • Use a tape measure to check the distance of the top and PART NUMBER DESCRIPTION bottom diagonals (4 diagonals in total). - Page 9 Assembly Steps for Leviathan Open Gazebo 4.0m x 4.0m ** Avoid splitting timber parts by pre-drilling all screw holes ** Step 3: PARTS LIST PART NUMBER • Connect (4x) 45x140x2360.B Rafters by sliding onto the chamfered arms of SMB015 Bracket. 35mm Screw •...
- Page 10 Assembly Steps for Leviathan Open Gazebo 4.0m x 4.0m ** Avoid splitting timber parts by pre-drilling all screw holes ** Step 4: COMPONENTS REQUIRED PART NUMBER • Once SMB015 Support is in place at correct height, fit 45x145x3060.A Rafters by 45x140x3060.A slotting and bolting them into place.
- Page 11 Assembly Steps for Leviathan Open Gazebo 4.0m x 4.0m ** Avoid splitting timber parts by pre-drilling all screw holes ** Step 5: PARTS LIST PART NUMBER • Fix remaining Rafters to 45x140x3060.A and Beams using Bracket LS30 and 35mm screws. 35mm Screw •...
- Page 12 Assembly Steps for Leviathan Open Gazebo 4.0m x 4.0m ** Avoid splitting timber parts by pre-drilling all screw holes ** PARTS LIST DESCRIPTION Roof Board Shank Nails Step 6. • Fix the Roof Boards by positioning the longest board flush to the ends of Rafter. Leave a 2mm gap in the centre where the roof boards join.
- Page 13 Assembly Steps for Leviathan Open Gazebo 4.0m x 4.0m ** Avoid splitting timber parts by pre-drilling all screw holes ** PARTS LIST PART NUMBER 20x120x300.A 35mm Screw Step 7 • Fix four (4x) 20x120x300.A Trim onto each of the Posts using 2x 35mm screws per Trim. 35mm Screw 20x120x300.A Congratulations on your new Gazebo !!
- Page 14 Assembly Steps for Leviathan Open Gazebo 4.0m x 4.0m (Felt) Plastic Waterproof Membrane: • Fully cover the roof with the plastic waterproof membrane leaving a minimum of 30mm overhang. • Use a staple gun or tacks to secure the membrane to the roof boards. Felt: •...
- Page 15 Assembly Steps for Leviathan Open Gazebo 4.0m x 4.0m Regular Shingle Installation: If your shingles have a peelable plastic backing remove this before installing them to the roof. • Felt lap Adhesive is an optional extra. • Membrane: Place membrane over top of roof leaving a 15-20mm overhang on each side. if membrane does not overlap •...
- Page 16 Place further shingles across the top ridge of the gazebo using shingles cut out from the previous step. Secure Step 6: these into place with nails provided. Important: Adhesive layer (Bitumen) on the back of the shingles will adhese the shingles together in warm sunlight. Dunster House Shingles installation video - https://www.youtube.com/watch?v=IFMFYYSUEUI Page 16...
- Page 17 Assembly Steps for Leviathan Open Gazebo 4.0m x 4.0m Hexagon Shingle Installation: • If your shingles have a peelable plastic backing remove this before installing them to the roof. • Felt lap Adhesive is an optional extra. Membrane: Place membrane over top of roof leaving a 15-20mm overhang on each side. if membrane does not overlap whole area of roof face overlap a second piece with at least a 20mm overlap.
- Page 18 Place further shingles across the top ridge of the gazebo using shingles cut out from the previous step. Secure Step 6: these into place with nails provided. Important: Adhesive layer (Bitumen) on the back of the shingles will adhese the shingles together in warm sunlight. Dunster House Shingles installation video - https://www.youtube.com/watch?v=IFMFYYSUEUI Page 18...
- Page 19 Assembly Steps for Leviathan Open Gazebo 4.0m x 4.0m (Guttering) • The guttering pack includes wooden wedges which should be fixed to Fig. A the eaves edging using one screw per wedge. • The outermost wedges should be positioned approximately 200mm Guttering wedge from the ends of the eaves edging, Fig.
- Page 20 INSTALLATION MANUAL Additional Wall Panels LEVIATHAN OPEN GAZEBO IMPORTANT INFORMATION Please remove component 45x140x630.A (Brace) if components CP1 and or CP8 are being installed. Please note: 1. These instructions will enable you to assemble additional wall panels to your Gazebo. The configuration of the panels shown on the illustrations may very from the product you have purchased.
- Page 21 Components required for Additional Wall Panels Panel CP1 Panel CP2 Pressure Treated Pressure Treated Panel CP8 Pressure Treated Page 21...
- Page 22 Components required for Additional Wall Panels for Leviathan Gazebo 15x70x2120 Full Wall Panel Trim 2120 15x70x1065 1065 Half Wall Panel Trim (Cut from full height trim) 15x70x1035 1035 Glass Wall Panel Trim (Cut from full height trim) 20x100x908 Glass Wall Panel Sill 15x70x1085 Half Wall Panel Trim 1085...
- Page 23 Assembly Steps for Leviathan Open Gazebo 4.0m x 4.0m Full height wall panels assembly ** Quantity of components will vary, Panel CP1 M10 Shield Anchors depending on your purchase. 60mm Screws M10x28 Washers M10x110 Bolts Step 1. • Position the Panel CP1 between the Posts as shown in the diagram below. •...
- Page 24 Assembly Steps for Leviathan Open Gazebo 4.0m x 4.0m Full height wall panels assembly 35mm Screws 15x70x2120 Trim Step 2. • Fix 15x70x2120 Trims using (8) 35mm screws per trim on the outside of the wall panels. • Fix 15x70x2120 Trims using (8) 35mm screws per trim on the inside of the wall panels. The Trims will cover the joints between the panels.
- Page 25 Assembly Steps for Leviathan Open Gazebo 4.0m x 4.0m Half height wall panels assembly ** Quantity of components will vary, Panel CP2 M10 Shield Anchors depending on your purchase. M10x28 Washers 60mm Screws M10x110 Bolts Step 1. • Position the Panel CP2 between the Posts as shown in the diagram below. Join two (2) Panel CP2 using (6) 60mm screws.
- Page 26 Assembly Steps for Leviathan Open Gazebo 4.0m x 4.0m Half height wall panels assembly 20x100x908 15x70x1065 and 15x70x1085 35mm Screws Step 2. • Position 20x100x908 Sills on top of Panels CP2 so that they are flush with the panel frame from inside the gazebo.
- Page 27 Assembly Steps for Leviathan Open Gazebo 4.0m x 4.0m Window panels assembly Panel CP8 60mm Screws **Assemble half height wall panels according to 35mm Screws the instructions given on the previous pages. 15x70x1035 • Remove the beading trims from one side of Panel CP8 frames. Step 1.
- Page 28 Assembly Steps for Leviathan Open Gazebo 4.0m x 4.0m 40mm Pin Nail 4x825x960 TGLASS 19x25x840 19x25x915 Step 1: Place silicone around the edge of the frame. Silicone Please note: The glass is a smaller size compared to panel frame to compensate for timbers Silicone Silicone contracting, swelling and glass not being...
Need help?
Do you have a question about the Leviathan P5-4040GAZAT and is the answer not in the manual?
Questions and answers