Table of Contents
Advertisement
Quick Links
Advertisement
Table of Contents

Related Manuals for Microtek MRS-600A3ADFHG


Summary of Contents for Microtek MRS-600A3ADFHG
- Page 1 A3 High-Speed Scanner S6570 User Manual...
- Page 2 Microtek, FileScan, ScanWizard and contents. DocWizard are registered trademarks of Microtek or its affiliates; other trademarks or registered trademarks belong to their Warning original registered companies. No further no ce will be given should there be updates This is a class A product;...
- Page 3 Safety Instruc ons Please read the following instruc ons Moving and Storing the Scanner carefully before using your scanner; these ・ Do not place the scanner on sliding, instruc ons describe the correct ways to inclined or uneven posi ons. use the scanner and its accessories to avoid damage to you or the machine due to Do not use the scanner at loca ons...
- Page 4 Symbols used in this manual The following symbols are used in this Important manual to describe the processes, restric ons, opera on precau ons and This represents opera on requirements and descrip ons that should be followed for restric ons. Please read these items safety considera ons.
-
Page 5: Table Of Contents
Table of Contents Chapter 1 Before Use Important Safety Instruc ons ..............1-1 Installa on Loca on ................1-1 Power ..................... 1-1 Mobile High-Speed Scanner ..............1-2 Handling ....................1-2 Disposal ....................1-3 Chapter 2 Basic Opera ons Components and Func ons ..............2-1 Power ON Instruc ons ................ -
Page 7: Chapter 1 Before Use
Chapter 1 Before Use Important Safety Instruc ons ..........1-1 Power .................. 1-1 Installa on Loca on .............. 1-1 Mobile High-Speed Scanner ..........1-2 Handling ................1-2 Disposal ................. 1-3... -
Page 9: Important Safety Instruc Ons
Installa on Loca on Important Safety Instruc ons ・ Keep sufficient space around the high- To ensure the safe opera on of this high-speed scanner, make sure to read the following safety speed scanner for opera on, maintenance warnings and precau ons. and ven la on use. -
Page 10: Mobile High-Speed Scanner
・ When using coiled extension cords, Mobile High-Speed Scanner please unwind all the power cables from the coil. Using power cables wound on ・ Pay extra a en on when moving the high- the coil for extended periods of me may speed scanner. -
Page 11: Disposal
Note ・ Do not install the high-speed scanner on ・ Do not spray water or flammable unsteady or inclined surfaces, or in areas substances (alcohol, paint thinners and with severe vibra ons, as doing so will benzene, etc.) into the high-speed cause the high-speed scanner to drop and scanner, as doing so may cause fire or cause personal injuries or damage the... - Page 13 Chapter 2 Basic Operations Components and Func ons ........... 2-1 Power ON Instruc ons ............2-3 Introduc on to the Opera on Panel ........2-4 Indicator and Status Descrip ons .......... 2-5 Document Feeding and Storing ..........2-5 Cleaning Paper Jams .............. 2-7...
-
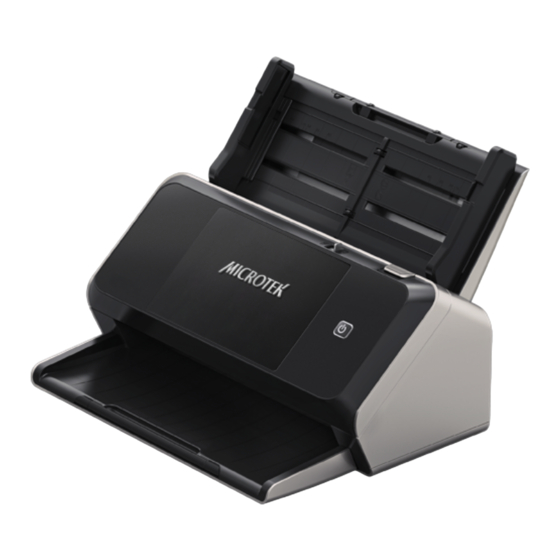
Page 15: Components And Func Ons
Components and Func ons This chapter introduces the names of components and the func ons of the high-speed scanner Front Name Descrip on Guide arm (le /right) Adjust the posi on of documents to suitable posi ons Paper feed mode toggle switch Slide the switch to toggle between “split”... - Page 16 Back Ven la on openings Ven la on openings to dissipate the heat inside the high-speed scanner USB Type-B port Power switch Scanner image data Used to control the transmission port, power supply of used to connect to the the scanner. PC to transmit image data.
-
Page 17: Power On Instruc Ons
(connect the data as shown in the figure cable for scanning). Load the paper flat, then open the scanning so ware Microtek DocWizard EX from the desktop. 10. A er opening the so ware, perform se ngs on the so ware according to your needs;... -
Page 18: Introduc On To The Opera On Panel
Introduc on to the Opera on Panel Opera on Part Name Icon Descrip on Method Press and hold Scanner On for 2 seconds Power Press and hold Enter sleep mode bu on for 3~5 seconds Press and hold Scanner Off at least 6 seconds The paper pickup structure is in “non-split”... -
Page 19: Indicator And Status Descrip Ons
Indicator and Status Descrip ons Icon LED indicator Status Descrip on Green on Normal The scanner is in sleep status. White on Normal The scanner is ready to scan. (constant) The scanner is not connected to the Flashing white Abnormal computer normally, and the scan func on is unavailable Red on /... - Page 20 ・ Please note that scanning the following types of documents may cause paper jams or malfunc ons. To scan these types of documents, you can copy the documents first and then scan the copies. Wrinkled or creased documents Carbon paper Curly documents Papers with treated surfaces Paper that is extremely thin and...
-
Page 21: Cleaning Paper Jams
・ Align the document with the center of the feed tray by sliding the two guide arms toward the document if needed. Do not leave any gaps between the arms and the document. Cleaning Paper Jams If paper jams or other abnormal situa ons occur during the usage process of the scanner, please release the paper jam using the following steps Remove the remaining documents on the feed tray that have not been scanned yet. -
Page 23: Chapter 3 Maintenance
Chapter 3 Maintenance Daily Maintenance and Cleaning ........... 3-1 Pickup Roller Replacement ............ 3-3... -
Page 25: Daily Maintenance And Cleaning
Daily Maintenance and Cleaning ・ To maintain the scan quality, please clean the high-speed scanner regularly by following the descrip ons below. Note Do not clean the high-speed scanner with spray cleaners. Otherwise, it may wet this ・ delicate machine and cause it to malfunc on. ・... - Page 26 Cleaning the feed roller A er the machine has been used for a period of me, large amounts of dust and ・ debris will accumulate on the surface of the feed roller; wipe off the debris and dust on its surface with a cloth that was soaked in water and wrung. Cleaning the glass surface of the scanner head ・...
- Page 27 Top scanner cover part Top pickup roller (paper separa on roller) Top ultrasonic detec on board Top light pipe of the scan detec on sensor Feed roller A Feed roller B Top scan head Lower body part Feed driven roller Bo om scan head Feed driven roller Bo om pickup roller (feed roller)
-
Page 28: Pickup Roller Replacement
Pickup Roller Replacement When the roller shows signs of wear. The paper feed ability will decrease, and the chance of paper feed errors (such as paper jams) will increase. Roller replacement cycle The feed roller is a consumable, and needs to be replaced approximately every 150,000 pages fed. - Page 29 Open the top pickup roller cover. Remove the top pickup roller from the right side. Take out the new top pickup roller and install it into the machine according to the removal method (insert the le end first, and then snap in the right end), and cover the top pickup roller cover.
- Page 30 Bo om pickup roller (feed roller) replacement Li the paper feed tray in the direc on shown in the figure to remove it. Open the bo om pickup roller cover in the direc on of the arrow. Rotate the bo om pickup roller removal lock block upwards by 90°.
- Page 31 Remove the bo om pickup roller from the right side of the machine. Take out the new bo om pickup roller and install it into the machine according to the removal method (insert the right end first, and then flip the bo om pickup roller removal lock block to the right side, insert the bo om pickup roller and rotate it 90°...
-
Page 33: Chapter 4 Troubleshoo Ng
Chapter 4 Troubleshooting Failure Category ..............4-1 Problem Solu on ..............4-1... -
Page 35: Failure Category
Clear documents in the device and contact the after-sales service staff of the sca ered documents from the Microtek. opened cover. Cover the scanner cover back. LED indica on a er troubleshoo ng: Constant white light... - Page 36 Problem 3: Paper jam So ware prompt: Paper jam LED indica on for the abnormality: Constant red light Solu on: Clear the remaining documents that have not yet been scanned from the paper tray structure. Open the scanner cover. Clear documents in the device and the sca ered documents from the opened cover. Cover the scanner cover back.
- Page 37 If this problem s ll cannot be solved a er cleaning, it may be because the internal glass is scratched. Please contact the customer service center of Microtek Problem 3: Pages are missing from the scanning...
-
Page 39: Product Specifica Ons
Product Specifica ons Product Type A3 High-Speed Shee ed Scanner Model Type MRS-600A3ADFHG Op cal Resolu on 600 dpi Scanning Sensor Light Source LED (Light Emi ng Diode) Color, grayscale, black and white, Scanning Modes automa c color iden fica on, mul -stream... - Page 40 *3. The dimensions and net weight are approximate values. *4. The 1039 mm long paper mode is recommended for use only with resolu ons of 300 dpi and lower, and in grayscale mode.
-
Page 41: Technical Service
Technical Service The technical service department of Microtek provides complete technical services. Please have the following data prepared before you contact us: ・ Serial number of the scanner (located behind or under the body of the scanner). ・ Computer hardware informa on (such as your CPU type, RAM size, available hard drive space and graphics card, etc.).
Need help?
Do you have a question about the MRS-600A3ADFHG and is the answer not in the manual?
Questions and answers