
Related Manuals for Trikdis FLEXi FC


Summary of Contents for Trikdis FLEXi FC
- Page 1 Communicator “FLEXi” FC for fire alarm control panel Installation manual September, 2023 www.trikdis.com UAB Trikdis Draugystės str. 17, LT-51229 Kaunas, Lithuania +370 37 408040 info@trikdis.lt...
-
Page 2: Table Of Contents
ENSORS WINDOWS 6.9 “S ” ..............................34 YSTEM EVENTS WINDOW 6.10 “E ” ............................... 35 VENTS WINDOW 6.11 R ..............................36 ESTORE DEFAULT SETTINGS SETTING PARAMETERS REMOTELY ..........................36 COMMUNICATOR TESTING ............................36 UPDATING FIRMWARE ..............................37 www.trikdis.com September, 2023... -
Page 3: Safety Precautions
Always disconnect the power supply before making any electrical connections. Any modifications, modernization or repairs not authorized by the manufacturer shall render the warranty void. Please adhere to your local waste sorting regulations and do not dispose of this equipment or its components with household waste. www.trikdis.com September, 2023... -
Page 4: Description
Events are sent via available communication channels with the selected priority. Any CMS can receive reports, as long as they have TRIKDIS software/IP receiver or any other manufacturer’s IP receiver supporting SIA DC-09 IP protocol. Prioritizing the transmission of events to the CMS: messages are first transmitted to the CMS and only then to Protegus 2. -
Page 5: Specifications
Up to 1000 events. Oldest entries deleted automatically. Configuration Remotely using TrikdisConfig software or locally using USB Type-C. Remotely using SMS messages. 1-Wire data bus length [1 WIRE] Up to 30 m Compatible temperature sensors Maxim®/Dallas® DS18S20, DS18B20; AM2301 series www.trikdis.com September, 2023... -
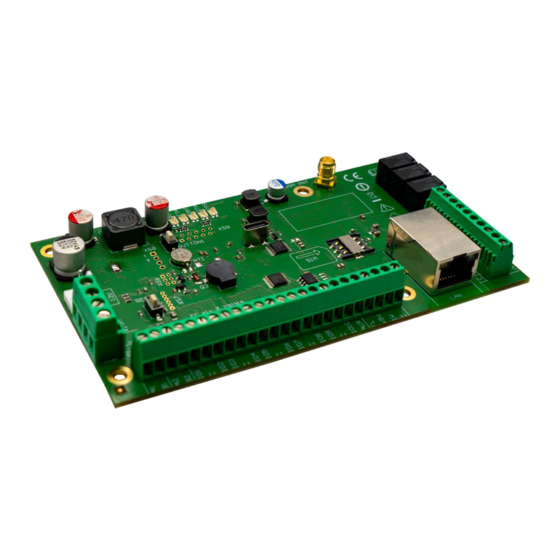
Page 6: Elements Of The „Flexi" Fc Communicator
9. SMA screw-on type connector for GSM antenna. 1-WIRE data bus terminal block. USB Type-C connector for configuring the communicator settings. 1.3 Purpose of terminals Terminal Description Power terminal „+“ Power supply terminal (15 – 32 V DC positive terminal) www.trikdis.com September, 2023... -
Page 7: Led Indication Of Operation
3 red flashes Unable to connect to GSM network 4 red flashes Unable to connect to the IP receiver using the primary channel 5 red flashes Unable to connect to the IP receiver using the secondary channel www.trikdis.com September, 2023... -
Page 8: Components Necessary For Installation
1 pc. Resistor 2,2 kΩ 20 pcs. Resistor 4,7 kΩ 10 pcs. Plastic spacer (mounting parts) 4 pcs. Antenna ME301M with 2,5 m long cable 1 pcs. Note: USB cable (Type-C type) for programming the communicator sold separately. www.trikdis.com September, 2023... -
Page 9: Installation Of The System
EN 60950 and EN 50131 standards. Plastic spacers. Dimensions of the „FLEXi“ FC board The picture below shows the dimensions of the board and its mounting holes (in millimeters), and also the locations of the holes. www.trikdis.com September, 2023... -
Page 10: Order Of Connecting Devices
32 using input expanders (iO-8, iO-MO, iO-LORA, iO8-LORA). Any terminal can be set as an input and assigned zone attributes: circuit type (NO, NC, EOL, EOL_T, ATZ, ATZ_T); sensitivity to temporary circuit events; see chapter 6.6 ““Zones” window”. Schematics for connecting sensors. www.trikdis.com September, 2023... -
Page 11: Connecting Smoke Detectors
(IOx) and set the circuit type (NO, NC, EOL, EOL_T, ATZ, ATZ_T) (see 6.6 “”Zones” window”). To connect a smoke detector circuit to a selected PGM output (IO10), the “Fire Sensor Reset” function must be assigned to the output (see chapter 6.7 ““PGM” window”). www.trikdis.com September, 2023... -
Page 12: Schematic For Connecting The Communicator To A Fire Alarm Control Panel
3.6 Schematic for connecting a temperature sensor Temperature sensors should be connected according to the given schematic. Maxim®/Dallas® DS18S20, DS18B20 temperature sensors (up to 8) or AM2301 humidity and temperature sensor (up to 1) can be connected to the communicator „FLEXi“ FC. www.trikdis.com September, 2023... -
Page 13: Schematics For Connecting A Relay And An Led Indicator
3.9 Schematics for connecting iO series expander modules If the communicator „FLEXi“ FC needs to have more inputs IN or outputs OUT, connect a wired or wireless TRIKDIS iO series input and output expander. The „FLEXi“ FC’s configuration for expander modules is described in chapter 6.5 ““Modules”... -
Page 14: Turning On The Communicator
If the light indication is different, see chapter 1.4 “LED indication of operation” to find out the reason. If all of the „FLEXi“ FC indicator lights are off, check the power supply and connections. www.trikdis.com September, 2023... -
Page 15: Quick Configuration Using Trikdisconfig Software
Communicator “FLEXi” FC for fire alarm control panels Quick configuration using TrikdisConfig software 1. Download the configuration software TrikdisConfig from www.trikdis.com (type “TrikdisConfig” in the search field) and install it. 2. Connect the „FLEXI“ FC to the computer using a USB Type-C cable. - Page 16 Protegus 2, then the "Return to Primary" connection type will be attempted after a set time interval. In the “Zones” window, “Zones settings” tab: 7. Tick the boxes if you want users to receive notifications to Protegus 2 about changes in zone states. www.trikdis.com September, 2023...
- Page 17 9. Tick the boxes if you want users to receive notifications to Protegus 2 about changes in the communicator’s internal event states. After finishing configuration, click the Write [F5] button and disconnect the USB cable. Note: See chapter 6 “Description of TrikdisConfig windows” to find more about other „FLEXI“ FC settings in TrikdisConfig. www.trikdis.com September, 2023...
-
Page 18: Settings For Connecting To Central Monitoring Station
If the fallback connection type succeeded in passing the message to CMS, then the "Return to Primary" connection type will be attempted after a set time interval. www.trikdis.com September, 2023... -
Page 19: Remote Control
7. Domain or IP – enter the receiver’s domain or IP address. 8. Port – enter the receiver’s network port number. 9. Protocol – choose which transmission protocol should be used for sending messages: TRK (to TRIKDIS receivers), DC- 09_2007 or DC-09_2012 (to universal receivers), TL150 (to SUR-GARD receivers). -
Page 20: Configuration And Control Via Sms Messages
Turn off an output, “x” is the output number. E.g.: OUTPUT1 123456 OFF PULSE=ttt Turn on an output for a few seconds - “x” is the OUT output number, and “ttt” is a three-digit number that specifies pulse time in seconds. www.trikdis.com September, 2023... -
Page 21: Control Pgm Outputs Using Phone Calls
The phone number must start with a "+" symbol and international country code. The phone number and username must be separated by a “#” symbol. E.g.: SETN 123456 PHONE5=+37061234567#JOHN#jonas@trikdis.lt PhoneX=DEL Delete user’s phone number and name from the system. -
Page 22: Description Of Trikdisconfig Windows
Access level (shown after access code is approved) When the Read [F4] button is clicked, the program will read and show settings currently saved on the „FLEXI“ FC. With TrikdisConfig, set the required parameters using the following program window descriptions. www.trikdis.com September, 2023... -
Page 23: System Options" Window
If required by the GPRS network service provider, enter the APN user name and password in the fields Login and Password. Locked ICCID - enter the ICCID number of the SIM card if you want the communicator to work only with this SIM card. www.trikdis.com September, 2023... - Page 24 “Access” tab Settings group “Access codes” Administrator Code – gives full access to configuration functions (default code – 123456). SMS password – password for remote control and programming via SMS messages (default code – 123456). www.trikdis.com September, 2023...
-
Page 25: Reporting To Cms" Window
Port – enter the receiver’s network port number. Protocol – select in which coding the events should be sent: TRK (to TRIKDIS receivers), DC-09_2007 or DC-09_2012 (to universal receivers. By selecting the SIA DC protocol, you can select the SIA-DCS messaging format.), TL150 (to SUR- GUARD receivers). - Page 26 For setting parameters on how the communicator will communicate with the CMS channels and with Protegus 2. The connection types are specified in order. If the communicator fails to connect using the “Main type” connection , it switches to the “Backup www.trikdis.com September, 2023...
-
Page 27: Users & Reporting" Window
Tel number – the user’s phone number that will receive SMS messages. The numbers must start with the international country code. The first 8 telephone numbers will receive reports using messages and phone calls. E-mail - enter the user’s email, so that the user would be invited to Protegus 2 to control the system. www.trikdis.com September, 2023... - Page 28 Settings group “SMS answer texts” The text for answers to commands sent using SMS messages can be customized in the column “SMS text”. Also here are the texts of SMS messages that are used when activating inputs or outputs. www.trikdis.com September, 2023...
-
Page 29: Modules" Window
ATZ_T – two zone normally closed circuit with end of line resistors, with tamper monitoring function (to use this type, choose the second ATZ zone in the input list). CMS – if the box is ticked, messages about zone events will be sent to the CMS (central monitoring station). www.trikdis.com September, 2023... - Page 30 CID – enter the event code or leave the default value. SIA - event SIA codes. Group – enter the group number that will be sent when an event occurs. Zone - enter the zone number that will be sent when an event occurs. www.trikdis.com September, 2023...
-
Page 31: Pgm" Window
Pulse OFF – initial state of output OUT – “On”. After the command the OUT state will become “Off” for the duration of the “Pulse time”, and later it will automatically return to the initial “On” state. www.trikdis.com September, 2023... - Page 32 Start time – set the time when OUT will be turned on (schedule start time). Stop time – set the time when OUT will be turned off (schedule end time). Mon – Sun – you can mark the days of the week when OUT will have to be turned on/off. www.trikdis.com September, 2023...
- Page 33 PGM – the number of output OUT and turn on/off event type (“Event” – output OUT turn on event and “Restore” – OUT turn off event). User SMS/Call – choose which users to inform via SMS message and/or call when an output OUT is turned on/off. www.trikdis.com September, 2023...
-
Page 34: Sensors" Windows
AM2301 temperature and humidity sensor can be connected. If the Humidity & Temperature sensor will be used, it must be manually assigned in the “Module type” column). 6.9 “System events” window “Events” tab ID – event’s number on the list. www.trikdis.com September, 2023... -
Page 35: Events Log" Window
Clear Log button – for clearing the event log entries from the device’s memory. In the table, you can find the “Event No.”, “Time”, “CID” code, “Event definition”. The events log can show up to 1000 events stored in the „FLEXI“ FC’s memory. www.trikdis.com September, 2023... -
Page 36: Restore Default Settings
2. To test the communicator’s outputs, turn them on remotely and check their operation. Ensure that the events were received by the Central Monitoring Station (CMS) and/or Protegus application. 3. Perform a fire alarm test to see if the CMS receives events correctly. www.trikdis.com September, 2023... -
Page 37: Updating Firmware
4. Open the TrikdisConfig window “Firmware”. 5. Click the button “Open firmware” and choose the required firmware file. The newest firmware files can be downloaded from the webpage www.trikdis.com. 6. Click the Update [F12] button. 7. Wait for the update to finish.
Need help?
Do you have a question about the FLEXi FC and is the answer not in the manual?
Questions and answers