
Related Manuals for REED R7920


Summary of Contents for REED R7920
- Page 1 R7920 Ultrasonic Thickness Gauge 1 YEAR 1 AN 1 AN 1 YEAR Instruction Manual 1.888.610.7664 www.calcert.com sales@calcert.com...
-
Page 2: Table Of Contents
Table of Contents Introduction ....................4 Product Quality ................... 4 Safety ......................4 Features ...................... 5 Included ...................... 5 Specifications ..................... 6 Instrument Description ................7 Display Description ..................7 Operating Instructions ................8-12 Initial Calibration ..................8 Selecting the Material Sound Velocity ........... 9 Preparing the Measurement Surface ............. - Page 3 View/Delete Stored Data ..............14 View from First/Last Page ..............15 View from Selected Item ..............15 Delete by Group Range (Delete the Item) ......... 16 Delete All ..................16 System Settings ................... 16 Enable or Disable the Audible Beep (Sound) ........17 Setting the Backlight Timer ..............
-
Page 4: Introduction
Product Disposal and Recycling .............. 26 Product Support ..................26 Introduction Thank you for purchasing your REED R7920 Ultrasonic Thickness Gauge. Please read the following instructions carefully before using your instrument. By following the steps outlined in this manual your meter will provide years of reliable service. -
Page 5: Features
Features • Measures the thickness of steel, cast iron, aluminum, acrylic resin, red copper, brass, zinc, quartz glass, polyethylene, PVC, grey cast iron and nodular cast iron • Easy-to-read backlit LCD display • User selectable unit of measure (in/mm) • Internal memory stores up to 300 measurements •... -
Page 6: Specifications
Specifications Measuring Range: 0.04 to 11.8" (1.00 to 300mm) Accuracy: <10mm: ±0.1mm ≥10mm: ±(1% rdg. +0.1mm) Resolution: 0.1mm/0.01mm/0.01" Velocity Range: 1000 to 9999m/s (0.039 to 0.394in/µs) Compatible Materials: Steel, cast iron, aluminum, acrylic resin, red copper, brass, zinc, quartz glass, polyethylene, PVC, grey cast iron and nodular cast iron Display: 2.4"... -
Page 7: Instrument Description
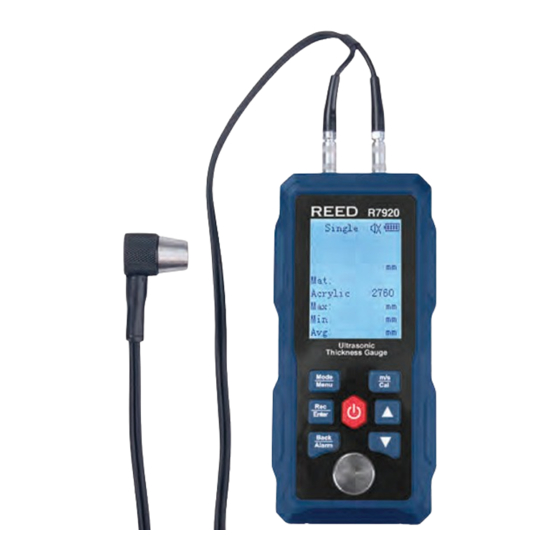
Instrument Description 1. Probe Connectors 2. LCD Display 3. Measurement Mode/ Menu Button 4. Record/Enter Button 5. Back/Alarm Toggle Button 6. Calibration Test Block 7. Power Button 8. Down Arrow 9. Up Arrow 10. Sound Velocity/ Calibration Button 11. Ultrasonic Sensor Display Description 1. -
Page 8: Operating Instructions
Operating Instructions Insert the ultrasonic sensor into the probe connector sockets on the meter. Press the POWER button to turn the meter ON. Press and hold the POWER button for approx. 2 seconds to turn the meter OFF. The LCD will display the current set sound velocity. Initial Calibration Select Single measurement mode by pressing the MODE/MENU button. -
Page 9: Selecting The Material Sound Velocity
Selecting the Material Sound Velocity While the meter is on, press the m/s/CAL button to enter the pre-loaded material sound velocities menu. Press the buttons to scroll through the pre-loaded material list. Adjust range Press the REC/ENTER button to confirm the 5720 - 6120 material selection and press the buttons... -
Page 10: Taking Thickness Measurements
Taking Thickness Measurements Set the sound velocity on the meter (See the Selecting the Material Sound Velocity section for details). Press the MODE/MENU button to select between Single and Continuous (Scan) measurement mode (See the Measurement Methods section for details). Apply coupling gel on the material under test and place the sensor firmly against the desired measurement area. -
Page 11: Determining The Sound Velocity For A Material With A Known Thickness
Adjust range 90º 5720 - 6120 Multi-point measurement: This method involves performing a number of 5920 measurements within a circle having a maximum diameter of about 1.18" (30mm) (Figure 2). Take the minimum indicated Figure 1 Figure 2 value as the thickness of the material. Continuous measurement (scan): Continuous measurement method involves 90º... -
Page 12: Enabling/Disabling Alarm Setting
Enabling/Disabling Alarm Setting The R7920 will alarm when the measured value is beyond the pre-set limits. When the measurement is lower or higher than the pre-set standard value limit, the alarm will sound. To enter the alarm limits, see the Setting the Alarm Thickness Limits section for details. -
Page 13: Setup Mode
Setup Mode Press and hold the MODE/MENU button for 2 seconds to enter Setup Mode. Use the arrows to scroll through the following parameters: Parameter Description Material Select the Material Under Test Speed Adjust Sound Velocity of the Material Under Test Unit Select Unit of Measure Records... -
Page 14: Adjusting The Sound Velocity Of The Material Under Test
Adjusting the Sound Velocity of the Material under Test Press the REC/ENTER button when "Speed" appears on the LCD. Press the buttons to adjust the sound velocity of the material under test if required. Note: Each material has an adjustment velocity range as shown below. -
Page 15: View From First/Last Page
View from First/Last Page Press the REC/ENTER button to enter the selected parameter. Press the REC/ENTER button again to activate files to view. Press the buttons to scroll through the list of saved files. Press the REC/ENTER button to see the details of the measured data. -
Page 16: Delete By Group Range (Delete The Item)
Delete by Group Range (Delete the Item) Press the REC/ENTER button to enter the selected parameter. Press the REC/ENTER button again to skip to the required digit. Press the buttons until the desired value is reached. Press the REC/ENTER button to confirm and skip to the next digit. After each value has been selected and confirmed, the meter will ask to confirm deletion of the specific group range. -
Page 17: Enable Or Disable The Audible Beep (Sound)
Enable or Disable the Audible Beep (Sound) Press the REC/ENTER button when "Sound" appears on the LCD. Press the buttons to select between "Yes" and "No". Press the REC/ENTER button to confirm selection. Note: At any time, press the BACK/ALARM button while in the setup menu screen to exit the Setup mode and resume normal operation. -
Page 18: View Device Information
View Device Information Press the REC/ENTER button when "About" appears on the LCD to view the device information. Press the BACK/ALARM button to return to the Setup Menu screen. Note: At any time, press the BACK/ALARM button while in the setup menu screen to exit the Setup mode and resume normal operation. -
Page 19: Charging The Battery
Charging the Battery Connect the R7920 via the included cable to a USB port on a PC or into a wall outlet using a USB Power Adapter (not included) to charge the Li-ion battery. Charge the meter until the battery indicator appears full. -
Page 20: Material Sound Velocities Table
Appendix A Material Sound Velocities Table Note: The sound velocities listed below are for reference only. Description Material in/µs User define 1 0.233 5920 User define 2 0.233 5920 User define 3 0.233 5920 Aluminum 0.250 6340-6400 Steel, common 0.233 5920 Steel, stainless 0.226... -
Page 21: Measurements On Cylindrical Surfaces
Description Material in/µs Plexiglass 0.106 2692 Porcelain 0.230 5842 0.094 2388 Quartz glass 0.222 5639 Rubber, vulcanized 0.091 2311 Measurements on Cylindrical Surfaces When measuring cylindrical material, such as pipes or oil tubes, it is important to properly adjust the angle between the ultrasonic sensor's crosstalk interlayer plate and the axial line of the material being measured. -
Page 22: Measuring An Un-Parallel Surface
Measuring an Un-Parallel Surface To get a satisfactory ultrasonic response, the other surface of the material under test must be parallel to or co-axial with the surface being measured, otherwise it will cause a measuring error or even provide no displayed reading. -
Page 23: Preventing Errors
While measuring castings pay attention to the following: When measuring casting with an un-machined surface use engine oil, consistent grease, or water glass as a coupling gel. Calibrate the sound velocity for the material under test with a standard test piece having the same material and measuring direction as that of the material being measured. -
Page 24: Ultra-Thin Material
Under certain circumstances, referring to a material speed-of-sound table can replace reference test pieces. The value in the speed-of-sound table may have some difference from the actual measured values due to difference in the material's physical and chemical characteristics. This is usually used for measuring low-carbon steel, and can only be taken as a rough measurement. -
Page 25: Overlapped Material And Compound Material
Overlapped Material and Compound Material It is impossible to measure uncoupled overlapped material because the ultrasonic wave can't pass through an uncoupled space. Since the ultrasonic wave can't transmit in a compound material in even speed, an ultrasonic thickness-gauge cannot be used to measure overlapped material and compound material. -
Page 26: Product Warranty
REED Instruments total liability is limited to repair or replacement of the product. REED Instruments shall not be liable for damages to goods, property, or persons due to improper use or through attempts to utilize the instrument under conditions which exceed the designed capabilities. - Page 27 NOTES 1.888.610.7664 www.calcert.com sales@calcert.com...
- Page 28 NOTES 1.888.610.7664 www.calcert.com sales@calcert.com...
- Page 29 TEST & MEASURE WITH CONFIDENCE Access our Product Catalog Over 200 portable test and measurement instruments 1.888.610.7664 www.calcert.com sales@calcert.com...
- Page 30 1.888.610.7664 www.calcert.com sales@calcert.com...
Need help?
Do you have a question about the R7920 and is the answer not in the manual?
Questions and answers