
Related Manuals for TESTO 310 II


Summary of Contents for TESTO 310 II
- Page 1 – Flue gas analyser testo 310 Instruction manual 1.888.610.7664 www.calcert.com sales@calcert.com...
-
Page 2: Table Of Contents
Products with wireless technology ............ 8 Product-specific approvals ..............9 Intended use ..................9 Product description ................10 Overview of the testo 310 ..............10 Flue gas probe ..................11 Overview of main menu ................ 12 Control keys ..................13 First steps ................... - Page 3 9.8.2 Tutorial ....................54 9.8.3 Exclusion of liability ................54 9.8.4 Wireless firmware update ..............54 testo DataControl archiving software ........... 56 9.9.1 System requirements ................57 9.9.1.1 Operating system ................. 57 9.9.1.2 PC ......................57 9.9.2 Procedure .................... 57 Maintenance ..................
- Page 4 Contents Cleaning the flue gas probe ..............59 10.6 10.7 Draining the condensate container ............60 10.8 Checking / replacing the particle filter ........... 61 Technical data ..................62 11.1 Measurement ranges and resolution ............ 62 11.2 Other instrument data ................62 Tips and assistance ................
-
Page 5: About This Document
1 About this document 1 About this document • The instruction manual is an integral part of the instrument. • Pay particular attention to the safety instructions and warning advice in order to prevent injury and damage to the product. •... -
Page 6: Safety And Disposal
• Only maintenance and repair work that is described in the documentation may be carried out on this instrument. Follow the prescribed steps exactly when doing the work. Only use original spare parts from Testo. Built-in rechargeable battery DANGER Risk of death! The built-in rechargeable battery can explode if it gets too hot. -
Page 7: Product-Specific Information
2 Safety and disposal • Rechargeable batteries must be disposed of in accordance with the local and country-specific regulations. In order to prevent short circuits and the associated heating, lithium batteries must never be stored unprotected in bulk. Appropriate measures against short circuits are, for instance, inserting the batteries into the original packaging or a plastic bag, masking the poles or embedding them in dry sand. -
Page 8: Disposal
At the end of its useful life, deliver the product to the separate collection point for electric and electronic devices (observe local regulations) or return the product to Testo for disposal. 3 Products with wireless technology Changes or modifications that have been made without the explicit consent of the competent approval authority may lead to cancellation of the type approval. -
Page 9: Product-Specific Approvals
These systems can be adjusted using the testo 310 and checked for compliance with the applicable limit values. The following tasks can also be carried out using the testo 310 II: • Regulating the O2, CO and CO2 values in combustion plants for the purpose of ensuring optimal operation. -
Page 10: Product Description
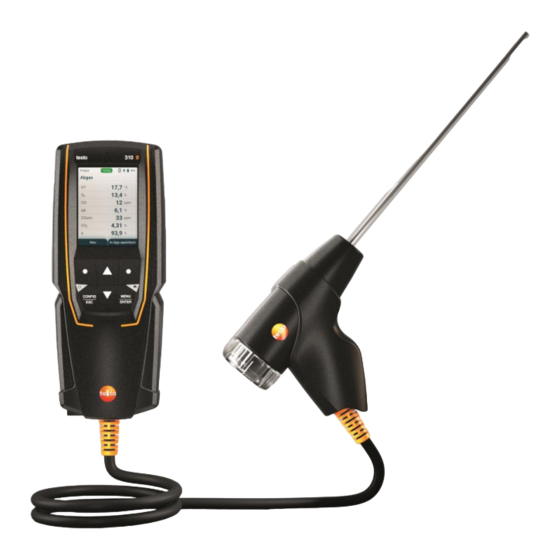
6 Product description 6 Product description Overview of the testo 310 1 Display 2 Control keys Charging socket for mains unit 4 Cable to the flue gas probe (USB-C) 5 Gas outlet 6 Condensate outlet 7 Magnetic holder 8 Magnetic holder... -
Page 11: Flue Gas Probe
6 Product description DANGER Magnetic field May be hazardous to the health of pacemaker wearers. - Keep a minimum distance of 7.9 inch (20 cm) between the pacemaker and the device. Flue gas probe 1 Thermocouple 2 Probe shaft 3 Probe handle 4 Connecting cable Removable filter chamber with window, particle filter, and sealing plug for differential pressure measurement... -
Page 12: Overview Of Main Menu
6 Product description Overview of main menu Display of fuel Measuring status Display of Smart App connection Display of Bluetooth connection Display of rechargeable battery capacity: : rechargeable battery is loading : rechargeable battery is empty : rechargeable battery is partly charged : rechargeable battery is fully charged Display of measuring function Display of measuring values... -
Page 13: Control Keys
6 Product description Control keys Symbol Meaning On/Off (long press) Switches the instrument on or off CONFIG/ESC • Switches to the measurement view • Back to the menu Print (long press) Transmit data to the protocol printer MENU/ENTER • Open menu •... -
Page 14: First Steps
If you notice any deformation, the instrument must no longer be used. Switch it off to prevent physical injury or damage to the instrument. Dispose of the instrument properly (observe local regulations) or return it to Testo for disposal. The rechargeable battery is permanently installed and can only be changed by a Testo service center. -
Page 15: Power Supply Operation
7 First steps Battery care • Do not fully exhaust the rechargeable battery. • Only store instrument with battery charged and at low temperatures, but not below 32 °F (0 °C) (best storage conditions with a charge level of 50-75% = 2 segments, at an ambient temperature of 50-68°F (10-20°C), recharge completely before use). -
Page 16: Using The Product
8 Using the product 8 Using the product Performing settings The instrument has two different configuration menus. The menu that is opened depends on the instrument status when called up. 8.1.1 Instrument configuration menu / commissioning When the instrument is switched on initially, the configuration menu is opened automatically. - Page 17 8 Using the product By selecting the country automatically the corresponding area version is activated with different calculation formulas and associated measurement parameters. The language selection is shown. [▼] [▲] to select the desired language and confirm the selection with [MENU/ENTER]. ...
-
Page 18: Instrument Configuration Menu / After Commissioning
8 Using the product 8.1.2 Instrument configuration menu / after commissioning After initial commissioning, settings can be made via the device configuration menu. Device settings can only be made if no measurements are running at the same time. Making settings Press [MENU/ENTER] when the device is switched on. -
Page 19: Country-Specific Presettings
8 Using the product • Country: Changing the country version (after changing the country version, the device restarts automatically) • Display: Setting the brightness (25%, 50%, 75% or 100%) and the auto-off function • Date & time: Setting the time and date •... -
Page 20: Reading Display
8 Using the product Countries Parameters Fuels , CO, COunv, η, η+, CO DE, AT, CH, AT, O , VT, Natural gas qA, λ, Zug, COumg, Δp CZ, FR, ES, Propane BE, PL, PT, Butane AR, BR Coke oven gas Town gas Gasoleo A EL fuel oil... -
Page 21: Preparing For Measurement
8 Using the product Preparing for measurement 8.2.1 Zeroing phases Gas sensors If flue gas measurement or ambient CO measurement is configured, the gas sensors are zeroed when the instrument is switched on (zeroing phase). The flue gas probe must be in the open air during the zeroing phase! Pressure sensor If draft measurement or differential pressure measurement is configured, the pressure sensor is zeroed when the instrument is switched on (zeroing phase). -
Page 22: Setting Fuel
8 Using the product Aligning the flue gas probe The flue gas must be able to flow freely past the thermocouple. • Align the probe by turning it as required. The tip of the probe must be in the core current of the flue gas flow. •... -
Page 23: Perform Flue Gas Measurement
8 Using the product [▼] [▲] Select the fuel type with and confirm the selection with [MENU/ENTER]. Perform flue gas measurement In order to maintain the measuring accuracy of the instrument, the correct fuel must be selected or configured. To achieve usable measurement results, the test time of a flue gas measurement should be at least 3 minutes and the measuring instrument should display stable readings. - Page 24 The measured values are shown on the display. In case the measurement device is connected with the testo Smart App, the measured values can be saved in the app with the right function key.
-
Page 25: Co Environment
8 Using the product CO Environment Cigarette smoke influences the measurement by more than 50 ppm. The breath of a smoker influences the measurement by about 5 ppm. The probe must be in the open air (CO-free) during the zeroing phase! Select measurement type Press [MENU/ENTER]... - Page 26 The measured values are shown on the display. In case the measurement device is connected with the testo Smart App, the measured values can be saved in the app with the right function key.
-
Page 27: Draft Measurement
8 Using the product Draft measurement Do not measure for longer than 5 min, as a drift of the pressure sensor means that the readings could be outside the tolerance limits. Select measurement type Press [MENU/ENTER] to open the main menu and select Measurement types with [MENU/ENTER]. - Page 28 8 Using the product Performing the measurement The flue gas probe must be outside the flue. ✓ Start measurement: select [Start] with the right function key. Draft zeroing is carried out. After zeroing, position the flue gas probe in the core current (area of the highest flue gas temperature).
-
Page 29: Differential Pressure
8 Using the product Differential pressure DANGER Danger of explosion due to dangerous mixture of gases! - Before measurement close the gas path with the sealing plug, as described below! - If the gas path is not correctly closed with the sealing plug during differential pressure measurement, there is a risk of unburned gas mixture escaping. - Page 30 8 Using the product Select the measurement type [▼] Differential pressure with [▲] and confirm the selection with [MENU/ENTER]. An information message is shown. Close the gas path with the sealing plug. Please see the description below. Prepare for measurement Open filter chamber of the flue gas probe: turn it gently anti-clockwise.
- Page 31 8 Using the product Remove particle filter (1) and store it to reinsert it after the measurement. Remove the sealing plug (2) in the filter chamber from the holder. Close the gas path with the sealing plug. Check that the sealing plug is fitted tightly. It should not yield at all on being tugged gently.
- Page 32 8 Using the product Carry out the measurement The silicone hose must be clear (pressureless, no kinks). ✓ Start measurement: select [Start] with the right function key. Pressure zeroing. Connect the silicone hose to the sampling point. Pressurise the system. ...
-
Page 33: Bluetooth
8 Using the product Bluetooth ® The testo 310 can be connected to the testo Smart App via Bluetooth connection. 8.7.1 Establishing a connection ® To establish a connection via Bluetooth , you need a tablet or smartphone with the Testo Smart App installed on it. -
Page 34: Switching On
8 Using the product Bluetooth menu is displayed. Display Explanation ® There is no Bluetooth connection, or a potential is displayed connection is being searched for. ® There is a Bluetooth connection active. is displayed ® Bluetooth is disabled. is not displayed 8.7.2.1 Switching on... -
Page 35: Switching Off
8 Using the product ® When the Bluetooth icon is shown on the display, Bluetooth is switched on. After opening the App, the instrument is automatically connected if it is within range. The instrument does not have to be connected to the smartphone/tablet via settings beforehand. -
Page 36: Print Data
The protocol is created and sent to the printer. The protocol is printed. Once the measuring device is connected with the testo Smart App, printing the data is only possible via the app. The function key on the measuring device is disabled. -
Page 37: Smart App
9 Smart App 9 Smart App App – user interface Open main menu Display of the measurement period Display of measurement results Can be controlled with different function keys Instrument status bar Configuration Selection of fuel Edit reading display Further symbols on the user interface (without numbering) One level back Exit view Share report... -
Page 38: Main Menu
9 Smart App Favorite Delete Further information Display report Multiple selection Main menu Main menu can be accessed via the icon at top left. To exit the main menu, select a menu or right-click on the guided menus. The last screen displayed is shown. -
Page 39: Measurement Menu
9 Smart App Measurement menu The testo 310 has permanently installed measurement programs (flue gas measurement, CO ambient, draft and differential pressure). These enable the user to carry out convenient configuration and implementation of specific measuring tasks. 9.3.1 Customize view... - Page 40 9 Smart App Click Turn ON reordering mode enable the edit mode to reorder the display of measurement variables. Tap the line of a measured variable and move it to the desired position. Click Turn OFF reordering mode to disable the edit mode. Click Save changes to save the changes and transfer them to the...
-
Page 41: Graphic View
9 Smart App 9.3.2 Graphic view In the Graphic view, the values for a maximum 4 channels can be displayed simultaneously in a chronological trend graph. All measured parameters can be displayed in the Graphic view via the channel selection (click on one of the four selection fields). -
Page 42: Perform Flue Gas Measurement
This enables parallel measurement of the combustion air temperature, the differential temperature and the differential pressure. The following Smart Probes can be connected: testo 915i (0563 4915), testo 510i (0560 1510), testo 115i (0560 2115 03) Select measurement type... -
Page 43: Ambient Co
9 Smart App 9.3.4 Ambient CO Cigarette smoke influences the measurement by more than 50 ppm. The breath of a smoker influences the measurement by about 5 ppm. The probe must be in the open air (CO-free) during the zeroing phase! Select measurement type Open the main menu with and click on... -
Page 44: Differential Pressure
9 Smart App The indication of the measured flue gas temperature in line 2 helps when positioning the probe. The reading is displayed. Quit measurement: [Stop]. Save measured values in the app: [Save]. 9.3.6 Differential pressure DANGER Danger of explosion due to dangerous mixture of gases! - Before measurement close the gas path with the sealing plug, as described below! - If the gas path is not correctly closed with the sealing plug during... - Page 45 9 Smart App Prepare for measurement Open filter chamber of the flue gas probe: turn it gently anti-clockwise. Remove particle filter (1) and store it to reinsert it after the measurement. Remove the sealing plug (2) in the filter chamber from the holder. Close the gas path with the sealing plug.
- Page 46 9 Smart App WARNING Hot probe shaft! Risk of burns! > Allow the probe shaft to cool down after a measurement, before touching it! > Only attach the silicone hose to the probe shaft once it has cooled down! Fit silicone hose onto the probe shaft of the flue gas probe.
-
Page 47: Customer
9 Smart App Customer In the Customer menu, all customer and measuring site information can be created, edited and deleted. Fields marked with * are mandatory. Without any information in this field, no customers or measuring sites can be stored. 9.4.1 Creating and editing a customer Click on... -
Page 48: Creating And Editing Measuring Sites
9 Smart App 9.4.2 Creating and editing measuring sites Click on Main menu opens Click on Customer. The Customer menu opens. Click on + New Customer. Click on the right tab Measuring point. Click on + New Measuring Point. -
Page 49: Memory
In the Memory menu, you can call up all the measurements from testo 310 stored with the app, analyze them in detail and also create and save csv data and PDF reports. When clicking on a measurement, an overview of the measurement results is displayed. -
Page 50: Sensors
9.6.1 Information Information is stored for each device. ✓ The App is connected to testo 310 II. - Click on Main menu opens. - Click on Sensors. ... -
Page 51: Settings Of Connected Devices
9 Smart App Information is displayed about the model, order number, serial number and firmware version. 9.6.2 Settings of connected devices Settings can also be made for each device. ✓ The probe is connected to the App. - Click on ... -
Page 52: App Settings
9 Smart App App settings 9.7.1 Language Click on Settings. Settings menu opens. Click on Language. A window with different languages opens. Click on the required language. The required language is set. 9.7.2 Measurement settings Click on Settings. ... -
Page 53: Privacy Settings
9 Smart App Click on the required data and enter if necessary. The required company details are set. Exit Company details. 9.7.4 Privacy settings Click on Settings. The Settings menu opens. Click on Privacy settings. A window with privacy settings opens. Activate or deactivate the required settings. -
Page 54: Tutorial
9 Smart App 9.8.2 Tutorial Click on Help and Information. The Help and Information menu opens. Click on Tutorial. The tutorial shows you the most important steps prior to commissioning. 9.8.3 Exclusion of liability Click on Help and Information. - Page 55 9 Smart App As soon as a new update is available, ✓ a notification will appear in the display. Start update. The update is carried out. Tap Later. The notification will appear again upon the next connection. The Bluetooth connection must not be interrupted during the instrument update.
-
Page 56: Testo Datacontrol Archiving Software
DataControl archiving software The free testo DataControl measurement data management and analysis software enhances the functionality of the testo Smart App measuring instrument with lots of useful functions: • Manage and archive customer data and measuring site information •... -
Page 57: System Requirements
Screen with a resolution of at least 800 x 600 pixels 9.9.2 Procedure To transfer the data from the App to testo DataControl, both ✓ instruments must be in the same network. For example: A notebook with installed testo DataControl and a smartphone with installed testo Smart App are connected to the same WLAN. - Page 58 An overview with available instruments opens. Select instrument. A safety notice is displayed. Click on Transfer data to DataControl and delete from instrument. Data has been successfully transferred from the app to testo DataControl. 1.888.610.7664 www.calcert.com sales@calcert.com...
-
Page 59: Maintenance
Carefully blow out oil residues in the valve block using compressed air. 10.5 Ensuring measuring accuracy Testo Customer Service will be happy to help you as required. 10.6 Cleaning the flue gas probe > In case of contamination, clean the probe shaft and the handle of the flue gas probe with a damp cloth. -
Page 60: Draining The Condensate Container
10 Maintenance 10.7 Draining the condensate container The fill level of the condensate trap can be monitored via the markings on the condensate trap. Draining the condensate container CAUTION Skin irritation due to condensate! - Avoid skin contact. - Make sure that the condensate does not run over the housing. ACHTUNG Damage to the sensors and the flue gas pump due to condensate entering the gas path! -
Page 61: Checking / Replacing The Particle Filter
10 Maintenance 10.8 Checking / replacing the particle filter Checking the particle filter Check the particle filter of the flue gas probe for contamination at regular intervals: check visually by looking through the window of the filter chamber. Replace the filter if there are signs of contamination. Replacing the particle filter The filter chamber may contain condensate. -
Page 62: Technical Data
11 Technical data 11 Technical data 11.1 Measurement ranges and resolution Measure- Measure- Resolution Accuracy Response ment ment time t90 parameter range @ 22 °C / 72 °F 0.0 ... 0.1 Vol.% ±0.2 Vol.% 30 s 21.0 Vol.% 0 ... 1 ppm ±20 ppm (0 ... -
Page 63: Tips And Assistance
Pollution degree Power source Rechargeable battery: 1500 mAh Power Rating Power Supply 5 V / 2 A, USB charger (Power Supply from Testo) with connection via USB C Battery charge time approx. 8 h Rechargeable battery > 8 h (pump on, 20°C ambient temperature) life Weight incl. -
Page 64: Accessories And Spare Parts
13 Support You can find up-to-date information on products, downloads and links to contact addresses for support queries on the Testo website. If you have any questions please contact your local dealer or the Testo Customer Service. 1.888.610.7664 www.calcert.com...
Need help?
Do you have a question about the 310 II and is the answer not in the manual?
Questions and answers