TESTO 310 Instruction Manual
Flue gas analyzer
Hide thumbs
Also See for 310:
- User manual ,
- Brief instructions (4 pages) ,
- Instruction manual (34 pages)
Table of Contents
Advertisement
Advertisement
Table of Contents

Related Manuals for TESTO 310


Summary of Contents for TESTO 310
- Page 1 310 · Flue gas analyzer Instruction manual...
-
Page 3: Table Of Contents
1 Contents Pos: 1 /TD/Überschriften/1. Inhalt @ 0\mod_1177587817070_79.docx @ 1243 @ 1 @ 1 Contents Contents ....................3 Safety and the environment ..............5 2.1. About this document ................ 5 2.2. Ensure safety ................... 6 2.3. Protecting the environment .............. 7 Specifications .................. - Page 4 1 Contents Maintaining the product ............... 30 6.1. Cleaning the measuring instrument ..........30 6.2. Cleaning the flue gas probe ............30 6.3. Draining the condensate container ..........30 6.4. Checking / replacing the particle filter ........... 31 Tips and assistance ................32 7.1.
-
Page 5: Safety And The Environment
2 Safety and the environment Pos: 3 /TD/Überschriften/2. Sicherheit und Umwelt @ 0\mod_1173774719351_79.docx @ 292 @ 1 @ 1 Safety and the environment Pos: 4 /TD/Überschriften/2.1 Zu diesem Dokument @ 0\mod_1173775252351_79.docx @ 346 @ 2 @ 1 2.1. About this document Pos: 5 /TD/Sicherheit und Umwelt/Zu diesem Dokument/Verwendung/Verwendung (Standard) @ 0\mod_1173775068554_79.docx @ 337 @ 5 @ 1 >... -
Page 6: Ensure Safety
Use only original spare parts from Testo. Pos: 18 /TD/Sicherheit und Umwelt/Sicherheit gewährleisten/testo 350/testo 350 Sicherheit @ 5\mod_1261385845735_79.docx @ 53306 @ @ 1 > Any further or additional work must only be carried out by authorised personnel. Testo will otherwise refuse to accept responsibility for the proper functioning of the measuring instrument after repair and for the validity of certifications. -
Page 7: Protecting The Environment
> At the end of its useful life, send the product to the separate collection for electric and electronic devices (observe local regulations) or return the product to Testo for disposal. Pos: 25 /TD/Überschriften/3. Leistungsbeschreibung @ 0\mod_1173774791554_79.docx @ 301 @ 1 @ 1... -
Page 8: Specifications
(alarm) device Pos: 28 /TD/Überschriften/3.2 Technische Daten @ 0\mod_1176211088437_79.docx @ 704 @ 2 @ 1 3.2. Technical data Pos: 29 /TD/Leistungsbeschreibung/Technische Daten/testo 310 Technische Daten/Messbereiche_Genauigkeiten testo310 @ 12\mod_1332405668932_79.docx @ 113821 @ 3 @ 4 3.2.1. Measurement ranges and resolution Measure-... -
Page 9: Other Instrument Data
± 1.5% of meas. val. (>100°C) Ambient -20.0 to 100.0 °C 0.1°C ± 1°C <50s temperature Pos: 30 /TD/Leistungsbeschreibung/Technische Daten/testo 310 Technische Daten/weitere Gerätedaten testo 310 @ 12\mod_1332409166268_79.docx @ 113855 @ 35 @ 1 3.2.2. Other instrument data Flue gas analyser Feature Values Storage and -20 to 50 °C... - Page 10 Measuring instrument, flue gas probe: 24 months Thermocouple: 12 months Sensors O2, CO: 24 months, Rechargeable battery: 12 months Terms of warranty Terms of warranty: see website www.testo.com/warranty Pos: 31 /TD/Überschriften/4. Produktbeschreibung @ 0\mod_1173774846679_79.docx @ 310 @ 1 @ 1...
-
Page 11: Product Description
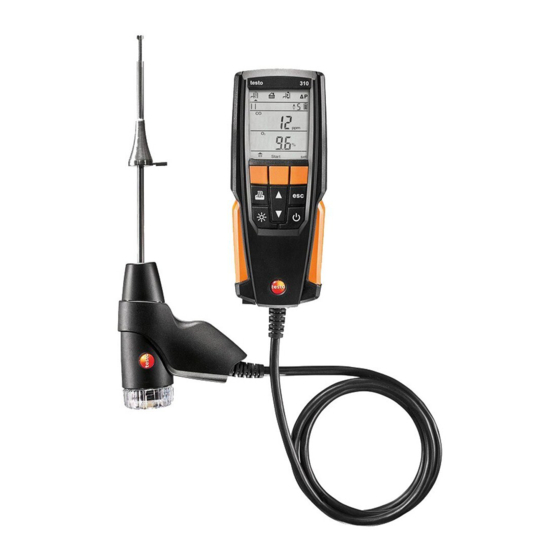
4 Product description Product description Pos: 32 /TD/Produktbeschreibung/Übersicht/testo 3xx/testo 310/testo 310 Übersicht @ 12\mod_1332410558502_79.docx @ 113960 @ 23 @ 1 4.1. Measuring instrument 4.1.1. Front view 1 Display 2 Function keys 3 Keypad Pos: 33 /TD/Produktbeschreibung/Übersicht/testo 3xx/testo 310/testo 310 Tastatur @ 12\mod_1332410926380_79.docx @ 113994 @ 3 @ 1 4.1.2. -
Page 12: Display
Back, cancel print process Switch display light on/off Transmit data to the Testo protocol printer. Pos: 34 /TD/Produktbeschreibung/Übersicht/testo 3xx/testo 310/testo 310 Display @ 12\mod_1332411639628_79.docx @ 114028 @ 3 @ 1 4.1.3. Display 1 Measurement type (an arrow marks the measurement type that... - Page 13 4 Product description 2 Status: Icon Meaning Measuring gas pump (icon visible when the instrument is switched off) The inner segments light up alternately when the measuring gas pump is running. Error Flashes when an error occurs, an error code is also displayed.
-
Page 14: Connections
Right function key: Open configuration menu Switch to the next parameter: Pos: 35 /TD/Produktbeschreibung/Übersicht/testo 3xx/testo 310/testo 310 Schnittstellen @ 12\mod_1337587126580_79.docx @ 119307 @ 2223 @ 1 4.1.4. Connections 1 Charging socket for mains unit (Micro USB) 2 Cable to the flue gas probe 3 Gas outlet Pos: 36 /TD/Produktbeschreibung/Übersicht/testo 3xx/testo 310/testo 310 Geräteanschlüsse @ 12\mod_1337587072729_79.docx @ 119273 @ 22233 @ 1... -
Page 15: Rear View
4 Product description Pos: 37 /TD/Produktbeschreibung/Übersicht/testo 3xx/testo 310/testo 310 Geräterückseite @ 12\mod_1337588347371_79.docx @ 119341 @ 22133 @ 1 4.1.6. Rear view 1 Attachment for carrying strap 2 Condensate trap 3 Magnetic holder 4 Gas outlet 5 Magnetic holder CAUTION Damage to other equipment caused by strong magnets! >... -
Page 16: Flue Gas Probe
4 Product description Pos: 38 /TD/Produktbeschreibung/Übersicht/testo 3xx/testo 310/testo 310 Abgassonde @ 12\mod_1332417785833_79.docx @ 114062 @ 2232443445555 @ 1 4.2. Flue gas probe 1 Thermocouple 2 Probe shaft 3 Probe handle 4 Connecting cable 5 Removable filter chamber with window, particle filter, and sealing plug for differential pressure measurement Pos: 39 /TD/Produktbeschreibung/Übersicht/testo 3xx/testo 310/testo 310 Gebietsversionen @ 12\mod_1332425442045_79.docx @ 114268 @ 2212255 @ 1... -
Page 17: Area Versions
4 Product description 4.3. Area versions The instrument can be configured for four area versions. Country- specific calculation formulas, associated measurement parameters and fuels are activated with this setting. Similarly, the setting influences the date and time format. The area version is set in the instrument configuration menu / commissioning, see Instrument configuration menu / commissioning, page 21. -
Page 18: Reading Display
LI OIL - EL fuel oil HE OIL - Heavy fuel oil Uood 15 - Wood 15% Pos: 40 /TD/Produktbeschreibung/Übersicht/testo 3xx/testo 310/testo 310 Messwertanzeige @ 12\mod_1340612549682_79.docx @ 135653 @ 221222223535335535533 @ 1 4.4. Reading display Display Measurement parameter Ambient temperature... - Page 19 4 Product description Display Measurement parameter Carbon monoxide undiluted Ratio Air surplus Pos: 41 /TD/Überschriften/6. Produkt verwenden @ 0\mod_1173774928554_79.docx @ 328 @ 22223353555533 @ 1...
-
Page 20: Using The Product
5 Using the product Using the product Pos: 42 /TD/Produkt verwenden/testo 310/testo 310 Netzteil_Akku @ 12\mod_1332419151029_79.docx @ 114234 @ 23323543545535355555535344555544 @ 1 5.1. Mains unit / rechargeable battery The rechargeable battery is permanently installed and can only be changed by a Testo service centre. -
Page 21: Mains Operation
Pos: 43 /TD/Überschriften/6.1 Einstellungen vornehmen @ 0\mod_1184584321421_79.docx @ 1863 @ 2223553545353555354554 @ 1 5.2. Performing settings Pos: 44 /TD/Produkt verwenden/testo 310/Testo 310 Konfigurationsmenü @ 12\mod_1332419014640_79.docx @ 114200 @ 3323554455355535555544555544 @ 1 The instrument has two different configuration menus. The menu that is opened depends on the instrument status when called up. - Page 22 5 Using the product 3. Make settings: [esc] to revert to the previous parameter at any time. Display / Explanation parameter ArEA (area Selecting the area version activates different version) calculation formulas and associated measurement parameters, see Area versions, page 17. >...
-
Page 23: Measurements Configuration Menu
5 Using the product 5.2.2. Measurements configuration menu This configuration menu enables you to make important settings relating to a measurement. Fuels and measuring units can be set. Press right function key ([set]) after the instrument's initialisation phase. 1. Switch the instrument on: Hold down ], until all segments are shown on the display. -
Page 24: Measuring
5 Using the product 5.3. Measuring Pos: 46 /TD/Produkt verwenden/testo 310/testo 310 Messung vorbereiten @ 12\mod_1332426623055_79.docx @ 114331 @ 33335555555555555544555544 @ 1 5.3.1. Preparing for measurement 5.3.1.1. Zeroing phases Gas sensors If flue gas measurement ( or ambient CO measurement ( configured, the gas sensors are zeroed when the instrument is switched on (zeroing phase). -
Page 25: Using The Flue Gas Probe
(area of the highest flue gas temperature). 5.3.1.3. Setting fuel To carry out a flue gas measurement, the fuel must be set correctly, see Measurements configuration menu, page 23. Pos: 47 /TD/Produkt verwenden/testo 310/testo 310 Abgasmessung @ 12\mod_1332427125680_79.docx @ 114365 @ 33115555555554554 @ 1... -
Page 26: Flue Gas
2. Quit measurement: [Stop]. > Remove flue gas probe from the flue gas duct and purge with fresh air. Pos: 48 /TD/Produkt verwenden/testo 310/testo 310 CO-Umgebung @ 12\mod_1332428458095_79.docx @ 114399 @ 323255555555 @ 1 5.3.3. Ambient CO Cigarette smoke influences the measurement by more than 50 ppm. -
Page 27: Differential Pressure
The indication of the measured flue gas temperature in line 2 helps when positioning the probe. The reading is displayed. 3. Quit measurement: [Stop]. Pos: 50 /TD/Produkt verwenden/testo 310/testo 310 Differenzdruckmessung @ 12\mod_1332429111766_79.docx @ 114467 @ 1222555555555 @ 1 5.3.5. Differential pressure WARNING... - Page 28 5 Using the product 2. Remove particle filter (1). 3. Remove the sealing plug (2) in the filter chamber from the holder. 4. Close the gas path with the sealing plug. 5. Check that the sealing plug is fitted tightly. It should not yield at all on being tugged gently.
- Page 29 5 Using the product 3. Pressurise the system. The reading is displayed. 4. Quit measurement: [Stop]. After the measurement 1. Open filter chamber of the flue gas probe: turn it gently anti- clockwise. 2. Remove the sealing plug from the gas path. 3.
-
Page 30: Maintaining The Product
Do not use any aggressive cleaning agents or solvents! Mild household cleaning agents and soap suds may be used. Pos: 53 /TD/Produkt instand halten/testo 310/testo 310 Instandhaltung Abgassonde reinigen @ 12\mod_1332429721261_79.docx @ 114502 @ 222255555 @ 1 6.2. Cleaning the flue gas probe >... -
Page 31: Checking / Replacing The Particle Filter
The condensate outlet must be completely closed, other- wise measuring errors could occur if external air gets in. Pos: 55 /TD/Produkt instand halten/testo 310/testo 310 Instandhaltung Partikelfilter prüfen @ 12\mod_1332429814300_79.docx @ 114570 @ 12225555 @ 1 6.4. Checking / replacing the particle filter Checking the particle filter: >... -
Page 32: Tips And Assistance
Pos: 57 /TD/Überschriften/8.1 Fragen und Antworten @ 0\mod_1177402017078_79.docx @ 1093 @ 221255 @ 1 7.1. Questions and answers Pos: 58 /TD/Tipps und Hilfe/Fragen und Antworten/testo 310 Fragen und Anworten @ 12\mod_1332430291744_79.docx @ 114604 @ 22555555 @ 1 Question Possible causes / solution Rechargeable battery low >... -
Page 33: Accessories And Spare Parts
Pos: 59 /TD/Überschriften/8.3 Zubehör und Ersatzteile @ 0\mod_1177402058734_79.docx @ 1102 @ 525555 @ 1 7.2. Accessories and spare parts Pos: 60 /TD/Tipps und Hilfe/Zubehör und Ersatzteile/testo 310 Zubehör_Ersatzteile @ 12\mod_1332430335374_79.docx @ 114638 @ 2221255 @ 1 Printer Description Item no. - Page 34 7 Tips and assistance...
- Page 35 7 Tips and assistance...
- Page 36 0970 3100 en 01 V01.00...
Need help?
Do you have a question about the 310 and is the answer not in the manual?
Questions and answers