Advertisement
- 1 General notes
- 2 Intended use
- 3 Hazard levels
- 4 Accessories and spare parts
- 5 Scope of delivery
- 6 Device description
- 7 Startup
- 8 Operation
- 9 Care and maintenance
- 10 Transport
- 11 Storage
- 12 Special accessories
- 13 Troubleshooting guide
- 14 Specifications
- 15 Characteristic curves
- 16 Documents / Resources
General notes
Read these original operating instructions and the enclosed safety instructions before using the device for the first time. Proceed accordingly.
Keep both books for future reference or for future owners.
Intended use
This device has been developed for private use and is not intended for the loads imposed by commercial use.
This device is intended for indoor use only.
 Note
Note
The pump is not suitable for boosting the existing line pressure.
Permissible feed fluids
Permissible feed fluids:
- Processed water
- Well water
- Spring water
- Rain water
- Swimming pool water with intended dosage of additives
The temperature of the delivered liquid must not exceed 35°C.
Improper use
Note
The manufacturer accepts no liability for possible damage caused by improper use or incorrect operation.
Hazard levels

Indication of an imminent threat of danger that will lead to severe injuries or even death.

Indication of a potentially dangerous situation that may lead to severe injuries or even death.

Indication of a potentially dangerous situation that may lead to minor injuries.
ATTENTION
Indication of a potentially dangerous situation that may lead to damage to property.
Accessories and spare parts
Only use original accessories and original spare parts. They ensure that the appliance will run fault-free and safely.
Information on accessories and spare parts can be found at www.kaercher.com.
Scope of delivery
The scope of delivery for the appliance is shown on the packaging. Check the contents for completeness when unpacking. If any accessories are missing or in the event of any shipping damage, please notify your dealer.
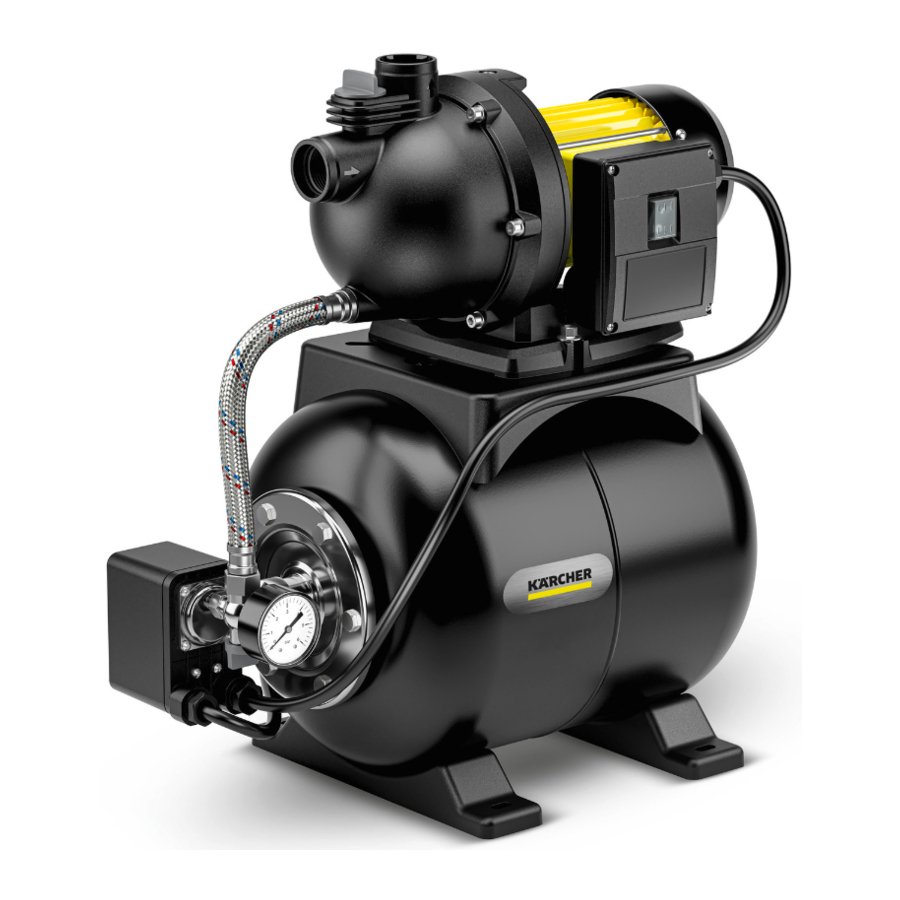
Device description
The maximum amount of equipment is described in these operating instructions. Depending on the model used, there are differences in the scope of delivery (see packaging).
Illustration A
- Connection adapter with integrated check valve
- Sealing plug
- Connection G 1 (33.3mm) suction line (inlet)
- Filling nozzle with cap
- Connection G 1 (33.3mm) pressure line (outlet)
- Connection adapter for pumps G 1
- ON/OFF switch
- Pressure indicator
- Stand with elongated hole for screwing
- Air valve (car valve) with cap
- Power supply cable with plug
- Drain screw
Startup
We recommend using only original Kärcher suction hoses, filter components and hose connections. Using components from other manufacturers can lead to malfunctions when sucking the feed fluid, especially when using bayonet connection systems.
Before initial startup
Preparation
- Before initial startup, check the pressure of the air filling in the storage tank. If necessary, top up to 2.0 bar with a commercially available air pump when switched off/depressurised.

Illustration B - Secure the device against slipping, screw it down if necessary.
- Remove the sealing plug.
- Screw the connection adapter with integrated check valve into the suction connection of the pump (inlet).

Illustration C


Note
If the water is dirty, we recommend fitting a pre-filter (see Special accessories) between the check valve and the suction hose.

Illustration D
- Connect vacuum-proof suction hose with integrated backflow stop to suction side. (Available as an special accessory).
- Screw the connection adapter into the pressure connection of the pump (outlet).
- Connect the pressure line.
- Open the filling nozzle cap.

Illustration E

- Fill with water until it overflows.

Illustration F
- Screw the cap tightly onto the filling nozzle.
- Open existing stop valves in the pressure line.

Note
Even minor leaks lead to malfunctions.
- In case of leaks, seal all connections with a suitable sealant (e.g. Teflon tape) to avoid malfunctions due to leakage or air intake.
Permanent installation
In a permanent installation, the pump can be screwed to a suitable surface.
- Screw the pump tightly to a level surface using suitable screws.
In addition, in the case of a fixed installation, it is recommended to fit a flexible component on the pressure side, such as a flexible pressure equalization hose (see Special accessories), on the pressure side. This has the following advantages:
- Greater flexibility in erection and installation.
- Sound reduction since no vibration is transmitted in to the pipes of the house water system.
- With smaller leaks, the pump switches less often.
Note
In order to simplify the subsequent draining and pressure relief of the system, we recommend the installation of a stop cock between the pump and the pressure line (not included in the scope of delivery). Closing the stop cock prevents water from flowing out of the pressure line when the pump is drained.
Operation
- Plug the mains plug into the socket.
- Switch the device on with the ON/OFF switch.
Note
Pump starts immediately. Wait until the pump sucks in and delivers evenly, then close the stop valves in the pressure line. After reaching the switch-off pressure, the pressure switch switches off the motor. The storage tank is now filled, the domestic water supply is ready for operation. If there is no water supply, the switch-off pressure is not reached and the pressure switch can no longer shut off the device. This heats up the water in the pump head. To prevent damage to the pump due to overheating, the power supply is interrupted by the thermal switch in the event of overheating. After cooling down, the power supply is restored.
Note
The cooling time until the engine restarts can be up to 150 minutes.
We recommend the use of a dry-running protection device (see special accessories) for regular protection against water shortage.
ATTENTION
Risk of injury, the system is pressurised!
When opening a pressurised system, you can be injured by flying parts.
Depressurise the device before opening the connections (for pressure, see chapter Technical data)
Ending operation
- Switch off the device at the ON/OFF switch.
- Unplug the device at the mains plug.
Care and maintenance

Danger of electric shock.
Always switch the device off and disconnect the mains plug before working on the device. The device is maintenance-free.
Pressure relief
- Open and close connected stop valves for pressure relief.
The system is depressurised.
Note
Rinse the pump with clear water after each use when pumping water with additives.
Check the pressure of the air filling in the storage tank
1. Check the pressure of the air filling in the storage tank every six months, if necessary top up to 2.0 bar when the device is switched off/depressurised (unplug the device, open the water tap)
Note
The type plate is located below the cover. Unscrew the cover in an anti-clockwise direction.
(Illustration B)
Transport
Risk of injury
Risk of injury from falling device.
When transporting the device, observe the weight of the device (see chapter Specifications) and secure it accordingly when transporting it in vehicles.
Storage
Failure to observe the weight
Risk of injury and damage
Be aware of the weight of the device during storage.
- Empty the device completely before storage.
- Store the device in a frost-protected place.
Special accessories
You will find the possible special accessories on the last page of these operating instructions.
Troubleshooting guide
Malfunctions often have simple causes that you can remedy yourself using the following overview. When in doubt, or in the case of malfunctions not mentioned here, please contact your authorised Customer Service.
| Fault | Cause | Rectification |
| Pump is running, but not delivering | There is air in the pump. | See chapter Preparation |
| The air cannot escape on the pressure side. | Open the tapping point on the pressure side. | |
| No water available. | Check the water reservoir. | |
| The pump does not start up, or stops suddenly during operation | The power supply is disconnected. | Check the fuses and the electrical connections. |
| Thermal protection switch in the motor has switched off the pump due to overheating of the motor. |
NoteThe cooling time until the motor starts can be up to 150 minutes. | |
| The pump switches itself off and also on again | The thermal protection fuse has switched off the pump to protect it from overheating or switched it on again after it has cooled down. | To prevent recurrence, the system should be checked for leaks and sealed. |
| The motor restarts immediately after switching off | The pressure in the system is lost. | Check the connections including seals and check for water leakage. The slightest leakage affects operation. |
| The air pressure in the storage tank is too low. | Fill the storage tank with 2.0 bar (see chapter Care and maintenance). | |
| The return valve does not close properly. | Check the check valve on the suction side. | |
| The membrane in the pressure tank is defective. | Have the membrane replaced. | |
| The pump capacity drops or is too low | The suction filter or the check valve (special accessory) are contaminated. | Clean the suction filter or the check valve (special accessory). |
| The delivery rate of the pump depends on the delivery head and the connected periphery. | Observe the max. delivery head (see chapter Specifications) Select a different hose diameter or a different hose length if necessary. | |
| Vibrating noise during water removal | The membrane in the pressure tank vibrates. | An operating noise that can be eliminated by reducing the pressure of the air filling in the storage tank. |
Specifications
| BP 3.200 Home | BP 4.900 Home | ||
| Mains voltage | V | 230-240 | 230-240 |
| Power frequency | Hz | 50 | 50 |
| Nominal power | W | 600 | 1150 |
| Device performance data | |||
| Maximum flow rate | l/h | 3200 | 4900 |
| Suction height (max.) | m | 8 | 8 |
| Solids content in water | kg/m 3 | >2,5 | >2,5 |
| Pressure (max.) | MPa (bar) | 3,6 | 5,0 |
| Max. pressure of the air filling in the storage tank | MPa (bar) | 0,18 - 0,2 (1,8 - 2,0) | 0,18 - 0,2 (1,8 - 2,0) |
| Max. permissible inner pressure in the storage tank | MPa (bar) | 0,50 (5,0) | 0,50 (5,0) |
| Delivery height (max.) | m | 28 | 35 |
| Dimensions and weights | |||
| Weight (without accessories) | kg | 10,5 | 13,9 |
Note
Reason for exception according to regulation (EU) 2019/1781 Annex I Section 2 (12): (j)
Subject to technical modifications!
Characteristic curves


Documents / Resources
References
Download manual
Here you can download full pdf version of manual, it may contain additional safety instructions, warranty information, FCC rules, etc.
Download Kärcher BP 3.200 Home, BP 4.900 Home - Booster Pump with Pressure Tank Manual
Advertisement


Need help?
Do you have a question about the BP 3.200 Home and is the answer not in the manual?
Questions and answers