Kärcher BP 1 Barrel - Pump Manual
- Operating instructions manual (40 pages) ,
- Manual (74 pages)
Advertisement
Proper use
This appliance has been designed for use in private households and is not intended for commercial use. The manufacturer is not responsible for any damages that may occur on account of improper use or wrong operations.
The appliance is mainly intended to remove rain water from collection containers.
Approved fluids
- Water with impurities up to a maximum grain size of 1mm
- Water from swimming pool (provided the dosing of additives is proper)
- Washing lye
Operation
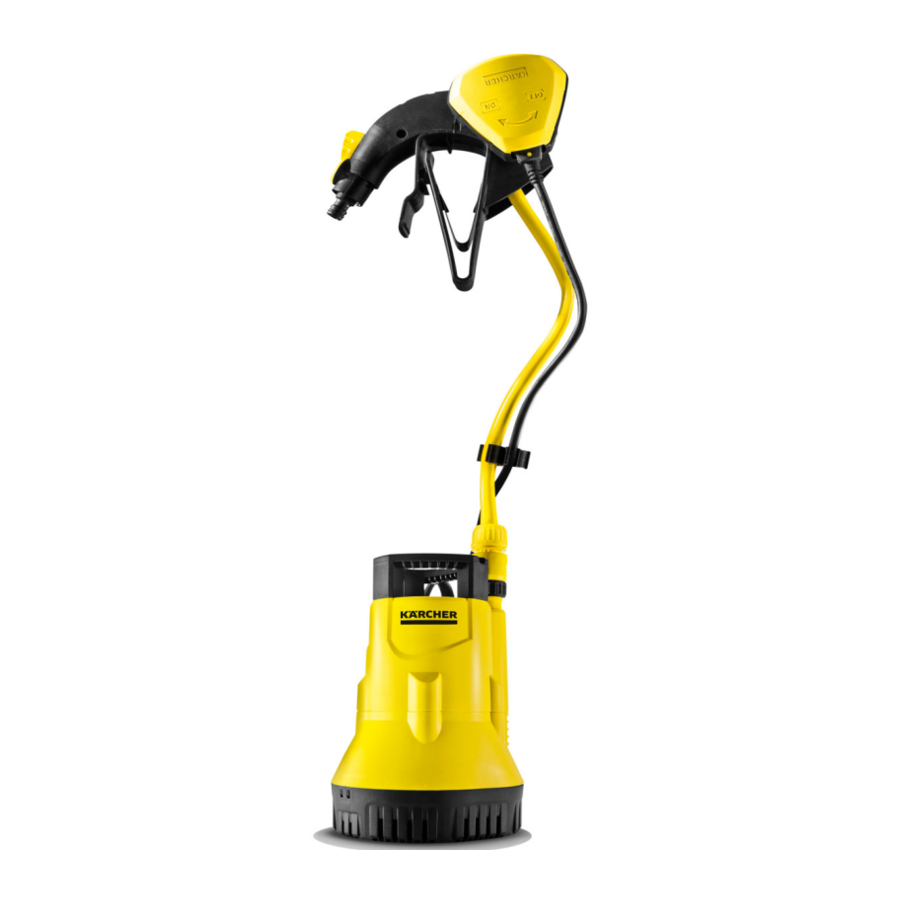
Description of the Appliance

- Power cord with plug
- Drum edge holder
- Locking valve
- O ring
- Housing bowl for level switch
- Housing cover for level switch
- Hose coupling
- Pressure hose
- Hose clamp
- Level sensor
- Level switch attachment
- Carrying handle
- Hose connection G3/4 (24.4 mm) for hose coupling
Before Startup
→Screw the hose connection on to the pump
→ Connect the hose connection to the hose coupling of the drum edge holder.
Operation

Risk of mortal danger on account of electric shock! Do not touch the feed fluid and the rope fastened to the carrying handle during operation.
 NOTICE
The liquid level must at least be 3 cm for the pump to suck in liquids independently.
If the prerequisites for the pump operation are met (water level, position / level switch), the pump will start immediately after the mains plug has been plugged in.
Comfort operation
In order to run the pump independently of the water level, the level switch must be mounted inside the housing.
Illustration ![]()

→Screw the housing bowl and the O-ring onto the drum edge holder.
→Place the level switch into the housing bowl.
→Press the housing cover down onto the housing bowl until it locks.
Illustration 

→Slide the drum edge holder onto the container edge until it is properly seated.
Illustration

→ Place the pump on a stable surface in the liquid to be transported. Immerse it using a rope tied to the handle or hang it into the container by the hose. The suction area should not be blocked fully or partially through the impurities.
Illustration ![]()

→ Close locking tap (arrow horizontal).
→ Insert the mains plug into the socket.
→ Rotate the housing with the level switch in the arrow direction "ON".
→ The pump will turn on.
→ Open the locking tap to remove water (arrow vertical).
Automatic operation
In the automatic mode, the level switch automatically controls the pumping operations. The pump switches on or off when the fluid level reaches the height that has been set.
Ensure that the level sensor is not obstructed in any way.
Illustration ![]()

→ In automatic operation, set the required switching height by clamping the level switch cable into the stopper.
→ Open the locking tap to remove water (arrow vertical).
→ Insert the mains plug into the socket.
Manual operation
In manual operations the pump remains switched on continuously.
Illustration ![]()

→ In manual operations mode, align the level sensor upward (cable pointing downward). Tip: Push the cable of the level sensor like a loop through the handle.
→ Open the locking tap to remove water (arrow vertical).
→ Insert the mains plug into the socket.
NOTICE
Dry running leads to increased wear and tear; do not leave the pump unattended during manual operation. Switch off the pump within 3 minutes of dry running.
Finish operation
NOTICE
Soiling can deposit and lead to malfunctions.
→ Rinse the pump with clean water after use. This especially applies after pumping chlorinated water or other liquids that leave residue.
→ Rotate the housing with the level switch in the arrow direction "OFF". The pump will turn off.
→ Disconnect the main plug from the socket.
Maintenance
→ The pump is maintenance-free.
Transport

In order to prevent accidents or injuries, keep in mind the weight of the appliance during transport (see Specifications).
→ Lift and carry the pump on the carrying handle.
→ If you want to transport the appliance on a vehicle secure it from slipping.
Storage
In order to prevent accidents or injuries, keep in mind the weight of the appliance when selecting a storage location for it (see Specifications).
Storing the Appliance
Illustration ![]()

→Tip the drum edge holder forward and take out toward the top.
→Completely drain the pump and allow it to dry.
→Store the appliance in a frost free area.
Special accessories
| 2.645-193.0/ 2.645-203.0 | Universal hose coupling Plus, for 1/ 2", 5/8" and 3/4" hoses | Recessed grips made of soft plastic ensure easy han dling. Universally useable for all common garden hoses. |
| 2.645-148.0 | Hose PrimoFlex plus, 25 m, 3/4" | Phthalate-free 3/4" garden hose for connecting the pump with the application equipment. |
Troubleshooting
To avoid risks, all repairs and replacement of spare parts may only be carried out by authorized customer service personnel.
First pull out the plug from the mains before carrying out any tasks on the machine.
| Fault | Cause | Remedy |
Pump runs but does not transport | Air in the pump | Plug in/ pull out the mains plug of the pump a few times till the fluid gets sucked |
| Suction area blocked | Pull out the mains plug and clean the suction area | |
| (only in manual mode) Water level below the minimum water level | Immerse the pump deeper into the liquid, if possible. | |
| Pressure hose is blocked | Pull out the mains plug and clean the pressure hose | |
| Locking tap is closed (arrow horizontal). | Open the locking tap (arrow vertical). | |
Pump does not runorPump suddenly comes to a standstill during operations | Power supply interrupted | Check fuses and electrical connections |
| Thermal protection switch in the motor has switched off the pump as it was overheated. | Pull out the mains plug, let the pump cool down, clean the suction area, prevent dry running | |
| Dirt particles have got jammed into the suction area | Pull out the mains plug and clean the suction area | |
| Pump operation stopped by sensor | Check position of level sensor | |
Pumping capacity is reducing | Suction area blocked | Pull out the mains plug and clean the suction area |
Pumping capacity too low | The pumping capacity depends on the flow height, hose diameter and hose length. | Keep max. flow height, see technical data. If necessary, select a different hose diameter or hose length. |
Our Kärcher branch will be pleased to help you further in the case of questions or faults.
Specifications
| BP 1 Barrel | ||
| Voltage | V | 230 - 240 |
| Current type | Hz | 50 |
| Output Pnom | W | 400 |
| Max. flow rate | l/h | 3800 |
| Max. pressure | MPa (bar) | 0.11 (1.1) |
| Max. flow height | m | 11 |
| Max. immersion depth | m | 7 |
| Max. grain size of the dirt particles that can be transported | mm | 1 |
| Weight | kg | 5.6 |
| Sound levels (EN 60704-1) | dB(A) | 44 |
| Mains cable length (EN 60335-2-41) | m | 10 |
Reason for exception according to regulation (EU)
2019/1781 Annex I Section 2 (12): (j)
Subject to technical modifications!

The possible delivery rate is even larger:
- the larger the diameter of the hoses used are.
- the shorter the hoses used are.
- the less loss of pressure is caused by the connected accessories.

Documents / ResourcesDownload manual
Here you can download full pdf version of manual, it may contain additional safety instructions, warranty information, FCC rules, etc.
Advertisement


Need help?
Do you have a question about the BP 1 Barrel and is the answer not in the manual?
Questions and answers