Kärcher BP 2 Cistern - Pump Manual
- Operating instructions manual (44 pages) ,
- Manual (82 pages)
Advertisement
Proper use
This appliance has been designed for use in private households and is not intended for commercial use. The manufacturer is not responsible for any damages that may occur on account of improper use or wrong operations.
The appliance is mainly intended for the delivery of clear water (without dissolved gases) from cisterns, wells or water butts that can be fed into irrigation systems or the service water of a house (lavatory flush, washing machine, etc.).
The appliance is not intended to be operated for recirculation in swimming pools, garden ponds and fountains.

Water that has been delivered with this appliance is no drinking water!
Approved fluids
- Water with a contamination level up to a grain size of 1.5 mm
- Washing lye

Caustic, slightly inflammable and other explosive substances such as petrol, petroleum, diluted nitrogen, greases, oils, salt water and waste water from toilets as well as sludgy water that has a slower flow capacity than water, should not be transported using the pump. The temperature of the transported fluids should not exceed 35°C. The appliance is not suitable for continuous pump operation or as a stationary installations (such as a lifting device, fountain pump).
Danger or hazard levels

Immediate danger that can cause severe injury or even death.
Possible hazardous situation that could lead to severe injury or even death.
Pointer to a possibly dangerous situation, which can lead to minor injuries.
ATTENTION
Pointer to a possibly dangerous situation, which can lead to property damage.
Operation
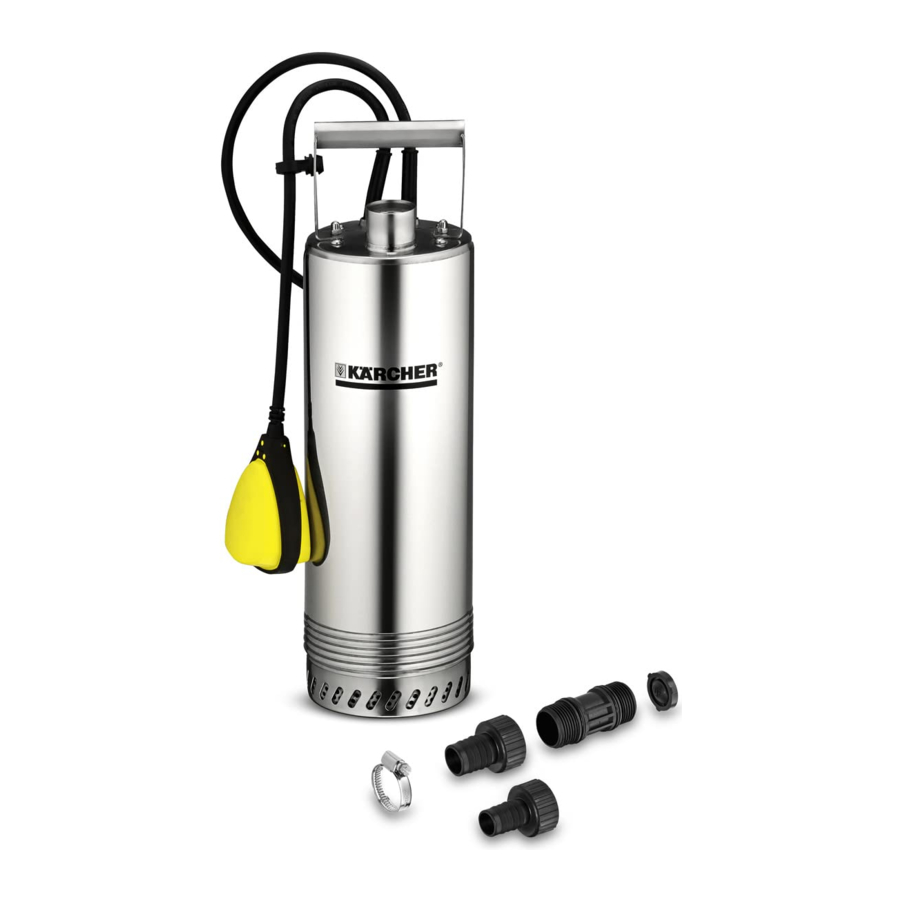
Description of the Appliance

- Check valve (pre-assembled)
- Handle
- Power cord with plug
- Connection G1 (33.3) internal thread
- Intake grille/ pre-filter
- Float switch
- Connection adapter for pumps G1
- Hose connection pieces 1" and 3/4"
- Hose clip
- Holder float switch
Preparing the Appliance
Risk of injury or damage due to toppling appliance. Prior to every operation, place the appliance on a level surface and secure it against rolling away.
Illustration ![]()

Connect garden hose or lifting tube:
→ When using a garden hose, screw the connection adapter into the connection piece.
Additional sealing is not required.
→ Screw a fitting hose connection piece onto the connection adapter.
→ Attach the hose end to the hose connection piece and secure it by means of a hose clamp.
Tighten the hose clamp using a ratchet (approx. 5 Nm).
Illustration 

→ Push the holder for the float switch into the handle bore until it locks in place.
Illustration 

→ Adjust float switch.
The float switch can be adjusted in order to adjust the switch-on and switch-off height. Reducing the distance between the float switch and the holder results in a higher switch-on level and a lower switch-off level.
Leave sufficient space so that the float switch can move freely.
→ Attach fastening rope (not included in the scope of delivery) to the handle.
→ Lower the pump on the fastening rope into the fluid to be delivered.
→ Secure the fastening rope.
Illustration ![]()

The maximum immersion depth (h1) describes the depth of the water in which the pump can still be installed. Usually it is not necessary to lower the pump to the maximum immersion depth.
The delivery height (h2) describes the height difference between the water level and the water outlet at the end of the delivery hose. The maximum delivery height must be observed so that the pump can deliver. This must be observed over the entire pathway of the pump, as the delivery height will increase with the falling water level (due to pumping).
Operation
The fluid level must be at least 5 cm for the pump to draw independently.
→ Insert the mains plug into the socket.
Dry running damages the pump.
→ Do not leave the pump unattended during operation.
→ Alternatively use a dry run protection or an electronic pressure switch with dry run protection (see optional accessories).
Finish operation
→ Disconnect the main plug from the socket.
Cleaning

Risk of electric shock. Turn off the appliance and remove the mains plug prior to performing any care and maintenance work.
 Note:
Note:
Soiling can deposit and lead to malfunctions.
Rinse the pump with clear water at regular intervals.
→ Disconnect the main plug from the socket.
→ Clean the intake grille using a suitable brush and rinse with clear water.
Illustration ![]()

→ Unscrew the connection adapter from the connection piece.
→ Remove the check valve.
→ Screw the connection adapter into the connection piece.
→ Connect the garden hose to the pipe system and the pump adapter.
→ Rinse pump with clear water.
→ Install the non-return valve.
Ensure correct positioning of the check valve. The labelling "Up" must point upwards.
Maintenance
The appliance is maintenance free.
Transport
In order to prevent accidents or injuries, mind the weight of the appliance during transport.
When transporting in vehicles
→Secure the appliance against shifting and tipping over.
Storage
In order to prevent accidents or injuries, mind the weight of the appliance when selecting a storage location.
→ Store the appliance in a horizontal position and secure it against rolling away.
 ATTENTION
If the appliance is not drained completely, it can be destroyed by frost.
→ Fully drain the appliance prior to storing it.
→Store the appliance in a frost free area.
Special accessories

| 2.645-148.0 | Hose PrimoFlex plus 3/4" - 25m | Phtalate-free 3/4" garden hose for connecting the submersible pressure pump with the application equipment. Also available in other lengths and qualities. |
| 6.997-359.0 | Pump connection piece incl. check valve, small | Vacuum-resistant connection of the hoses to the pump. For pumps with G1 (33.3 mm) connection thread and 3/4" and 1" hoses, including union nut, hose clamp, flat packing and check valve. |
| 6.997-473.0 | Connection adapter for pumps G1 | To connect pumps to the interior thread of water connections. |
| 6.997-355.0 | Dry run fuse | If no more water flows through the pump, the dry run fuse will protect the pump from damage and automatically turn it off. With G1" (33.3 mm) threaded connection. |
| 6.997-357.0 | Electronic pressure switch with dry run fuse | Perfect for converting a submersible pressure pump into a domestic water supply system. With water demand, the pump switches on and off automatically. If no water flows through the pump, the dry run protection protects the pump against damage and automatically switches it off. With G1 (33.3 mm) connection thread. |
Troubleshooting
To avoid risks, all repairs and replacement of spare parts may only be carried out by authorized customer service personnel.
First pull out the plug from the mains before carrying out any tasks on the machine.
| Fault | Cause | Remedy |
Pump runs but does not transport | Air in the pump | Plug in/ pull out the mains plug of the pump a few times till the fluid gets sucked |
| Suction area blocked | Pull out the mains plug and clean the suction area | |
| Water level below minimum water level | Immerse the pump deeper into the liquid, if possible. | |
Pump does not runorPump suddenly comes to a standstill during operations | Power supply interrupted | Check fuses and electrical connections |
| Thermal protection switch in the motor has switched off the pump as it was overheated. | Pull out the mains plug, let the pump cool down, clean the suction area, prevent dry running | |
| Dirt particles have got jammed into the suction area | Pull out the mains plug and clean the suction area | |
Pumping capacity is reducing | Suction area blocked | Pull out the mains plug and clean the suction area |
Pumping capacity too low | The pumping capacity depends on the flow height, hose diameter and hose length. | Keep max. flow height, see technical data. If necessary, select a different hose diameter or hose length. |
Our Kärcher branch will be pleased to help you further in the case of questions or faults.
Specifications
| BP 2 | ||
| Voltage | V | 230 |
| Current type | Hz | 50 |
| Output Pnom | W | 800 |
| Max. flow rate | l/h | 5700 |
| Max. pressure | bar | 3,2 |
| Max. flow height | m | 32 |
| Max. immersion depth | m | 7 |
| Max. grain size of the dirt particles that can be transported | mm | 1,5 |
| Max. solid content in the water | kg/m3 | 1,0 |
Reason for exception according to regulation (EU)
2019/1781 Annex I Section 2 (12): (j)
Subject to technical modifications!

Die possible feed volume is even larger:
- the lower the flow heights
- the larger the diameter of the hoses used,
- the shorter the hoses used are
- the lower the pressure loss caused by the connected accessories

Documents / ResourcesDownload manual
Here you can download full pdf version of manual, it may contain additional safety instructions, warranty information, FCC rules, etc.
Advertisement


Need help?
Do you have a question about the BP 2 Cistern and is the answer not in the manual?
Questions and answers