Dräger Alcotest 6510 Instructions For Use Manual
Breath alcohol monitor
Hide thumbs
Also See for Alcotest 6510:
- Instructions for use manual (28 pages) ,
- Instructions for use manual (52 pages) ,
- Instructions for use manual (20 pages)

Related Manuals for Dräger Alcotest 6510


Summary of Contents for Dräger Alcotest 6510
- Page 1 ® Alcotest 6510 Atemalkohol-Messgerät Breath Alcohol Monitor Gebrauchsanweisung Instructions for Use...
-
Page 2: Table Of Contents
Inhalt Contents Zu Ihrer Sicherheit ........4 For your safety . - Page 3 Menü ........... . 22 Menu .
-
Page 4: Zu Ihrer Sicherheit
Zu Ihrer Sicherheit For your safety Gebrauchsanweisung beachten Strictly follow the instructions for use Jede Handhabung an dem Gerät setzt die genaue Kenntnis und Any use of the instrument requires full understanding and strict Beachtung dieser Gebrauchsanweisung voraus. observation of these instructions. Das Gerät ist nur für die beschriebene Verwendung bestimmt. -
Page 5: Verwendungszweck
6510 is supplied with standard calibration by the manufacturer. If the calibration date exceeds the period of 6 months: recalibrate instrument or have it Alcotest 6510 calibrated by DrägerService. The date of the last calibration can be found in the quick menu (page 24). -
Page 6: Was Ist Was
What‘s what? Case ® 1 Alcotest 6510 monitor 2 Mouthpieces, 3 pieces 3 Batteries, 2 pieces 4 Hand strap 5 Transport case 6 Brief instructions for use... -
Page 7: Messgerät
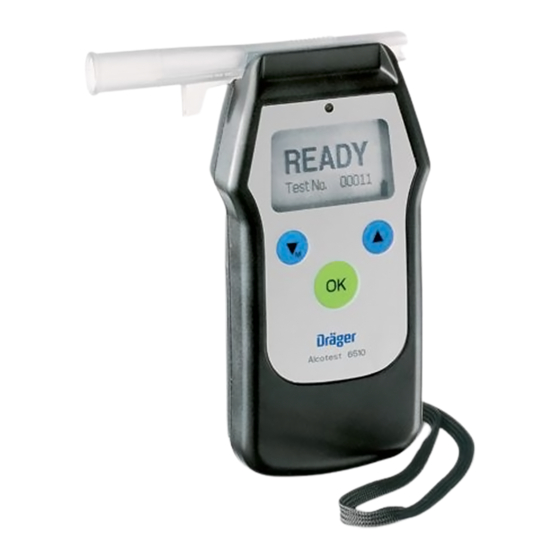
1 Anzeige 1 Display 2 Menütaste "AUF" 2 Menu button "UP" 3 Taste "OK" 3 "OK" button 4 Menütaste "AB/MENÜ" 4 Menu button "DOWN/MENU" 5 Buchse 5 Socket 6 Lampe rot/grün 6 Lamp red/green Alcotest 6510 7 Mundstückaufnahme 7 Mouthpiece receptacle... -
Page 8: Vorbereitung
Preparation Inserting the batteries Upon initial operation or if the battery symbol on the display indicates "empty". Gently press onto the lock of the battery compartment and remove cover. Observe correct polarity when inserting the batteries! Close battery cover. - Page 9 Batteries to be used 2 each 1.5 V Type Alkaline (Mignon, LR6, AA) rechargeable battery 2*1.2 V NiMH Note: Charging batteries while in the instru- ment will cause damage to the instru- ment.
-
Page 10: Kurzbetriebsanweisung Aufkleben
Attaching the brief instructions for use An area for the "brief instructions for use" sticker is provided on the back of the instru- ment. — The instrument is delivered with the brief instructions in English, German, French and Spanish language. —... -
Page 11: Gerätesymbole Und Anzeigen
Symbols and readings The measured breath alcohol value is given in mg/L for the basic set- ® ting of the Alcotest 6510. The instrument can be switched over to all usual measuring units (page 30). Symbols In these instructions for use several symbols are used corresponding to the messages indicated on the display: Battery symbol Indicates the battery charging status:... - Page 12 Buttons "OK"-button Confirms entries or selected functions. Button to switch instrument on and off. "DOWN" and "UP" Setting of values and selection of menu functions.
-
Page 13: Mundstück Aufsetzen
With the grooved markings facing up, press the mouthpiece into mouthpiece receptacle until audible sound confirms correct engaging. Remove packaging completely and com- mence breath test. Mouthpiece can be used with orientation to right or left side. Alcotest 6510... -
Page 14: Ein- Und Ausschalten
Switching on and off Switch on Keep - button pressed for approx. 1 second until startwindow is displayed. Alcotest 6510 Switch off Keep - button pressed. The instrument switches off after 2 seconds. Alcotest 6510 shut-down in 2 sec. Automatic switch off The instrument switches off automatically 4 minutes after the last use. -
Page 15: Messung Durchführen
Messung durchführen Performing the Measurement Voraussetzungen Conditions — Für jede Testperson ist ein neues Mundstück einzusetzen. — A new mouthpiece is to be used for every person tested. — Keine hohen Alkoholkonzentrationen auf den Sensor geben, z.B. — Do not apply too high alcohol concentrations on to sensor, e.g. by durch Spülen des Mundes mit hochprozentigen Alkoholika kurz rinsing the mouth with high-grade alcohols shortly before the mea- vor der Messung. -
Page 16: Automatische Messung
The sampling is activated automatically after the minimum breathing volume and the minimum blowing period are reached. Preparation Insert new mouthpiece in the holder (page 13). Alcotest 6510 Switch instrument on (page 14). After 2 seconds: — the user info screen (if activated, page 29) WAIT "WAIT"... - Page 17 Performing the measurement Ask the test subject to blow evenly into the mouthpiece without interruption. A sufficient flow is indicated by a continous tone and a green light. While the sample is taken the display shows: "Blow" Blow When the sampling was successful the green light will cease and the continous tone will stop.
-
Page 18: Fehler Bei Der Abgabe Der Atemprobe
Error in delivering the breath sample If the sampling volume is too low the display shows: "Insufficient Volume" Insufficient The horn sounds briefly and a red light Volume flashes. To repeat press the - button. The instrument is ready for measurement after 4 seconds. -
Page 19: Mundstück Entfernen
Removing the mouthpiece Push the mouthpiece out of the mouthpie- ce holder. Dispose of the mouthpiece in accordan- ce with local regulations. Alcotest 6510... -
Page 20: Zusätzliche Möglichkeiten Der Probenahme
Additional possibility for sampling The functions can be switched on or off in combination also in the main menu (page 25). Passive sampling During the passive sampling the sampling system is manually activa- ted by the user of the instrument. Possible applications for this function are testing of the ambient air or the exhaled air for alcohol concentrations of persons not able to cooperate (e.g. -
Page 21: Manuelle Probenahme
Manual sampling The sampling can also be activated manually, if the person to be tested is not able to provide the required minimum volume. Preparation as for the automatic measurement (page 16). If "Blow" is indicated on the display after exhaling has started, briefly press the - button shortly. -
Page 22: Menü
Menu Activation Switch instrument on. When "WAIT" or "READY" appears on the display the menu functions can be called up. For quick menu press button shortly. For main menu keep button pressed for at least 3 seconds. Operation — Select functions using buttons. -
Page 23: Symbole In Der Anzeige
Symbols on the display Menu Return to next higher menu level Menu item with sub-menu Open menu item Selected function Further items below the visible items Further items above the visible items Function Activated item Actual screen (1) of all screens (6) -
Page 24: Kurzmenü
Quick menu Last 10 tests Back to measurement Last 10 tests Selection of the tests with Last cal. date Back with - button. Set language Set contrast Last cal. date Display of last calibration date. Back with - button. Select language English, German, French, Spanish, user defined language to be load in the instrument. -
Page 25: Hauptmenü
Main menu The main menu consists of three sub-menus Back to measurement Information Settings Calibration — Information — Settings — Calibration Access to the main menu is protected by a PIN. Entering the PIN The display shows: Back to measurement "Enter PIN". - Page 26 In case of a wrong PIN the display shows "Wrong PIN" together with the entered PIN. Press - button and enter new PIN. Back to measurement Wrong PIN 2 2 2 2 Enter PIN...
-
Page 27: Information
Information The menu item "Information" includes the Information Last 10 tests following items: Last cal. date Configuration Test number — Last 10 tests Software version — Last cal. date — Configuration — Test number — Software version Last 10 Tests, Last cal. date see quick menu (page 24). - Page 28 Additional sample Activated additional functions such as manual or passive sampling. Volume Minimum exhalation volume in liters. Time Minimum blowing time in seconds. Test number Display of the of the next test. Software version Display of the part number and the software version.
-
Page 29: Einstellungen
Settings The menu item "Settings" includes the follo- Settings Instrument wing items: Measurement — Instrument — Measurement Instrument Instrument Set language Display test number Select language, set contrast Set contrast Change PIN see quick menu (page 24). User info. screen Testnummer Activate or deactivate the display of th testnummer. - Page 30 Measurement Setting of parameters and limit values for the Measurement Display mode measurement. Measurement unit Result resolution Sample mode BAC limits Blow criteria Display mode Measurement unit Result resolution Sample mode BAC limits Blow criteria Display mode Display mode Back to menu Selection of the result presentation: Result a) numerical = corresponding to the...
- Page 31 Sample mode Auto sample Sample Mode Auto sample Selection of the mode of time for sam- Additional pling: a) definite volume Sampling is complete when minimum volume is reached. b) End of breathing sampling is complete at the end of exhalation. Additional sample Additional Back to menu...
- Page 32 Grenze/Beispiel < 0,10 mg/L < 0,24 mg/L < 0,48 mg/L Limit/Example Pass Fehler/Fail Hoch/High Anzeigemodus Pass Alarm/Alert Fehler/Fail Hoch/High Displaymode ZPWF Zero Pass Warn Fehler/Fail Hoch/High Alkoholkonzentration Alcohol concentration Example for factory’s setting. Factory settings — Pass: < 0,10 mg/L —...
-
Page 33: Kalibrierung
Calibration Last cal. date Calibration Last cal. date In the sub-menu item "Last cal. date" the Options calibration date last entered can be Calibrate Accuracy check viewed, see quick menu (page 24). Set last cal. date Options Setting of the follwing items with the and the - button. - Page 34 Calibration After pressing the -button the display Calibrate Back to menu shows the "Setpoint" and the "Gas type". Setpoint: x.xxx mg/L Gas type: Simulator Next After pressing the -button the instru- ment will be ready for calibration. When "Supply gas" is shown supply respective gas. A minimum flow rate of 3 L/min to obtain "Gas flow OK"...
- Page 35 Accuracy check Enter the "Accuracy check" item by Accuracy check Back to menu using the -button. The display shows Check Gas: the calibration gas to be used. x.xxx mg/L Gas type: Simulator Next Follow the sampling procedure descri- bed for calibration. After successful accuracy check the result is Accuracy check Back to menu...
-
Page 36: Fehler
Error In case of internal error, the following error message is displayed. Internal System ERROR If the failure still occurs after the instrument is switched on and off several times, contact DrägerService. -
Page 37: Instandhaltung
Instandhaltung Maintenance Instandhaltungsintervalle Maintenance intervals Bei Bedarf: If necessary: Batterien auswechseln, siehe Seite 38. Changing batteries, page 38. Halbjährlich: Every six months: Kalibrierung überprüfen, siehe Seite 40. Check calibration, page 40. Lagerung Storage ® ® Das Alcotest 6510 verbraucht auch im ausgeschalteten Zustand The Alcotest 6510 consumes a small amount of current even etwas Strom. -
Page 38: Reinigen
Cleaning Do not submerge in liquid – liquid must not enter the sockets! To clean: wipe with a disposable tissue. do not use cleaning agents containing al- cohol or solvents. Changing batteries If the battery symbol on the display indicates "empty"... - Page 39 — For continuity of use it is recommended always to have replacement batteries or an additional battery supply available. Caution: Used batteries — Do not expose to fire, — Do not recharge, — Do not force open. Danger of an explosion! Only dispose of as special waste, in accordance with local waste disposal regu-...
-
Page 40: Kalibrierung
Kalibrierung Calibration — nur durch befugte Personen — only by authorized personnel — empfohlene Kalibrierung alle 6 Monate — calibration recommended every 6 months — unter dem Menüpunkt "Letztes Kal. Datum" kann das letzte einge- — in sub-menu item "Last cal. date" the calibration date last entered gebene Kalibrierdatum eingesehen werden. - Page 41 Durchführung Procedure Durchführung der Kalibrierung wie im Menü auf Seite 33 Procedure as calibration described in the menu on the page 33. beschrieben. After successful calibration an "Accuracy check" for testing the in- Nach erfolgreicher Kalibrierung ist ein Kalibrier Test über den strument must be performed.
-
Page 42: Gerät Entsorgen
Disposal of the instrument — at the end of its service life. Dispose of the instrument in accordance with national waste disposal regulations Ask a suitable disposal contractor to dis- pose of the instrument. The local environmental agency can sup- ply further details. -
Page 43: Störung, Ursache, Abhilfe
Fault, Cause, Remedy Fault Cause Remedy Instrument switches off automatically. batteries discharged. replace batteries, page 38. Instrument has been left ready for measure- ment for more than 4 minutes. Instrument leaves menu-mode automatically Instrument has an automatically switch off of Reselect menu item. -
Page 44: Technical Data
Technical data Measuring principle Electrochemical sensor Measurement range Breath alcohol concentra- 0.00 bis 2.5 mg/L tion 0 bis 2500 µg/L 0.000 bis 0.500 g/210L 0 to 250 µg/100mL 0 to 250 µg% (Ethanol-Mass per breath volume at C and1013 hPa.) Blood alcohol 0.00 to 5.00 ‰... -
Page 45: Technische Daten
Display range Display range is identical to measuring range. If the result is exceeding the measuring range the display will show three arrows "↑ ↑ ↑ ↑ ↑ ↑ ↑ ↑ ↑ ↑ ↑ ↑ " as overflow indication. Ambient conditions For operation –5 to 50 C (23 to 122... - Page 46 Sensitivity drift typically 0.6 % of meas. value/month Intervals before readiness for operation 1st measurement about 6 s after terminating a result of a previous test in range: (breath alcohol unit) 0.25 mg/L 120 s 0.50 mg/L 140 s 1.00 mg/L 180 s >...
- Page 47 Calibration Calibration interval depends on required accuracy, typically: 6 month Permissible calibration range for unit of measuring value: mg/L 0.160 to 0.750 mg/L µg/L 160 to 750 µg/L g/210L 0.035 to 0.150 g/210L µg/100 mL 16 to 75 µg/100 mL µg% 16 to 75 µg% ‰...
- Page 48 Dimensions 140 mm x 80 mm x 35 mm (W x H x D) Weight approx. 195 g Electrical supply Batteries 2 x 1.5 V Type Alkaline (Mignon, LR6, AA) approx. 1500 measurements CE-marking electromagnetic compatibility (Directive 89/336/EEC)
-
Page 49: Order List
Order list Name and Description Part no. ® Alcotest 6510 83 17 900 (instrument, 3 mouthpieces, 2 batteries, hand strap and case) Accessories Mouth-pieces hygienically tested 100 pieces 68 10 690 250 pieces 68 10 825 1000 pieces 68 10 830 Alkaline battery (1 piece) 13 35 804 Rechargable battery NiMH (1 piece) - Page 51 Dräger Safety AG & Co. KGaA Dräger Safety AG & Co. KGaA Revalstraße 1 Revalstraße 1 D-23560 Lübeck D-23560 Lübeck Tel. (0451) 8 82- 0 Germany (0451) 8 82- 20 80 Tel. +49 451 8 82- 0 www.draeger-safety.de +49 451 8 82- 20 80 www.draeger-safety.com 90 23 757 - GA 4754.500 de/en 90 23 757 - GA 4754.500 de/en...
Need help?
Do you have a question about the Alcotest 6510 and is the answer not in the manual?
Questions and answers