Table of Contents
Advertisement
Quick Links
JetNet 7020G/JetNet 5620G-4C
Quick Installation Guide V1.0
Copyright
Copyright © 2014 all rights reserved. No part of this publication
may be reproduced, adapted, stored in a retrieval system,
translated into any language, or transmitted in any form or by
any means without the written permission of the supplier.
About the Quick Installation Guide
This Quick Installation Guide is intended to guide professional
installer to install and configure the JetNet 7020G/JetNet 5620G-
4C. It covers procedures to assist you in avoiding unforeseen
problems.
Introduction
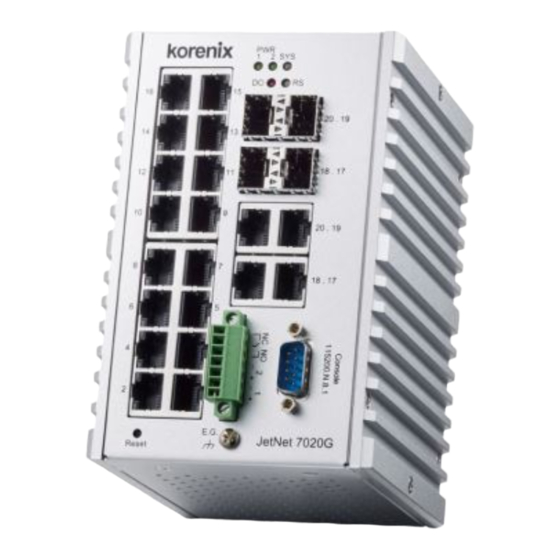
JetNet 7020G/JetNet 5620G-4C is a switch with 16 ports Gigabit
Ethernet RJ-45, 4 ports Gigabit Ethernet with 4 ports SFP sockets
combo design.
The JetNet 7020G/ JetNet 5620G-4C are designed with multi-
purpose concept, it features particular power system design to
bear the hashed operating environment, such as -40~75°C
temperature, 10~60V dirty power source, and serious
electromagnetic interfere, to satisfy the inquire of railway
communication, road traffic control or power substation for
smart grid applications.
Package Check List
JetNet 7020G or JetNet 5620G-4C*1
Quick Installation Guide*1
Dimension
98*147*125mm
Installation
Interface Introduction
JetNet 7020G/JetNet 5620G-4C supports 16 ports Gigabit Ethernet RJ-45,
and 4 ports GbE/SFP combo.
Mounting the DIN Rail
The DIN Rail clip on the rear side of JetNet 7020G/
JetNet 5620G-4C.
Wiring the Power Inputs & Earth Grounding
1.
Insert the positive and negative wires into the V+
and V- contact on the terminal block connector.
2.
Connect the Chassis Grounding to Earth Ground
system to obtain electromagnetic immunity to
resist lighting, electro static discharge and
electric fast transient.
3.
Tighten the wire-clamp screws to prevent the
power wires from being loosened.
Wiring the Relay Output
The relay output contacts are in the front side. The relay output is
controlled by the pre-defined operating rules.
To activate relay output function, please refer to the User's Manual
for more relay output management information.
Device Management
JetNet 7020G/ JetNet 5620G-4C Managed Ethernet Switch via the RS-
232 console with the attached console cable. Or you can remotely
manage the switch via network. You can choose Telnet/SSH,
Web/HTTPS management.
Preparation for console management
Attach the RS-232 DB9 connector to your PC's COM port. Connect the
RJ-45 connector to the console port of the JetNet Switch.
Go to Start ► Program ► Accessories ► Communication ► Hyper
1.
Terminal
2.
Give a name to the new console connection.
3.
Choose the COM name and select the correct serial
settings. The serial port settings are as below: Baud
Rate:115200/Parity: None/Data Bit: 8/Stop Bit: 1
4.
After connected, you will see the Switch login request.
Type the username and password and then you can login.
The default username is "admin", password is "admin".
5.
Follow the manual to configure the software features.
Preparation for Web management
Before you attempt to use the embedded web interface to
manage switch operation, verify that your JetNet 7020G/
JetNet 5620G-4C are properly installed on your network and
that every PC on this network can access the switch via the web
browser.
1.
Launch the web browser on the PC.
2.
Type http://JetNet Managed Switch_IP_Address (default
IP address is 192.168.10.1.) then press Enter.
3.
The login screen will appear next. Type in the user name
and password and click "OK" button. The default user
name and password is admin/admin.
4.
At the left column of the web management interface are
the software features, where ring column will list the
available settings.
Support
5 Years Warranty
Each of Korenix's product line is designed, produced, and tested with
high industrial standard. Korenix warrants that the Product(s) shall be
free from defects in materials and workmanship for a period of five (5)
years from the date of delivery provided that the Product was properly
installed and used.
This is warranty is voided if defects, malfunctions or failures of the
warranted Product are caused by damage resulting from force measure
(such as floods, fire, etc.), other external forces such as power
disturbances, over spec power input, or incorrect cabling; or the
warranted product is misused, abused, or operated, altered and
repaired in an unauthorized or improper way.
Attention! To avoid system damage caused by sparks, please DO NOT
plug in power connector when power is on.
The product is in compliance with Directive 2002/95/EC and 2011/65/EU
of the European Parliament and of the Council of 27 January 2003 on the
restriction of the use of certain hazardous substances in electrical and
electronics equipment (RoHS Directives & RoHS 2.0)
Korenix Customer Service
KoreCARE is Korenix Technology's global service center, where our
professional staff are ready to solve your problems at any time Korenix
global service center's e-mail is KoreCARE@korenix.com.
For more information and documents download please visit our website:
http://www.korenix.com/downloads.htm
Advertisement
Table of Contents

Related Manuals for Korenix JetNet 7020G


Summary of Contents for Korenix JetNet 7020G
- Page 1 Preparation for Web management The DIN Rail clip on the rear side of JetNet 7020G/ translated into any language, or transmitted in any form or by Before you attempt to use the embedded web interface to any means without the written permission of the supplier.
- Page 2 JetNet 7020G /JetNet 5620G-4C 支持16端口千兆以太网RJ-45 译成任何语言,或以任何形式或方式传播。 和4端口GbE / SFP组合。 在PC上启动Web浏览器。 关于快速安装指南 输入http:// JetNet Managed Switch_IP_Address(默 安装DIN导轨 本“快速安装指南”旨在指导专业安装人员安装和配置 认IP地址为192.168.10.1。),然后按Enter键。 JetNet 7020G /JetNet 5620G-4C背面的DIN导轨夹。 JetNet 7020G /JetNet 5620G-4C 。 它涵盖了帮助您避免意 登录屏幕将出现在下一个。 输入用户名和密码,然后单击 外问题的程序。 “确定”按钮。 默认的用户名和密码是admin / admin。 连接电源输入和接地 常规 Web管理界面的左栏是软件功能,其中环列将列出可用的 将正极和负极导线插入接线盒连接 设置。 器上的V +和V-接点。...
Need help?
Do you have a question about the JetNet 7020G and is the answer not in the manual?
Questions and answers