
Subscribe to Our Youtube Channel
Related Manuals for Hioki LR8101


Summary of Contents for Hioki LR8101
- Page 1 LR8101 LR8102 Startup Guide DATA LOGGER Dec. 2023 Edition 1 [600659680] LR8102A965-00 HIOKI LR8102A965-00...
- Page 2 HIOKI LR8102A965-00...
-
Page 3: Table Of Contents
.....43 Overview Specifications of Modules ....46 M7100 Voltage/Temp Module ....46 Product Overview .........13 ....46 M7102 Voltage/Temp Module Common features to LR8101 and LR8102 ............13 Maintenance and ...13 Features applicable to LR8102 only Service Part Names and Functions ....14 ....14 LR8101/LR8102 Data Logger... - Page 4 Contents HIOKI LR8102A965-00...
-
Page 5: Introduction
Introduction Introduction Thank you for choosing the Hioki LR8101/R8102 Data Logger. To ensure that you get the most out of this instrument over the long term, please read this manual carefully and keep it available for future reference. The LR8102 Data Logger is a model based on the LR8101 with additional functions. See “1.1 Product Overview”... -
Page 6: Checking Package Contents
• Instruction Manual • Logger Utility • Logger Utility Instruction Manual • CAN Editor • CAN Editor Instruction Manual • Communications Command Instruction Manual • GENNECT One * 1. The latest edition can be downloaded from Hioki’s website. HIOKI LR8102A965-00... -
Page 7: Optional Equipment (Sold Separately)
The optional equipment listed below is available for the instrument. To purchase optional equipment, please contact your authorized Hioki distributor or reseller. Optional equipment is subject to change with no advance notice. Check Hioki’s website for the latest information. M7100... -
Page 8: Symbols And Abbreviations
Indicates that the product complies with standards imposed by EU directives. Indicates that the product is subject to the Directive on Waste Electrical and Electronic Equipment (WEEE) in EU member nations. Dispose of the product in accordance with local regulations. HIOKI LR8102A965-00... -
Page 9: Safety Information
Do not use a measuring instrument without a measurement category „ rating for measurements on mains. Otherwise, the user will suffer from a serious bodily injury or the instrument and the mains installation will be damaged. HIOKI LR8102A965-00... -
Page 10: Precautions For Use
„ Use of the instrument while it is malfunctioning will result in serious bodily injury. If you find any damage, contact your authorized Hioki distributor or reseller. For inspections, see “2.1 Inspecting the Instrument Before Use” (p. 19). Installing the instrument... - Page 11 Doing so will result in bodily injury or damage to the instrument. These rated voltages differ according to the measurement module model. You can fined them on “4 Specifications” (p. 43). Module 10 LR8101 Module 10 LR8101 M7100 LR8102...
- Page 12 Attach the connector covers when a measuring module is not „ connected. Failure to do so could cause the user to experience an electric shock or damage to the instrument and measurement modules. HIOKI LR8102A965-00...
-
Page 13: Overview
1.1 Product Overview This instrument, a multichannel data logger that can be combined with individual measuring modules, is used for recording physical readings, including temperatures and voltages. Common features to LR8101 and LR8102 Choice of modules according to applications Feature... -
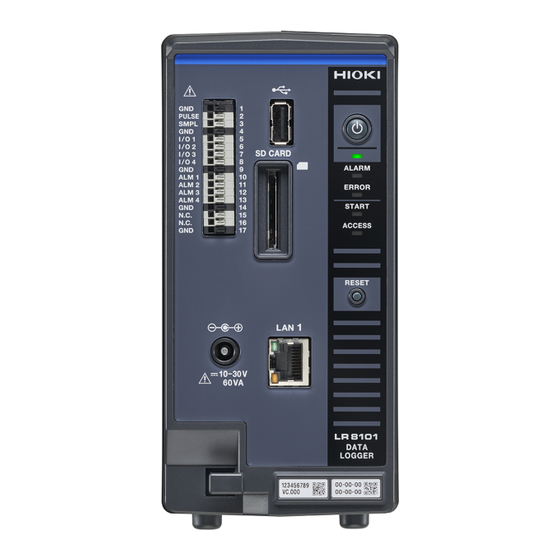
Page 14: Part Names And Functions
Part Names and Functions 1.2 Part Names and Functions LR8101/LR8102 Data Logger Front Rear LR8101 LR8102 LR8101, LR8102 Name Function USB connector Used to an optional USB Drive. External control Used to control the instrument with external signals. Alarm signals can be terminals output from this terminal. - Page 15 START The instrument is making a measurement. ACCESS The instrument is accessing the SD Memory Card or USB Drive. ACT* The instrument is outputting CAN signals. TERM* The CAN terminator resistor has been turned on. *1. LR8102 only HIOKI LR8102A965-00...
- Page 16 Part Names and Functions Right side Left side LR8101/LR8102 LR8101/LR8102 Name Function LED description Describes what the LEDs on the front of the instrument indicate. Used to ventilate the instrument to prevent the inside temperature from Vents rising excessively. Warning Provides the important information of the instrument.
-
Page 17: Optional Equipment
Do not remove this sticker because the number is important. Connecting Used to connect the measurement modules. After connecting the modules, fix the plate plates using screws. HIOKI LR8102A965-00... - Page 18 Optional Equipment HIOKI LR8102A965-00...
-
Page 19: Connection (Preparing For Measurements)
Using a damaged measurement cable or a damaged instrument will result in serious bodily injury. If you find any damage, replace them with those specified by Hioki. Inspect the instrument before turning it on to make sure no damage has occurred during storage or shipping. -
Page 20: Connecting Measurement Modules
Turn the instrument off and remove the measurement cables before „ connecting/removing measurement modules. Failure to do so could cause the user to experience an electric or damage to the instrument and the measurement modules. You will need: Phillips screwdriver (No. 2) HIOKI LR8102A965-00... - Page 21 Connecting Measurement Modules Turn the instrument off and remove the AC Adapter. Remove the cover. Connect the measurement module to the connectors of the instrument. Tighten the four captive screws to 0.6 N•m. Reattach the covers removed in step HIOKI LR8102A965-00...
-
Page 22: Connecting The Ac Adapter
Connect the plug of the power cord to the outlet. A DC power supply (10 V to 30 V DC) can also be used as an external power supply. See “2.4 Connecting an External Power Supply” in the Instruction Manual. HIOKI LR8102A965-00... -
Page 23: Connecting Cables
Follow the procedure below before connecting cables to the input „ terminals: 1. Turn the instrument and the equipment off to be connected. 2. Discharge static electricity from your body. Failure to do so could cause the user to experience an electric shock or damage the instrument. HIOKI LR8102A965-00... - Page 24 Do not connect or disconnect the connector while the instrument has „ been turned on. Doing so could damage the instrument. Do not bend or pull the Optical Connection Cable. „ Doing so could break the cable or damage the insulation, causing the instrument to malfunction. HIOKI LR8102A965-00...
-
Page 25: Sd Memory Card And Usb Drive
Do not modify, disassemble, or repair the SD Memory Card or USB „ Drive. Doing so could cause bodily injury or fire. Keep these products out of reach of children. „ Failure to do so could cause children to swallow an SD Memory Card or USB Drive accidentally. HIOKI LR8102A965-00... -
Page 26: Turning The Instrument On And Off
Press the power key. The four LEDs below the power LED flash for 5 s. Press the power key again while the LEDs are flashing to turn the instrument off. The power LED is turned off. Power LED HIOKI LR8102A965-00... -
Page 27: Configuring Lan Settings And Connecting The Instrument To Lan
(Setting is not required when the DHCP server is used because the address is obtained from the server.) DNS: used/not used IP address (when used): ___.___.___.___ (Setting is not required when the DHCP server is used because the address is obtained from the server.) HIOKI LR8102A965-00... - Page 28 IP address of the communication partner can be looked up from the name by querying it to the server. If the DHCP server is enabled, the setting will be obtained from the server. HIOKI LR8102A965-00...
-
Page 29: Network Settings On A Pc
Area Connection] [Ethernet] ), and [Properties] then select [Internet Protocol Version 4 (TCP/ Select IPv4)] [Properties] , and then click Enter the IP address and subnet mask in the [IP address] [Subnet mask] boxes, [OK] respectively, then click HIOKI LR8102A965-00... -
Page 30: Connecting The Instrument And A Pc Via Lan
The LINK LED lights up when the instrument is properly connected to the network and available. If the LED does not light up, the instrument or connected devices may have a problem or the LAN cable may have a break. HIOKI LR8102A965-00... - Page 31 You will need: 9642 LAN Cable (two), hub Connect the 9642 LAN Cable to the LAN 1 or LAN 2 port of the instrument. Connect the 9642 LAN Cable to a LAN port of the hub. 9642 LAN Cable To hub 9642 LAN Cable HIOKI LR8102A965-00...
-
Page 32: Default Connection Settings For Lan 1
Setting :SYSTem:COMMunicate:LAN:IPADdress ip1,ip2,ip3,ip4 Syntax Command :SYSTem:COMMunicate:LAN:IPADdress 192,168,1,100 Example :SYSTem:COMMunicate:LAN:UPDate Query :SYSTem:COMMunicate:LAN:IPADdress? Syntax Query ip1<NR1>,ip2<NR1>,ip3<NR1>,ip4<NR1> Response :SYSTem:COMMunicate:LAN:IPADdress? Example :SYSTem:COMMunicate:LAN:IPADdress 192,168,1,100 (Response) Parameter 0 to 255 0 to 255 0 to 255 0 to 255 HIOKI LR8102A965-00... - Page 33 • If the PC is used only to set the IP address of the instrument, replace the PC. • Change the IP address of the PC as well if it becomes necessary as a result of setting the IP address of the instrument. HIOKI LR8102A965-00...
- Page 34 The settings screen is displayed. [LAN] Select the check box. [Search] Click Select the target instrument. [Details] Click [Detail Information] dialog box is displayed. [Send] Configure the network settings and click Change the IP address of the PC. (as needed) HIOKI LR8102A965-00...
-
Page 35: Settings And Operations
Connect the instrument and a PC with a LAN cable to control the instrument using communication commands. See “2.7 Configuring LAN Settings and Connecting the Instrument to LAN” (p. 27). For the list of communications commands, see the “Communication Command Instruction Manual” on the provided DVD. HIOKI LR8102A965-00... - Page 36 • Send the command to stop the measurement. 7. Acquiring waveform data See “4 Acquiring Measurement Data” in the Instruction Manual. See “Comparison of real-time data acquisition” (p. 37). Select an appropriate data acquisition method according to the application. HIOKI LR8102A965-00...
- Page 37 DVD. Manual, contained program • The latest version available on the included contained on from Hioki’s website* DVD, describes the the included sample program. DVD. • Sequence Maker* *1. XCP on ETHERNET can operate on LAN 1; however, the operation conditions may be limited depending on the usage environment.
-
Page 38: Saving And Loading Data
The instrument can load setting data saved on storage devices (SD Memory Card or USB Drive). See “6.4 Loading Data” in the Instruction Manual. The instrument can load the following files: setting conditions saved with LR8101 or LR8102 and CAN setting files (CES) saved with the PC application (CAN Editor). -
Page 39: Resetting The Instrument
The instrument settings are restored to the factory settings at the start-up of the instrument. RESET Hold down the key until the four LEDs below the power LED flash and the buzzer sounds at the start-up of the instrument. HIOKI LR8102A965-00... -
Page 40: Using Logger Utility
• Measured data in binary format can be converted into that in CSV format. • Waveform data can be transferred in real-time to an Excel file on a PC. • Up to five loggers, including not only the LR8101/LR8102 but also those you already have, with 600 channels in total are operable. -
Page 41: Remotely Operating The Instrument Through The Http Server
Allows you to control and set the instrument from a web browser. Only one instrument can be connected at the same time. Browsing Mode Allows you to only view screens and states from a web browser. Up to four units can be connected at the same time. HIOKI LR8102A965-00... -
Page 42: Configuring Lan Settings
Select the type of LAN you want to change. Enter the LAN settings in each box. [LAN Settings] Click After the LAN 1 settings have been changed, the HTTP server is disconnected. Wait for a while, and then reconnect to the server. HIOKI LR8102A965-00... -
Page 43: Specifications
When Z1016 AC Adapter or a 12 V DC external power supply is used: 15 W, consumption (instrument only) Maximum rated power When Z1016 AC Adapter is used: 100 VA (including AC adapter) When a 30 V DC external power supply is used: 60 VA (instrument only) HIOKI LR8102A965-00... - Page 44 Open-drain output (with 5 V voltage output) Output voltage High level: 4.0 V to 5.0 V, low level: 0 V to 0.5 V Switchable between high level and low level Maximum making/breaking 5 V to 30 V DC, 200 mA capacity HIOKI LR8102A965-00...
- Page 45 Operates at a rising edge or falling edge. (depending on the edge setting) Output specifications of the external output terminal (I/O 4) High: 4.0 V to 5.0 V 10 kΩ I/O 4 Low: 0 V to 0.5 V 10 ms or more HIOKI LR8102A965-00...
-
Page 46: Specifications Of Modules
Approx. 1.2 kg (2.6 lbs) ± Maximum input voltage 100 V DC Maximum inter-channel 300 V DC voltage Maximum rated line-to-ground 600 V AC/DC, measurement category II voltage Anticipated transient overvoltage: 4000 V Maximum rated inter-module 600 V AC/DC voltage HIOKI LR8102A965-00... -
Page 47: Maintenance And Service
It is recommended to replace these parts regularly to ensure instrument functionality over the long term. To order replacement, please contact your authorized Hioki distributor or reseller. Part service life varies with the operating environment and frequency of use. The recommended replacement interval do not guarantee these parts to operate throughout the period. - Page 48 Solvents such as benzene, alcohol, acetone, ether, ketone, thinners, or gasoline could deform or discolor the instrument. Periodically clean the vents to avoid blockage. „ When the vents become clogged, the internal cooling effect of the instrument is hampered, which could damage the instrument. HIOKI LR8102A965-00...
-
Page 49: Troubleshooting
5.2 Troubleshooting If damage is suspected, read the “Before returning the instrument for repair” (p. 49) section to remedy problems. If this does not help you, contact your authorized Hioki distributor or reseller. Before returning the instrument for repair Problem... -
Page 50: Error Messages
Module error of module No. 7 ERR_SY13 Module error of module No. 8 ERR_SY14 Module error of module No. 9 ERR_SY15 Module error of module No. 10 ERR_SY16 CAN controller error Turn the instrument off and request repair. ERR_SY17 The instrument’s fan malfunctions. HIOKI LR8102A965-00... - Page 51 Numerical calculation data is not Execute numerical calculations. found. WARN_FL04 The instrument cannot load this The selected file is in the format file. that the instrument cannot load, or the selected file is corrupt. Load a suitable file. HIOKI LR8102A965-00...
- Page 52 Use a PC to shorten the name of failure. the folder saved on the SD Memory Card or USB Drive. WARN_FL18 The instrument is busy with Wait for the instrument to complete another task. the task to operate it. HIOKI LR8102A965-00...
- Page 53 A target file for an FTP data auto- Use FTP to manually acquire the transfer was not found. file that has not been sent from the instrument or load the file from the storage device set as a recording destination. HIOKI LR8102A965-00...
-
Page 54: Disposing Of The Instrument
Store the removed battery out of reach of children. „ Failure to do so could cause children to swallow the battery accidentally. Dispose of the battery by local regulations. CALIFORNIA, USA ONLY Perchlorate Material - special handling may apply. https://dtsc.ca.gov/perchlorate/ HIOKI LR8102A965-00... - Page 55 Remove the rear panel. Remove the plate at the rear. Remove the motherboard. Remove the plate. Insert the tip of the tweezers between the battery and the battery holder and lift up on the battery to remove it. Lithium battery HIOKI LR8102A965-00...
- Page 56 Disposing of the Instrument HIOKI LR8102A965-00...
- Page 57 HIOKI LR8102A965-00...
- Page 58 HIOKI LR8102A965-00...
Need help?
Do you have a question about the LR8101 and is the answer not in the manual?
Questions and answers